openwrt 换源
OpenWRT/LEDE 源使用帮助 — USTC Mirror Help 文档
常用软件
# shell
zsh
# better ternminal dev
vim-full tmux htop
# downlaod
curl wget
# networking
tcpdump mtr-json ss ip-full iputils-arping ncat iperf3 ethtool-full
# VPN
luci-app-wireguard

# system
第三方软件
DDNS
FreeDNS
FreeDNS是一个免费提供 DDNS 服务的网站,上面有许多人分享了自己的一级域名,我们可以在上面注册自己的二级域名。
以下是 FreeDNS 各页面功能的介绍
- Subdomains页面
- 用于添加和管理自己的子域名
- 添加时类型 A 表示将子域名映射到一个 ipv4 地址上
- 类型 AAAA 表示映射到 ipv6 地址上
- CNAME 表示映射到另一个域名
- 用于添加和管理自己的子域名
- Dynamic DNS页面
- 包含各种配置 DDNS 的方式,见下节
- Registry页面
- 包含所有可选域名
配置
- 方式一:使用 crontab 脚本(最简单)
- ipv4 在 FreeDNS Dynamic DNS页面,在每个子域名处,有对应的 quick cron example。将其添加到 crontab 中即可。 注:使用这种方式无法更新 ipv6 地址,会将 ipv4 地址更新给域名
- ipv6 在Get your update URLs (afraid.org)中开启 Randomized Update Token 使用这里的 cron script,其中会访问 v6.sync.afraid.org,可以更新 ipv6
-
方式二:使用 openwrt 插件
- openwrt 插件下载:luci-ddns-app
- DDNS Service provider 选择 afraid.org-keyauth(也可使用 afraid.orgv2-token,但是下一步使用的编码则使用上一种方式中开启 Randomized Update Token 处的 token)
-
password 处填写每个子域名对应更新链接中的编码(在 FreeDNS 每个子域名的 Direct URL 中可见) 类似如下格式
- 其余 domain,username 都可以随便填
- 在 Advanced Setting 中选择 netwrok
-
保存应用后,点击 reload,可以在 Log File Viewer 中查看是否成功运行。 可以看到第一次完成更新,第二次不更新
212943       : Detect registered/public IP
   212943       : #> /usr/bin/nslookup rm.ipv6.my.to  >/var/run/ddns/FreeDNS_ipv6.dat 2>/var/run/ddns/FreeDNS_ipv6.err
   212943       : Registered IP '2409:8a38:1600:7e42:9e9d:7e1f:cfc6:de30' detected
   212943  info : Starting main loop at 2022-01-25 21:29
   212943       : Detect local IP on 'network'
   212943       : Local IP '2409:8a38:1600:2c2c:9e9d:7e58:c2c6:de30' detected on network 'wan_6'
   212943       : Update needed - L: '2409:8a38:1600:2c2c:9e9d:7e58:c2c6:de30' <> R: '2409:8a38:1600:7e42:9e9d:7e1f:cfc6:de30'
   212943       : Force communication via device 'pppoe-wan'
   212943       : #> /usr/bin/curl -RsS -o /var/run/ddns/FreeDNS_ipv6.dat --stderr /var/run/ddns/FreeDNS_ipv6.err --interface pppoe-wan --noproxy '*' 'https://freedns.afraid.org/dynamic/update.php?***PW***&address=2409:8a38:1600:2c2c:9e9d:7e58:c2c6:de30'
   212945       : DDNS Provider answered:
  Updated 1 host(s) rm.ipv6.my.to to 2409:8a38:1600:2c2c:9e9d:7e58:c2c6:de30 in 0.335 seconds
   212945  info : Update successful - IP '2409:8a38:1600:2c2c:9e9d:7e58:c2c6:de30' send
   212945  info : Forced update successful - IP: '2409:8a38:1600:2c2c:9e9d:7e58:c2c6:de30' send
   212945       : Waiting 600 seconds (Check Interval)


   213945       : Detect registered/public IP
   213945       : #> /usr/bin/nslookup rm.ipv6.my.to  >/var/run/ddns/FreeDNS_ipv6.dat 2>/var/run/ddns/FreeDNS_ipv6.err
   213947       : Registered IP '2409:8a38:1600:2c2c:9e9d:7e58:c2c6:de30' detected
   213947  info : Rerun IP check at 2022-01-25 21:39
   213947       : Detect local IP on 'network'
   213947       : Local IP '2409:8a38:1600:2c2c:9e9d:7e58:c2c6:de30' detected on network 'wan_6'
   213947       : Waiting 600 seconds (Check Interval)
Cloudflare
cf 支持 global key 和 token 两种方式鉴权,cloudflare.com-v4 方法使用 token,推荐使用。
默认 ddns provider 没有 cloudflare,需要安装插件
注意点
- 生成 token 时,需要开启两项权限
- Zone -> Zone -> Read
- Zone -> DNS -> Edit
- 配置 openwrt ddns luci 时
- Lookup Hostname 对应要更新的域名,ddns 首先会解析该域名来判断是否需要更新
- domain 比较奇怪,是一个组合
subdomain@domain。脚本通过@分隔 domain 字符串,得到两个内容- domain: 对应 cloudflare 的 Zone id
- subdomain.domain:对应需要更新的 record id
- 比如对于
op1.6.yfycloud.site,需要填op1.6@yfycloud.site
- Username 必须填Bearer
- https 开启更安全:
/etc/ssl/certs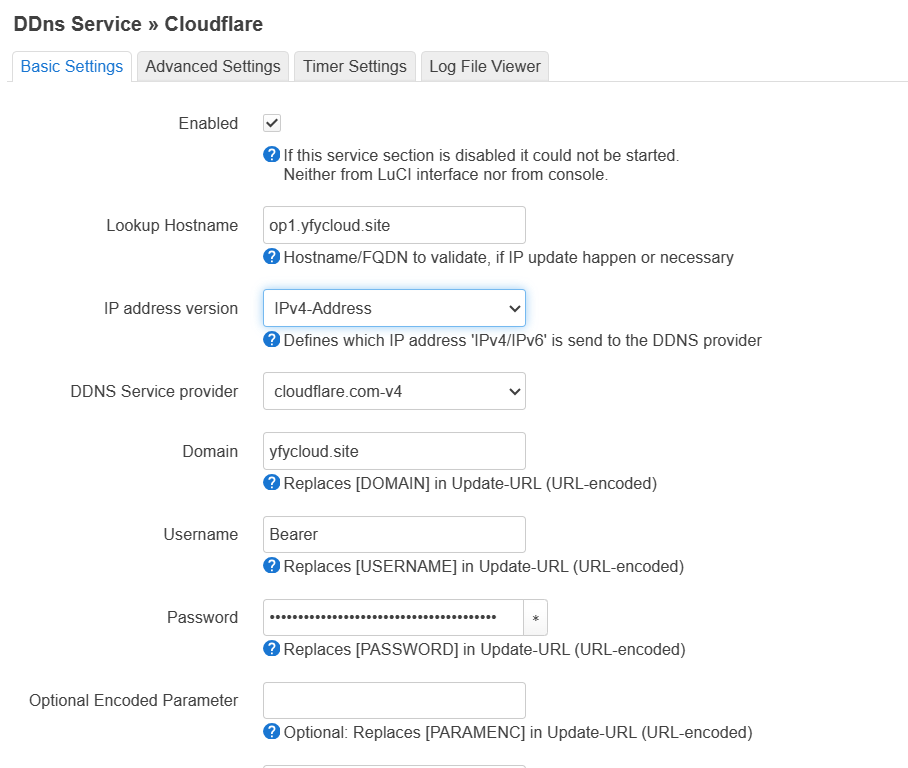
成功日志
 172255       : Current IP '114.214.236.72' detected on network 'wan'
 172255       : Forced Update - L: '114.214.236.72' == R: '114.214.236.72'
 172255       : parsing script '/usr/lib/ddns/update_cloudflare_com_v4.sh'
 172255       : Found Username 'Bearer' using Password as Bearer Authorization Token
 172255       : #> /usr/bin/curl -RsS -o /var/run/ddns/Cloudflare.dat --stderr /var/run/ddns/Cloudflare.err --capath /etc/ssl/certs --noproxy '*' --header 'Authorization: Bearer ***PW***'  --header 'Content-Type: application/json'  --request GET 'https://api.cloudflare.com/client/v4/zones?name=yfycloud.site'
 172256       : #> /usr/bin/curl -RsS -o /var/run/ddns/Cloudflare.dat --stderr /var/run/ddns/Cloudflare.err --capath /etc/ssl/certs --noproxy '*' --header 'Authorization: Bearer ***PW***'  --header 'Content-Type: application/json'  --request GET 'https://api.cloudflare.com/client/v4/zones/9de934462ae45ebf6d363d953b0ea5ef/dns_records?name=yfycloud.site&type=A'
 172257       : IPv4 at CloudFlare.com already up to date
 172257  info : Forced update successful - IP: '114.214.236.72' send
 172257       : Waiting 600 seconds (Check Interval)
ipv6
刚开是由于不清楚 domain 的含义,导致各种报错
'https://api.cloudflare.com/client/v4/zones/9de934462ae45ebf6d363d953b0ea5ef/dns_records?name=yfycloud.site&type=AAAA'
 173821  WARN : Could not detect 'record id' for host.domain.tld: 'yfycloud.site'
 174031       : #> /usr/bin/curl -RsS -o /var/run/ddns/CloudflareIPv6.dat --stderr /var/run/ddns/CloudflareIPv6.err --noproxy '*' --header 'Authorization: Bearer ***PW***'  --header 'Content-Type: application/json'  --request GET 'https://api.cloudflare.com/client/v4/zones?name=op1.6.yfycloud.site'
 174032  WARN : Could not detect 'zone id' for domain.tld: 'op1.6.yfycloud.site'
 174032 ERROR : No update send to DDNS Provider
成功日志
174709       : Detect current IP on 'network'
 174709       : Current IP '2001:da8:xxxx' detected on network 'wan6'
 174709       : Update needed - L: '2001:0da8:xxxx' <> R: '2001:0da8:d800:0336:0216:3eff:fee2:4e72'
 174709       : parsing script '/usr/lib/ddns/update_cloudflare_com_v4.sh'
 174709       : Found Username 'Bearer' using Password as Bearer Authorization Token
 174709       : #> /usr/bin/curl -RsS -o /var/run/ddns/CloudflareIPv6.dat --stderr /var/run/ddns/CloudflareIPv6.err --capath /etc/ssl/certs --noproxy '*' --header 'Authorization: Bearer ***PW***'  --header 'Content-Type: application/json'  --request GET 'https://api.cloudflare.com/client/v4/zones?name=yfycloud.site'
 174710       : #> /usr/bin/curl -RsS -o /var/run/ddns/CloudflareIPv6.dat --stderr /var/run/ddns/CloudflareIPv6.err --capath /etc/ssl/certs --noproxy '*' --header 'Authorization: Bearer ***PW***'  --header 'Content-Type: application/json'  --request GET 'https://api.cloudflare.com/client/v4/zones/9de934462ae45ebf6d363d953b0ea5ef/dns_records?name=op1.6.yfycloud.site&type=AAAA'
 174710       : #> /usr/bin/curl -RsS -o /var/run/ddns/CloudflareIPv6.dat --stderr /var/run/ddns/CloudflareIPv6.err --capath /etc/ssl/certs --noproxy '*' --header 'Authorization: Bearer ***PW***'  --header 'Content-Type: application/json'  --request PUT --data @/var/run/ddns/CloudflareIPv6.dat 'https://api.cloudflare.com/client/v4/zones/9de934462ae45ebf6d363d953b0ea5ef/dns_records/7e4d07109629151a0b776bd7ffc76a0e'
 174711  info : Update successful - IP '2001:0da8:xxxx' send
 174711  info : Forced update successful - IP: '2001:0da8:xxxx' send
参考:
- Solved Cloudflare dyndns - Installing and Using OpenWrt - OpenWrt Forum
- Trying Cloudflare DDNS on 21.02 - Installing and Using OpenWrt - OpenWrt Forum
ZeroTier
作用
- 将若干个安装了 Zerotier 的设备添加到一个虚拟的大局域网中互相访问
- 可以在 Zerotier 中设置 Route,从而实现访问某个 zerotier 设备所处局域网中的其它设备
具体过程
-
去 ZeroTier 注册一个账号,并了解 ZeroTier 的使用
-
安装 zerotier
这里会依赖 kmod-tun 等内核模块,这要求内核版本完全一致才能安装成功。
- 如果使用的是 openwrt 开发版本 (snapshot):由于 snapshot 每天、甚至几个小时就会更新,因此很有可能因为有了新的更新,导致 opkg 下载的 kmod-tun 内核版本不一致导致报错。解决办法为更新为新版的开发版,并尽快下载安装。或者自己编译 openwrt。
- 对于 stable 版本,官方源保证了一致性,因此这里不会出现问题。
-
配置 ZeroTier
- 创建目录:mkdir -p /etc/zerotier
-
修改/etc/config/zerotier 内容(存在样本配置),下面代码为使用命令行配置方法
-
启动 zerotier(这步之后已经可以从 ZeroTier Central 中看到路由器连上了)
-
创建接口(这步之后已经可以 ping 通)
- web 界面,网络 -> 接口,添加新接口
- 名称 ZeroTier
- 协议选静态协议,ip 设置为 ZeroTier Central 中的 ip
- 接口选 z 开头的适配器
- 创建/分配防火墙区域选择 lan(其实 lan/wan 都可以)
- 保存&应用
ZEROTIER_MASK=255.255.255.0
ZEROTIER_IP=192.168.196.11

uci set network.Zerotier=interface
uci set network.Zerotier.proto='static'
uci set network.Zerotier.device='ztyou4dlov'
uci set network.Zerotier.netmask=$ZEROTIER_MASK
uci set network.Zerotier.ipaddr=$ZEROTIER_IP
uci commit network

uci add_list firewall.@zone[0].network='Zerotier'   # add Zerotier to lan
uci commit firewall
-
防火墙
全部设置成 allow

-
ZeroTier Central 配置路由转发
配置这个后,在外网可以通过局域网 ip 直接访问不在 ZeroTier Central 中的其它局域网设备。(过程大致是:外网 -> zerotier -> 局域网一台设备 (位于 ZeroTier 中) -> 局域网其它设备)
配置图:访问 192.168.31.*中的设备时,会通过 192.168.192.168(实际局域网 ip 为路由器) 访问
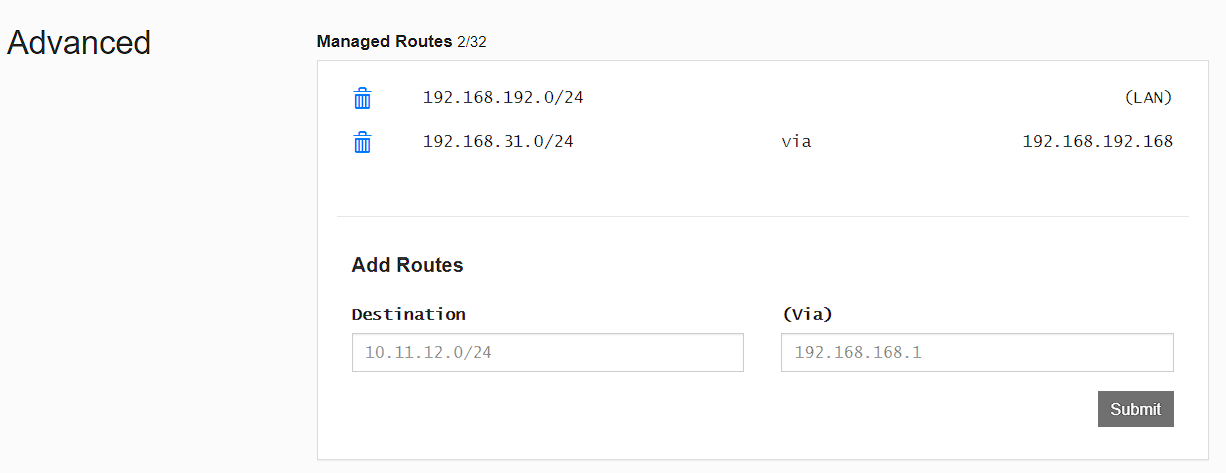
注意:别将第一行的删了,否则全部无法访问
缺点:目前发现,当两台电脑位于同一个局域网,想要直接通过局域网 ip 访问时,即使没有开启 zerotier 软件,两台电脑的相互访问速度也会严重受限(原本可以跑到 500M,直接降为 10M)
遇到的问题
root@tr3000:~# uci show zerotier
uci: Entry not found

root@tr3000:~# zerotier-cli show
zerotier-cli: missing port and zerotier-one.port not found in /var/lib/zerotier-one
root@xdr6088 ➜  ~ opkg files zerotier
Package zerotier (1.14.1-1) is installed on root and has the following files:
/usr/bin/zerotier-idtool
/etc/uci-defaults/80-zt-migration
/etc/init.d/zerotier
/usr/bin/zerotier-one
/etc/config/zerotier
/usr/bin/zerotier-cli
明显少了东西
root@tr3000:~# opkg files zerotier
Package zerotier (1.14.1-r1) is installed on root and has the following files:
/usr/bin/zerotier-idtool
/usr/bin/zerotier-one
/usr/bin/zerotier-cli
之后更新 tr3000 算了
Wireguard
安装
-
安装wireguard wiregurad是内核模块,如果是自己编译的openwrt则无法通过opkg安装(linux kernel hash校验失败导致依赖不满足),需要在编译时集成到openwrt中。或者手动安装
配置
新手使用luci配置,之后直接复制到/etc/config/network中即可
- 创建接口
- web界面,网络 -> 接口,添加新接口
- 名称wireguard
- 协议选wiregurad VPN
- 生成私钥
- 设置ip地址为虚拟局域网地址,如10.0.31.10/24
- 保存&应用
- 添加peer
- 在Luci中手动添加
-
或者编辑
/etc/config/network,添加已有的设备,如
-
使其生效方式:
- 重启路由器
- 重启网络接口
- 命令行重启网络接口
ipv6
op有ipv6网络环境,如何让wg接入的设备也能拥有ipv6环境?
可以给op和peer设置ULA的ipv6地址,peer的ipv6包到达op后,需要从op的网络接口出去(比如wan)。但是wan的masq默认是不对ipv6流量进行src nat的。这里我们想要做到:
- 从wg接口进入op的流量,从wan出去时,对ipv6的源地址(ULA地址)进行nat
- 其它ipv6流量(源地址为分配的公网ipv6地址)从wan出去时,不进行nat
- 依赖,对于22.03以后的版本,实测不需要安装其它内核模块。官方文档写对于openwrt21.02 ,需要安装nat模块
- wg接口设置ipv6地址。从ULA地址段选取一个:Unique local address - Wikipedia,如图所示。
 我选择了一个48的网段
- 设置nft规则,从wg接口进入的流量出去时需要进行src nat。
vim /etc/nftables.d/11-nat6-wg.nft

chain srcnat_ula6_wg0 {
        type nat hook postrouting priority srcnat; policy accept;
        oifname "eth0" ip6 saddr fdab:2333:2333::/48 counter masquerade comment "!fw4: ULA masquerade6"
}
chain srcnat_ula6_wg1 {
        type nat hook postrouting priority srcnat; policy accept;
        oifname "eth0" ip6 saddr fdab:2333:2334::/48 counter masquerade comment "!fw4: ULA masquerade6"
}

service firewall restart
- 允许ULA地址路由。虽然我们上面开启了SNAT是不会把私有地址发送到公网的,但是路由器对于ULA地址仍然默认是不会进行路由转发的,需要手动开启。(这里要注意的是防火墙postrouting规则是在进行路由选择之后生效的,参考netfilter-packet-flow)
- 对于wan6口通过dhcpv6上网,只需要设置sourcefilter=0。
- 对于pppoe上网,没有wan6接口,暂时还不知道怎么配置。
参考
- WireGuard VPN with ULA and NAT6? - Installing and Using OpenWrt / Network and Wireless Configuration - OpenWrt Forum
- [OpenWrt Wiki] WireGuard Road-Warrior Configuration
- NAT6 through your upstream IPv6 interface when routing IPv6 peer traffic from a ULA (configuration B, or configuration A if the peer only uses a ULA)
shadowsocks-libdev
网络
IPv6 (obsolete)
updated
2024 update: 这部分内容比较陈旧了,是最开始接触openwrt时写的。现在已经知道了ipv6配置可以分为有无PD的情况。
理论
- ICMPv6有多种报文格式,大体可以分为两类,差错报文和数据报文。ipv6使用ICMPv6中的一系列报文RS, RA, NS, NA(R--> router, N-->neighbor, S-->solicitation, A-->advertisement)来完成地址解析(通过ip获得MAC)、邻居不可达检测、地址冲突检测、地址分配(SLAAC)等任务。
-
SLAAC(Stateless Address Autoconfiguration):无状态的地址自动配置协议。使用RA进行地址配置,特点是无状态的。
详细:一个接口up时,会发送一个RS报文请求网络前缀。其它设备返回一个RA报文。设备通过前缀+EUI64自动生成ipv6地址(传统情况,现在 windows、手机 和 一些使用 networkmanager 的 linux 设备,通常会获得若干临时地址。这些地址是动态随机的,和 mac 没有关系,导致这个的原因是有一个 ipv6 安全地址机制。linux 可以配置关闭)。设备的默认网关(路由表中::项)也被设置为响应者,同时设置一个网关的有效时间。其它设备每隔一段时间发送一个RA报文。200-600s
- DHCPv6则是有状态的。目前会混合使用这两个协议来配置ipv6。
WAN口为dhcp
这种情况,路由器为一个二级的路由器,直接转发WAN传来的RA报文即可。
修改/etc/config/dhcp
- lan和wan6 添加3个relay(其中wan6部分可能需要自己添加)
- 设置一个master
config dhcp 'lan'
        option interface 'lan'
        option start '100'
        option limit '150'
        option leasetime '12h'
        option dhcpv4 'server'
        option ra 'relay'
        option dhcpv6 'relay'
        option ndp 'relay'
        list ra_flags 'none'

config dhcp 'wan'
        option interface 'wan'
        option ignore '1'

config dhcp 'wan6'
        option interface 'wan'
        option ra 'relay'
        option dhcpv6 'relay'
        option ndp 'relay'
        option master '1'
静态ipv6
理论上获得了一个ipv6前缀后,可以自己设置静态的ipv6地址,基本不会和别人发生冲突。
可以在WAN6 interface中设置为static(动态为DHCPv6 client),并设置一个ipv6地址。
以下为修改后的/etc/config/network内容
config interface 'wan'
 option device 'wan'
 option proto 'dhcp'

config interface 'wan6'
 option device 'wan'
 option proto 'static'
 list ip6addr '2001:da8:d800:611::123d/64'
 option ip6gw '2001:da8:d800:611::1'
WAN口为pppoe
这种情况,不能使用上面的全部配置为relay的方式。刚开始全部配置为relay后,发现设备需要先ping一下路由器的WAN口ipv6地址之后,才能正常ipv6上网。
我还没有搞懂是为什么,经过不断各种尝试后,发现以下配置成功。
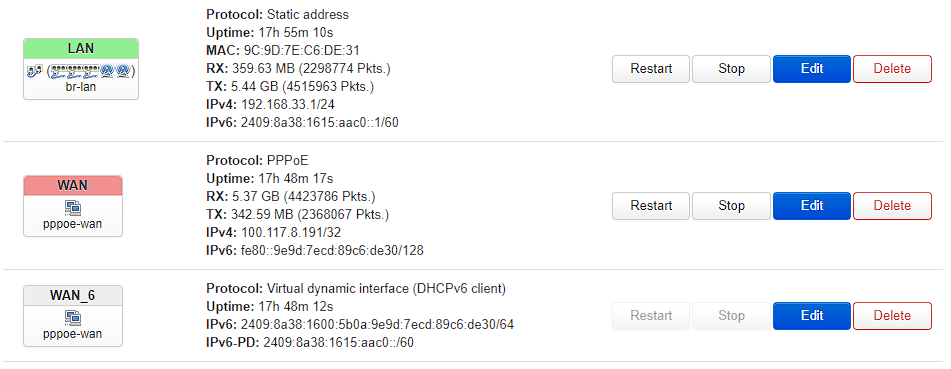
-
首先wan口设置为pppoe后,拨号成功后会生成一个WAN_6虚拟接口,我们可以将WAN6接口删掉
(以下为最终成功的截图)
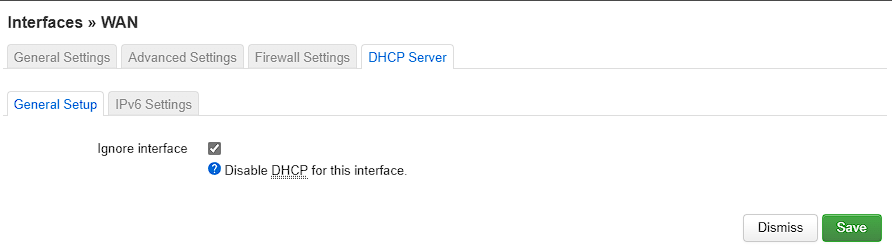
-
然后需要将WAN中的DHCP Server设置为忽略,之后需要配置LAN
-
LAN中RA和DHCPv6都需要设置为server
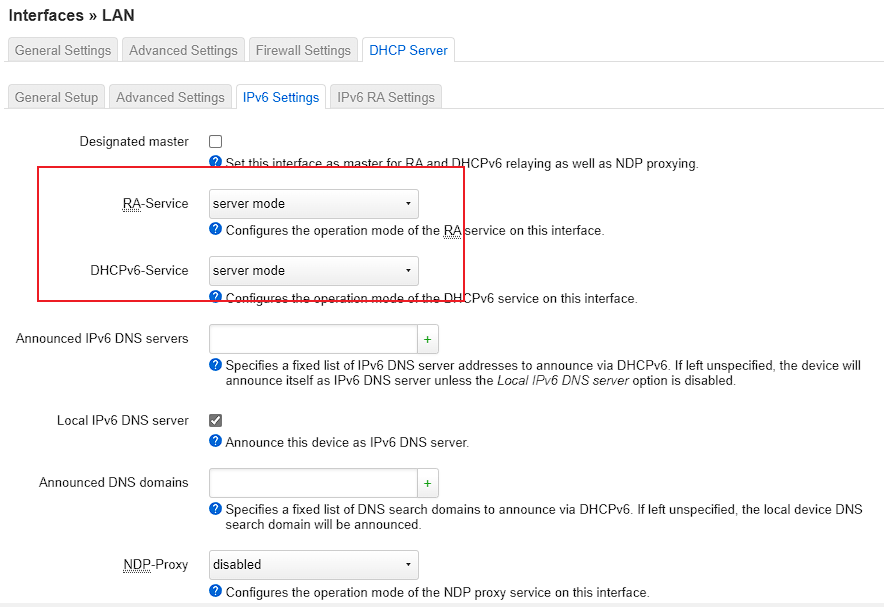
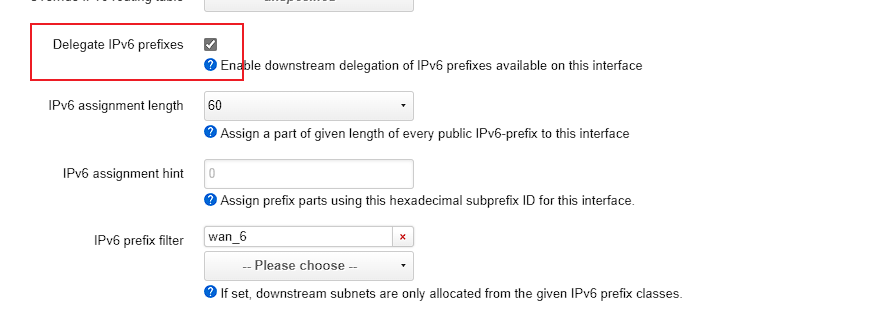
然后Advanced中需要开启Delegate IPv6 prefixes,最终效果就是LAN接口中也出现了ipv6地址
记录下最后的配置文件
/etc/config/dhcp
config dhcp 'lan'
        option interface 'lan'
        option start '100'
        option limit '150'
        option leasetime '12h'
        option dhcpv4 'server'
        option dhcpv6 'server'
        option ra 'server'
        list ra_flags 'managed-config'
        list ra_flags 'other-config'

config dhcp 'wan'
        option interface 'wan'
        option ignore '1'
/etc/config/network
config interface 'lan'
        option device 'br-lan'
        option proto 'static'
        option netmask '255.255.255.0'
        option ipaddr '192.168.33.1'
        option ip6assign '60'
        list ip6class 'wan_6'

config interface 'wan'
        option device 'wan'
        option proto 'pppoe'
        option username 'xxx'
        option password 'xxx'
        option ipv6 'auto'
IPv6
IPv6 with OpenWrt - YouTube OpenWRT 路由器IPv6实战配置长篇教程:纠正你的IPv4思维!_路由器_什么值得买 (smzdm.com)
[OpenWrt Wiki] IPv6 configuration
ipv6配置可以分为有无PD的情况。有PD的情况如果前缀长度=64,那么只能一个接口使用,无法再往下分配PD。如果<64,则可以继续分配子网。PD情况下,需要开启RA server和dhcpv6 server。dhcpv6 server可以通过设置flag来控制是否动态分配地址,还是让设备自己SLAAC获得地址。有PD情况是最好的。
无PD情况下,正常只有wan口可以获得ipv6地址,如果要让底下设备都获得ipv6地址,openwrt有一个relay功能。但是后面发现relay模式不如PD情况好,会有一些问题。常见的比如每隔一段时间需要ping一下wan口才能访问ipv6。
因此无PD情况,感觉使用NAT6是更好的选择。openwrt luci目前不支持ipv6的端口转发,所以需要使用iptable6命令行
无PD情况另外一种解决办法是,通过二层的gre tap隧道连接到另一个分配PD的网络来获得PD
upstream
PPP-based protocols - for example pppoe and pppoa - require that option ipv6 is specified in the parent config interface wan section. See WAN interface protocols. option ipv6 can take the value:
- 0: disable IPv6 on the interface
- 1: enable IPCP6 negotiation on the interface, but nothing else. If successful, the parent interface will be assigned a link-local address (prefix fe80::/10). All other IPv6 configuration is made in the
wan6interface which must be configured manually, as described below. - auto: (default) enable IPv6 on the interface. Spawn a virtual interface wan_6 (note the underscore) and start DHCPv6 client odhcp6c to manage prefix assignment. Ensure the lan interface has
option ip6assign 64(or a larger prefix size) set to redistribute the received prefix downstream.
Downstream
OpenWrt features a versatile RA & DHCPv6 server and relay. Per default, SLAAC and both stateless and stateful DHCPv6 are enabled on an interface. If there are any prefixes of size /64 or shorter present then addresses will be handed out from each prefix. If all addresses on an interface have prefixes shorter than /64, then DHCPv6 Prefix Delegation is enabled for downstream routers. If a default route is present, the router advertises itself as default router on the interface.
- Server support for Router Advertisement, DHCPv6 (stateless and stateful) and DHCPv6-PD
- Automatic detection of announced prefixes, delegated prefixes, default routes and MTU
- Change detection for prefixes and routes triggering resending of RAs and DHCPv6-Reconfigure
- Detection of client hostnames and export as augmented hosts-file
- Support for RA & DHCPv6-relaying and NDP-proxying to e.g. support uplinks without prefix delegation
- 如果上游不支持PD,那么想要给下游分配ipv6就只能relay或NAT?
The system is also able to detect when there is no prefix available from an upstream interface and can switch into relaying mode automatically to extend the upstream interface configuration onto its downstream interfaces. This is useful for putting the target router behind another IPv6 router which doesn't offer prefixes via DHCPv6-PD.
关于 SLAAC 和 DHCPv6 的介绍可以参考 IPv6 知识和 openwrt relay 模式的坑
SLAAC and DHCPv6
Example configuration section for SLAAC + DHCPv6 server mode. This is suitable also for a typical 6in4 tunnel configuration, where you specify the fixed LAN prefix in the tunnel interface config. Make sure to disable NDP-Proxy by removing the ndp option if any.
# cat /etc/config/dhcp
config dhcp lan
    option dhcpv6 server
    option ra server
    option ra_flags 'managed-config other-config'
    ...
SLAAC only
Example configuration section for SLAAC alone. Make sure to deactivate RA flags, otherwise clients expect the presence of a DHCPv6 and consequently may fail to activate the network connection. Note that disabling DHCPv6 makes some clients (e.g. Android devices) prefer IPv4 over IPv6.
# cat /etc/config/dhcp
config dhcp lan
    option dhcpv6 disabled
    option ra server
    list ra_flags 'none'
    ...
实际op3
config dhcp 'lan'
        option interface 'lan'
        option start '100'
        option limit '150'
        option leasetime '12h'
        option dhcpv4 'server'
        option dhcpv6 'server'
        option ra 'server'
        option ra_slaac '1'
        list ra_flags 'managed-config'
        list ra_flags 'other-config'

config dhcp 'wan'
        option interface 'wan'
        option ignore '1'
IPv6 relay
# cat /etc/config/dhcp
config dhcp lan
    option dhcpv6 relay
    option ra relay
    option ndp relay
    ...

config dhcp wan6
    option dhcpv6 relay
    option ra relay
    option ndp relay
    option master 1
    option interface wan6
wan6被设置为master,因此lan和wan6就被联系起来了 - lan内的rs会被转发给wan6发出 - wan6的ra转发给lan
config dhcp 'lan'
        option interface 'lan'
        option start '100'
        option limit '150'
        option leasetime '12h'
        option dhcpv4 'server'
        list dhcp_option '6,192.168.35.1'
        list dhcp_option '3,192.168.35.1'
        option ra 'relay'
        option ndp 'relay'
        option ndproxy_slave '1'

config dhcp 'wan'
        option interface 'wan'
        option ignore '1'

config dhcp 'wan6'
        option interface 'wan6'
        option ra 'relay'
        option ndp 'relay'
        option master '1'
IPv6 前缀下发的几个选项
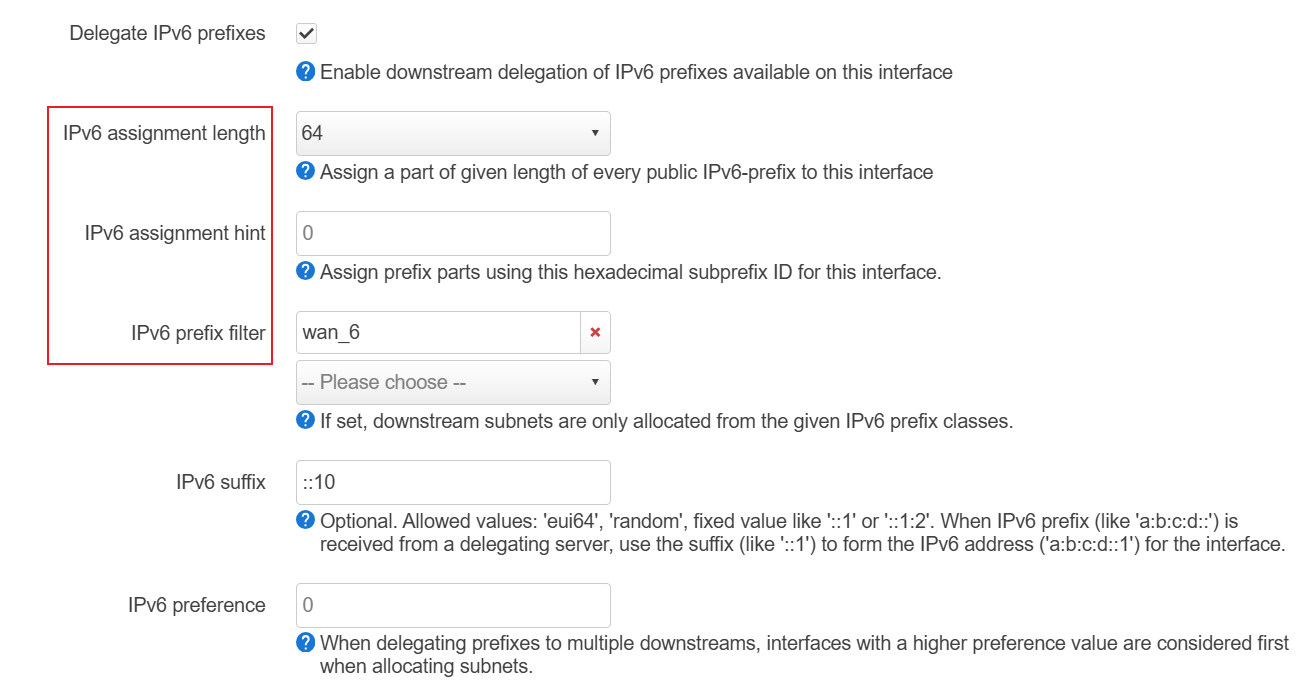
一下分别是 wan 口和 lan 口常见的设置
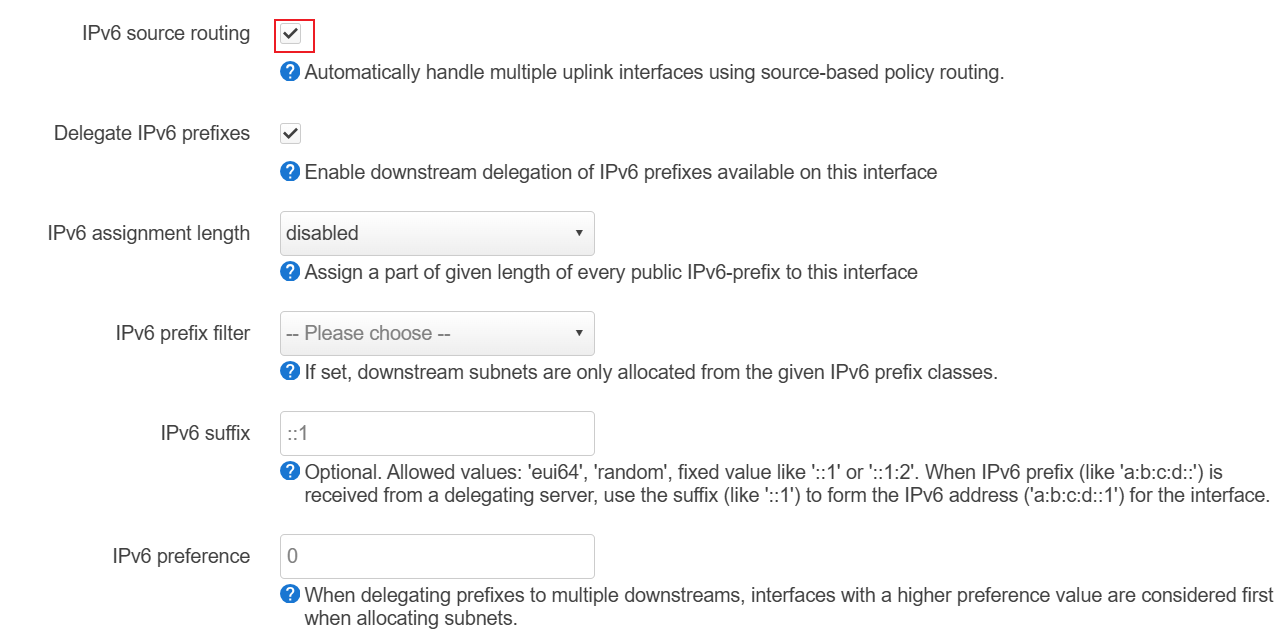
其中 Delegate Ipv6 prefixes 的作用是,如果此接口有小于 64 的前缀,则可以把前缀下发给其它接口,相当于划分子网。WAN 口需要开启这个选项,LAN 开或不开都可以。
IPv6 assignment length 表示这个接口需要获得一个前缀(从其它接口比如 wan 口),可以指定需要的长度。如果获得 64 表示这个接口所在的子网不能再划分了。如果能获得 60,则该接口还可以继续划分 16 个子网。prefix filter 用于筛选从那个接口获得 prefix,不指定则会使用 ULA。
ip6assign: Prefix size used for assigned prefix to the interface (e.g. 64 will assign /64-prefixes)ip6hint: Subprefix ID to be used if available (e.g. 1234 with an ip6assign of 64 will assign prefixes of the form ...:1234::/64 or given LAN ports, LAN & LAN2, and a prefix delegation of /56, use ip6hint of 00 and 80 which would give prefixes of LAN ...:xx00::/64 and LAN2 ...:xx80::/64)ip6class: Filter for prefix classes to accept on this interface (e.g.wan6- only assign prefix from the respective interface,local- only assign the ULA-prefix)
关于 96 位前缀
设备可以通过 DHCPv6 PD 获取一个 前缀,或者 SLAAC 获取一个 64 位前缀。本质都是你拥有了这一段前缀的路由权。
小于 64 的前缀,可以 ra,dhcpv6 server 啥的。
大于 64 的前缀, - 就只能 dhcpv6 了, - android 不吃 dhcpv6 - openwrt 界面里没有设置 dhcpv6 前缀的方式。只有这个接口从 PD 获得一个 64 前缀后,才能设置 RA server,dhcpv6 server 啥的。可以使用 adguardhome。 - 或者使用 ULA + NAT66。
DNS/dnsmasq
dnsmasq主要配置文件位于/etc/config/dhcp
openwrt 配置文件文档:[OpenWrt Wiki] DNS and DHCP configuration /etc/config/dhcp
dnsmasq 配置:dnsmasq/dnsmasq.conf.example at master · imp/dnsmasq (github.com)
常见选项
noresolv 1: 不使用上游 dns,而只是用配置文件中设置的上游 dns。Don't read upstream servers from/etc/resolv.confwhich is linked toresolvfileby defaultresolvfile /tmp/resolv.conf.d/resolv.conf.auto: tells dnsmasq to use this file to find upstream name servers; it gets created by the WAN DHCP or PPP client.option rebind_protection '0': 允许解析出 lan 地址,(2024-02-03) 现在rebind_protection是默认开启的。因此需要显示设置为0localservice:只允许来自本地网络的 DNS 查询,如果希望路由器作为别的网络的 dns 服务器,需要设置为 0。Accept DNS queries only from hosts whose address is on a local subnet, ie a subnet for which an interface exists on the server.
config dnsmasq
        option domainneeded '1'          # 不向上游查询纯域名。例如,只包含主机名而不包含任何点号的域名不会被转发到上游 DNS 服务器。
        option boguspriv '1'             # 不反向查询不在 hosts 中的私有 ip 段
        option filterwin2k '0'
        option localise_queries '1'      # 如果主机有多个 ip,根据查询接口的不同返回不同结果
        option rebind_localhost '1'      # 允许上游返回 127.0.0.0/8
        option rebind_protection '0'     # 1 时, 上游返回 private 地址时(RFC1918)将其丢弃
        option local '/op2/'             # 将 local 域名重定向到本地的 /etc/hosts
        option domain 'op2'              # 设置 DHCP 服务器返回的 domain
        option expandhosts '1'           # 将 hosts 中找到的主机名都添加 domain
        option nonegcache '0'            # 0 时,缓存 "no such domain" 结果
        option cachesize '8000'
        option authoritative '1'         # dnsmasq 是本地网络的权威 DHCP 服务器
        option readethers '1'            # Read static lease entries from `/etc/ethers`
        option leasefile '/tmp/dhcp.leases'                      # 指定 DHCP 租约文件的存储位置
        option resolvfile '/tmp/resolv.conf.d/resolv.conf.auto'  # 指定包含上游 DNS 服务器的配置文件
        option nonwildcard '1'           # 只绑定指定接口的地址
        option localservice '1'          # 只允许来自本地网络的 DNS 查询
        option filter_a '0'              # 0 时,禁用 A 记录过滤。
        option filter_aaaa '0'           # 0 时,禁用 AAAA 记录过滤。
        option mini_ttl '3600'
        option dns_redirect '1'
        option ednspacket_max '1232'
        # 自己通常会修改的
        option port '53'
        list listen_address '0.0.0.0'   # 避免 dnsmaq 对每个接口绑定一个 地址,更加简洁
        list listen_address '::'
        option confdir '/etc/dnsmasq.d'
        option localservice '0'    # 允许非局域网内设备访问,即使 bind_adder
        option noresolv '1'        # 不使用上游 dns,而只是用 dnsmasq 配置文件中设置的上游 dns
        option localuse '1'        # Use dnsmasq as a local system resolver.
        option cachesize '0'       # 禁用缓存,每次都向上游请求
        option allservers '0'
listen_addresses 和 bind_interface:On systems which support it, dnsmasq binds the wildcard address, even when it is listening on only some interfaces. It then discards requests that it shouldn't reply to. This has the advantage of working even when interfaces come and go and change address.
# Include another lot of configuration options.
#conf-file=/etc/dnsmasq.more.conf
#conf-dir=/etc/dnsmasq.d
转发请求
- 转发给其它dns
- 下面是openclash选择了重定向dnsmasq后的配置。可以关闭后手动维护(便于切换到adguard home等其它dns)
- noresolv表示不使用上游dns
- cachesize=0,表示禁用缓存,每个dns请求都被转发给openclash
dhcp option
- 3:设置默认网关
- 6:设置dns
- 无法指定端口
luci:interface -> lan -> edit ... 配置文件:dhcp
查看所有支持的选项
dns分流
以下设置默认将dns转发给127.0.0.1:7874(clash dns),对于*.my.to转发给119.29.29.29
option localservice '0'
        option port '53'
        #option resolvfile '/tmp/resolv.conf.d/resolv.conf.auto'
        option noresolv '1'
        option serverlist '/etc/dnsmasq.servers'
        list server '127.0.0.1#7874'
        list server '/my.to/119.29.29.29'
        list server '/us.to/119.29.29.29'
        list server '/zhenwei.site/119.29.29.29'
        list server '119.29.29.29'
        option cachesize '500'
或者在单独的配置文件中配置
option confdir '/etc/dnsmasq.d'

vim /etc/dnsmasq.d/dnsmasq_accelerated-domains.china.conf

server=/baidu.cc/202.38.64.56
server=/baidu.cm/202.38.64.56
server=/baidu.com/202.38.64.56
server=/baidu.jp/202.38.64.56
server 可以指定多次,需要把 allservers 打开 dnsmasq - Multiple forwarding servers for domain entries? - Server Fault
allservers
By default, when dnsmasq has more than one upstream server available, it will send queries to just one server. Setting this parameter forces dnsmasq to send all queries to all available servers. The reply from the server which answers first will be returned to the original requeser.
p.s. 如果一个 server 返回空值,一个之后返回真实值。那么仍然按照第一个返回空
指定多 dns server,适用于校内和校外两种情况
bind接口和非局域网访问
容易搞混的选项
- localise_queries(1): Choose IP address to match the incoming interface if multiple addresses are assigned to a host name in
/etc/hosts. Initially disabled, but still enabled in the config by default. Note well the spelling of this option.
 - localservice(0): Accept DNS queries only from hosts whose address is on a local subnet, ie a subnet for which an interface exists on the server.
dnsmasq默认监听所有接口(但是不是bind到::,而是bind所有本地地址)
localservice控制是否允许其它网段访问。比较特别的是,如果手动指定了bind interface,则除了开启localservice,还需要保证绑定了对应接口。
一些可能有用的配置选项
rebind_protection 1: Enables DNS rebind attack protection by discarding upstream RFC1918 responses DNS rebinding protection - Google Nest Help- 用户访问一个恶意网站时,恶意网站动态地将自己的域名绑定到用户私有地址,这样用户就会去访问本地网络。从而恶意网站可能获取用户的私有信息。
A DNS rebinding attack is performed when a malicious website pretends that IP addresses (usually IPs reserved for local networks) are part of their domain. This allows them to circumvent the same-origin policy implemented by browsers and view data from these IP addresses. A DNS rebinding attack can happen if someone using your network visits a malicious website that identifies your local IP address and deduces the structure of your local network. The malicious website could then bind their domains to the local IP address, send requests to devices on your network, and then read any responses to those requests. This could allow attackers to access some of your private information, or further compromise your network security.
update 2024-02-03:现在rebind_protection是默认开启的。因此需要显示设置为0
allservers 0: By default, when dnsmasq has more than one upstream server available, it will send queries to just one server. Setting this parameter forces dnsmasq to send all queries to all available servers. The reply from the server which answers first will be returned to the original requeser.
绑定 dns 请求的源地址
# You can control how dnsmasq talks to a server: this forces
# queries to 10.1.2.3 to be routed via eth1
# server=10.1.2.3@eth1
将域名对应 ip 自动添加到 ipset
# Add the IPs of all queries to yahoo.com, google.com, and their
# subdomains to the vpn and search ipsets:
#ipset=/yahoo.com/google.com/vpn,search

# Add the IPs of all queries to yahoo.com, google.com, and their
# subdomains to netfilters sets, which is equivalent to
# 'nft add element ip test vpn { ... }; nft add element ip test search { ... }'
#nftset=/yahoo.com/google.com/ip#test#vpn,ip#test#search
给域名绑定一个固定 ip force address
# Add domains which you want to force to an IP address here.
# The example below send any host in double-click.net to a local
# web-server.
#address=/double-click.net/127.0.0.1

# --address (and --server) work with IPv6 addresses too.
#address=/www.thekelleys.org.uk/fe80::20d:60ff:fe36:f83
遇到的问题
logqueries: Log the results of DNS queries, dump cache on SIGUSR1, include requesting IP
rebind_protection导致无法返回局部地址
19:43:37.091228 IP 127.0.0.1.51697 > 127.0.0.1.53: 15907+ A? jellyfin.yfycloud.top. (39)
19:43:37.091314 IP 10.0.32.2.47023 > 192.168.35.1.53: 50832+ A? jellyfin.yfycloud.top. (39)
19:43:37.091349 IP 127.0.0.1.51697 > 127.0.0.1.53: 16164+ AAAA? jellyfin.yfycloud.top. (39)
19:43:37.091388 IP 10.0.32.2.33248 > 192.168.35.1.53: 53062+ AAAA? jellyfin.yfycloud.top. (39)
19:43:37.092516 IP 192.168.35.1.53 > 10.0.32.2.33248: 53062 1/0/0 AAAA :: (67)
19:43:37.092518 IP 192.168.35.1.53 > 10.0.32.2.47023: 50832 1/0/0 A 192.168.35.2 (55)
19:43:37.092643 IP 127.0.0.1.53 > 127.0.0.1.51697: 15907 0/0/0 (39)
19:43:37.092713 IP 127.0.0.1.53 > 127.0.0.1.51697: 16164 0/0/0 (39)
递归循环
root@op2 ➜  ~ nslookup debian12-docker.op2
Server:         127.0.0.1
Address:        127.0.0.1:53

Name:   debian12-docker.op2
Address: 192.168.36.137

** server can't find debian12-docker.op2: SERVFAIL   # 也可能是no answer
root@op2 ➜  ~ tcpdump -ni any udp port 53 |grep debian
tcpdump: verbose output suppressed, use -v or -vv for full protocol decode
listening on any, link-type LINUX_SLL (Linux cooked v1), capture size 262144 bytes
10:42:06.385808 IP 127.0.0.1.53119 > 127.0.0.1.53: 51457+ A? debian12-docker.op2. (37)
10:42:06.385822 IP 127.0.0.1.53119 > 127.0.0.1.53: 51714+ AAAA? debian12-docker.op2. (37)
10:42:06.388495 IP 10.0.32.2.53348 > 192.168.35.1.53: 13219+ AAAA? debian12-docker.op2. (37)
10:42:06.389850 IP 10.0.32.1.59871 > 192.168.36.1.53: 7106+ [1au] AAAA? debian12-docker.op2. (48)
10:42:06.389983 IP 10.0.32.2.39748 > 192.168.35.1.53: 20089+ [1au] AAAA? debian12-docker.op2. (48)
10:42:06.391086 IP 10.0.32.1.37076 > 192.168.36.1.53: 37382+ [1au] AAAA? debian12-docker.op2. (48)
10:42:08.889751 IP 127.0.0.1.53119 > 127.0.0.1.53: 51714+ AAAA? debian12-docker.op2. (37)
10:42:08.890363 IP 10.0.32.2.53348 > 192.168.35.1.53: 13219+ AAAA? debian12-docker.op2. (37)
10:42:08.892259 IP 10.0.32.1.59755 > 192.168.36.1.53: 7106+ [1au] AAAA? debian12-docker.op2. (48)
10:42:08.892541 IP 10.0.32.2.39748 > 192.168.35.1.53: 20089+ [1au] AAAA? debian12-docker.op2. (48)
10:42:08.894341 IP 10.0.32.1.33708 > 192.168.36.1.53: 37382+ [1au] AAAA? debian12-docker.op2. (48)
10:42:08.894564 IP 10.0.32.2.39748 > 192.168.35.1.53: 20089+ [1au] AAAA? debian12-docker.op2. (48)
10:42:08.896553 IP 10.0.32.1.48899 > 192.168.36.1.53: 37382+ [1au] AAAA? debian12-docker.op2. (48)
总是使用上游 dns(noresolve 失效)
mi4a 上,即使设置了 noresolv,但是仍然会根据 /tmp/resolv.conf.d/resolv.conf.auto 进行解析。
解决办法为,在网络接口中 uncheck Use DNS servers advertised by peer,或者配置文件中添加 option peerdns 0
config interface 'wwan0'
        option proto 'dhcp'
        option device 'wlan1_0'
        option defaultroute '0'
        option peerdns '0'
DNS/Adguardhome
使用Adguardhome代替dnsmasq有一些好处
- 更容易进行dns分流
- 美观的控制面板,可以看到统计信息
- 一些高级的dns filtering操作:block域名,返回指定ip
安装
初次安装需要访问<ip_address>:3000进行初始配置。配置完成后在/etc/adguardhome.yaml中生成配置文件。
我们需要使用adguardhome作为主dns,因此修改原本dnsmasq,绑定到54端口。
# vim /etc/config/dhcp

config dnsmasq
  ...
  option port '54'
  option cachesize '1000'
  option rebind_protection '0'
最后,修改adguradhome配置文件/etc/adguardhome.yaml,绑定到局域网
service adguardhome restart重启服务
bind接口/ip
PD情况下,ohcpd会将br-lan的PD ip作为DNS响应给lan内设备。但是adguardhome dns默认没有监听该ip。
而由于PD可能会发生变化,因此也没办法手动设置(Adguardhome并不支持bind到指定接口,只能指定具体ip)
一个可以的解决办法是:odhcp中设置DNS为fe80地址,然后在AG中设置绑定到该地址。注意:由于fe80地址可以重复,因此需要使用%格式指定接口。
  bind_hosts:
    - 192.168.35.1
    - 127.0.0.1
    - ::1   # ipv6版本的127.0.0.1,只能本机访问
    - fe80::216:3eff:fe4b:6780%br-lan
监听所有接口(包含ipv6)
dns设置
可以通过以下几种方式配置上游dns(upstream dns)
- GUI配置
- 配置文件
upstream_dns - 配置文件
upstream_dns_file: /usr/share/adguardhome.upstream- 会禁用upstream_dns并且GUI中无法看到
多个dns有以下策略
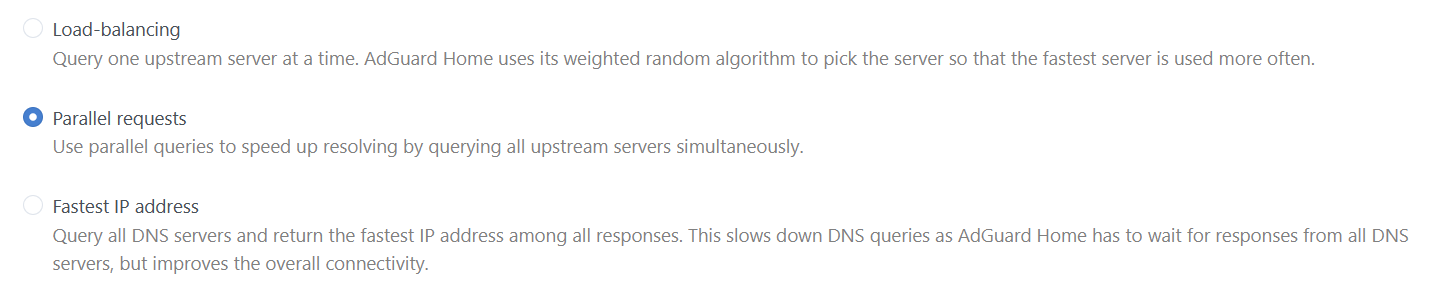
对应配置文件中以下选项
all_servers: Enables parallel queries to all configured upstream servers to speed up resolving. If enabled, the queries are sent to each server simultaneously and the first response is chosen. If disabled, the queries are sent to each upstream server one-by-one and then sorted by RTT. Note that more stable upstream servers are preferred by the algorithm.fastest_addr: Use the Fastest Address algorithm. It finds an IP address with the lowest latency and returns this IP address in DNS response.
dns分流
可以根据域名选择使用不同dns。 Configuration · AdguardTeam/AdGuardHome Wiki (github.com)
/etc/adguardhome.yaml中启用上游dns文件
upstream_dns_file: Path to a file with the list of upstream DNS servers. If it is configured, the value ofupstream_dnsis ignored.
/usr/share/adguardhome.upstream设置上游dns
[xxx]#:#表示使用默认dns[*.my.to]和[my.to]有一些区别。前者必须是my.to的子域名,不包括my.to自身,而后者包含自身及子域名。
# Default
127.0.0.1:7874    # clash dns,关闭ipv6解析

# my network
[/lan/]127.0.0.1:54   # 局域网设备 *.lan解析

[/my.to/]202.38.64.56  # 使用学校dns,在无网络时解析路由器ipv6,用于建立wg
[/us.to/]202.38.64.56

# 其余需要ipv6域名
[/pt/]119.29.29.29
[/ipw.cn/]119.29.29.29  # 双栈,测试用
[/wikipedia.org/]119.29.29.29
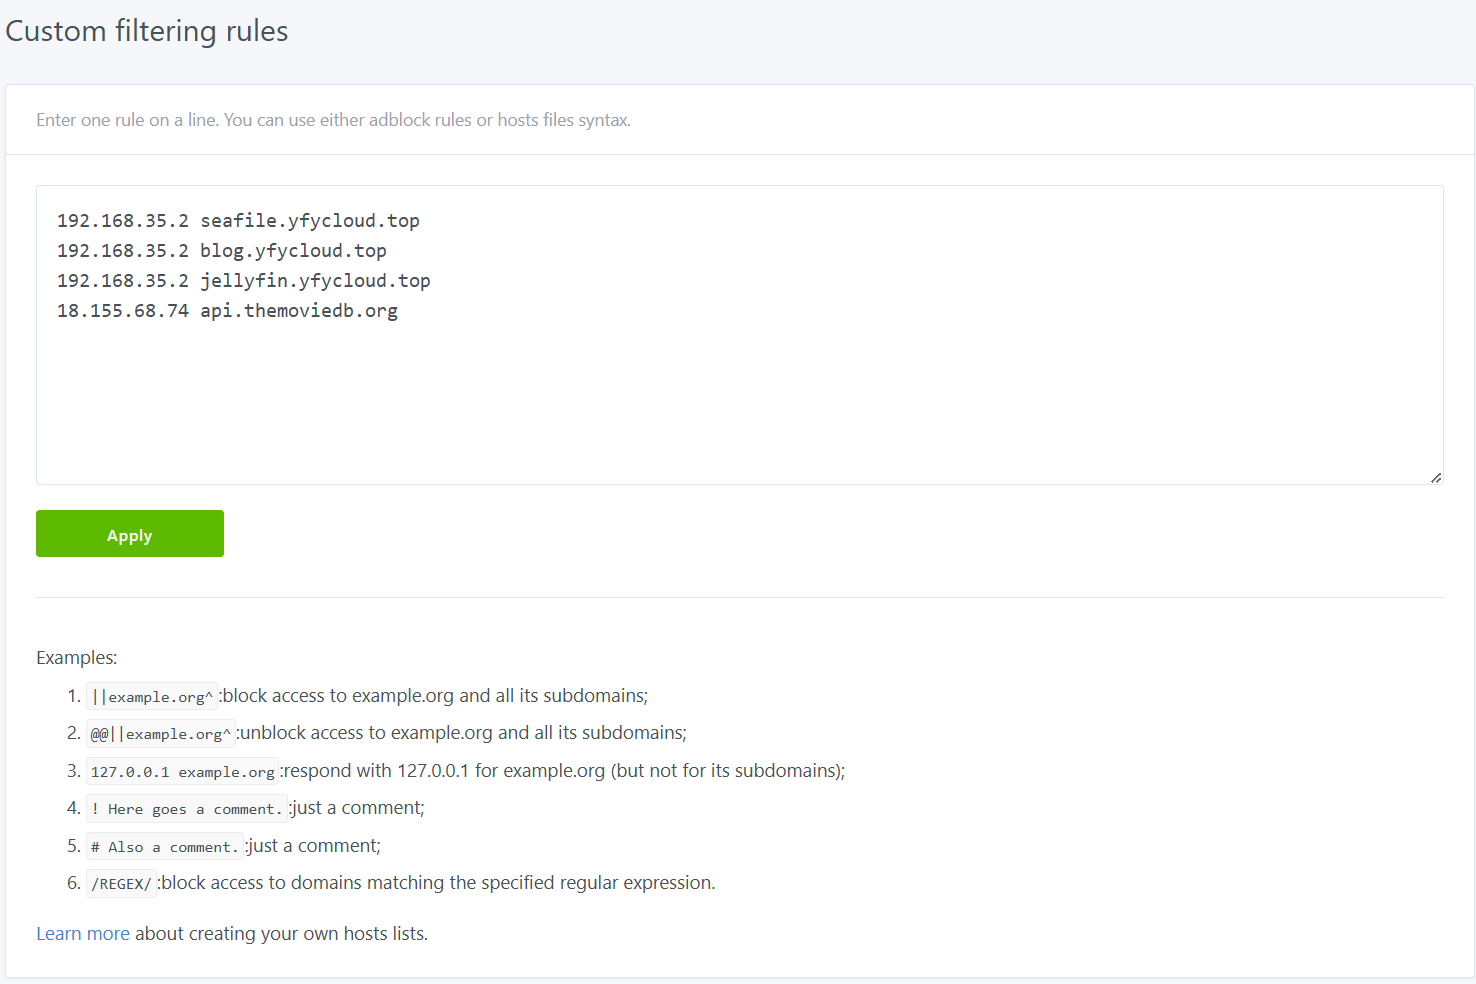
filters/自定义域名解析
Hosts Blocklists · AdguardTeam/AdGuardHome Wiki (github.com)
位于网页Filters -> custom filtering rules菜单中,以hosts文件的格式设置域名ip即可。
- 该功能还支持对域名进行blocking,见网页中给出的例子。
某些域名只返回ipv6
关于是否支持prefer_ipv4的讨论:Prefer IPv4/6. However, it does not affect the resolution of pure IPv6/4 domain names. · Issue #5919 · AdguardTeam/AdGuardHome (github.com)
- 有观点认为这应该是client做的事情
问题
重启后无法自启动
是由于启动脚本优先级冲突导致的。 AdguardHome doesn’t start automatically 解决方法为修改procd启动优先级:
- 删除启动软连接(位于
/etc/rc.d/)
- 修改启动脚本中的START和STOP值,
vim /etc/init.d/adguardhome
设备无法获得dns
发现手机设备不能获得dns了,显示为连上wifi后显示无法上网,浏览器打不开网页,但是app应用貌似都没有问题。 解决办法是在/etc/config/dhcp中添加dns option,强行设置dns。
记录下dnsmasq的设置,看下是否是不小心改错了。
config dnsmasq
        option domainneeded '1'
        option localise_queries '1'
        option local '/lan/'
        option domain 'lan'
        option expandhosts '1'
        option authoritative '1'
        option readethers '1'
        option leasefile '/tmp/dhcp.leases'
        option localservice '1'
        option ednspacket_max '1232'
        option rebind_protection '0'
        option port '54'
        option localuse '1'
        list server '127.0.0.1#7874'
        option noresolv '1'
        option cachesize '0'
Getting ''bad udp cksum'' when running tcpdump (f5.com) tcpdump时发现一个有意思的问题,dhcp reply显示bad udp cksum
This is an expected behavior as tcpdump tool on Linux because the checksum is offloading on your NIC but tcpdump reads IP packets from the Linux kernel right before the actual checksum takes place in the NIC chipset.
root@op2 ➜  ~ tcpdump -nvvv -i eth1 port 67 and port 68
tcpdump: listening on eth1, link-type EN10MB (Ethernet), capture size 262144 bytes
12:55:06.175120 IP (tos 0x0, ttl 128, id 28628, offset 0, flags [none], proto UDP (17), length 328)
    192.168.36.180.68 > 192.168.36.1.67: [udp sum ok] BOOTP/DHCP, Request from 28:11:a8:27:40:3e, length 300, xid 0xab30355a, Flags [none] (0x0000)
          Client-IP 192.168.36.180
          Client-Ethernet-Address 28:11:a8:27:40:3e
          Vendor-rfc1048 Extensions
            Magic Cookie 0x63825363
            DHCP-Message Option 53, length 1: Request
            Client-ID Option 61, length 7: ether 28:11:a8:27:40:3e
            Hostname Option 12, length 6: "S3-Pro"
            FQDN Option 81, length 9: "S3-Pro"
            Vendor-Class Option 60, length 8: "MSFT 5.0"
            Parameter-Request Option 55, length 14:
              Subnet-Mask, Default-Gateway, Domain-Name-Server, Domain-Name
              Router-Discovery, Static-Route, Vendor-Option, Netbios-Name-Server
              Netbios-Node, Netbios-Scope, Option 119, Classless-Static-Route
              Classless-Static-Route-Microsoft, Option 252
            END Option 255, length 0
            PAD Option 0, length 0, occurs 2
12:55:06.175586 IP (tos 0xc0, ttl 64, id 38812, offset 0, flags [none], proto UDP (17), length 340)
    192.168.36.1.67 > 192.168.36.180.68: [bad udp cksum 0xcb57 -> 0x4904!] BOOTP/DHCP, Reply, length 312, xid 0xab30355a, Flags [none] (0x0000)
          Client-IP 192.168.36.180
          Your-IP 192.168.36.180
          Server-IP 192.168.36.1
          Client-Ethernet-Address 28:11:a8:27:40:3e
          Vendor-rfc1048 Extensions
            Magic Cookie 0x63825363
            DHCP-Message Option 53, length 1: ACK
            Server-ID Option 54, length 4: 192.168.36.1
            Lease-Time Option 51, length 4: 43200
            RN Option 58, length 4: 19452
            RB Option 59, length 4: 35652
            Subnet-Mask Option 1, length 4: 255.255.255.0
            BR Option 28, length 4: 192.168.36.255
            Default-Gateway Option 3, length 4: 192.168.36.1
            Domain-Name Option 15, length 3: "lan"
            FQDN Option 81, length 13: [SO] 255/255 "S3-Pro.lan"
            Domain-Name-Server Option 6, length 4: 192.168.36.1
            END Option 255, length 0
配置文件
Upstream DNS servers settings
bootstrap_dns: List of DNS servers used for initial hostname resolution in case an upstream server name is a hostname.bootstrap_prefer_ipv6: Iftrue, instructs the bootstrapper to prefer IPv6 addresses to IPv4 ones when resolving DoH, DoQ, and DoT hostnames.
all_servers: Enables parallel queries to all configured upstream servers to speed up resolving. If enabled, the queries are sent to each server simultaneously and the first response is chosen. If disabled, the queries are sent to each upstream server one-by-one and then sorted by RTT. Note that more stable upstream servers are preferred by the algorithm.
DNS cache settings
cache_size— DNS cache size (in bytes).cache_optimistic(since v0.107.0) — Make AdGuard Home respond from the cache even when the entries are expired and also try to refresh them. Before v0.108.0-b.5 the TTL for such responses is 60 seconds and since v0.108.0-b.5 it's 10 seconds.
Other settings
enable_dnssec: Set DNSSEC flag in the outgoing DNS requests and check the result.aaaa_disabled: Respond with an empty answer to allAAAArequests.
防火墙
参考
- fw3基于iptable/netfilter实现:[OpenWrt Wiki] Netfilter In OpenWrt
- 在启动时运行iptable(firewall.user):Executing scripts at boot time - Installing and Using OpenWrt - OpenWrt Forum
从22.03版本开始,openwrt firwall后端,从iptables(fw3)换成了nftables(fw4)
nftable
参考
快速入门:[OpenWrt Wiki] nftables reference:Man page of NFT (netfilter.org)
打印规则
fw4 print dumps the nftables configuration that is built by fw4 and passed to nftables. It contains slightly higher-level code than the raw nftables state: fw4 uses variables, include files…
nft list ruleset dumps the full nftables configuration from the kernel. This dump mixes data from different sources:
- rules generated by fw4
- rules included from external files (
/etc/nftables.d/*.nftor/usr/share/nftables.d/) - rules added manually through the
nftcommand
fw3 print is the main utility to inspect iptable rules. Additionally the iptable command can be used to sort the rules differently and retrieve packet counts for matching rules. There are a number of arguments but the two most useful examples are:
where
- table is one of:
filter(default),nat,mangle -v: verbose, includes packet counts and physical interface name-n: numeric output-L: list rules-S: print rules The-Land-Sarguments sort/format the output differently. The-Soption is equivalent to using theiptable-savecommand.
- 不能打印fw4,nft生成的规则
- 使用
iptables-save打印所有table
配置文件
总结
[OpenWrt Wiki] Firewall configuration /etc/config/firewall
- zone:定义zone和路由器之间(input, output),zone内不同接口间的(forward)规则。还可以定义从zone出去的masq
- forward: 定义zone之间的转发
- rule:用于指定特定host,端口是否允许放行,相当于对zone更细粒度的补充。
- redirect:SNAT,DNAT
- include:fw4(nftable), fw3(shell script,可以使用iptable)
ntftable实现
filter rules
- input, forward, output
- input_zone, forward_zone, output_zone
- accept_from_zone, accept_to_zone
        chain forward {
                type filter hook forward priority filter; policy drop;

                ct state established,related accept comment "!fw4: Allow forwarded established and related flows"
                iifname { "eth1", "wg0", "ztyou4dlov" } jump forward_lan comment "!fw4: Handle lan IPv4/IPv6 forward traffic"
                ...
                jump handle_reject
        }

        chain forward_lan {
                jump accept_to_wan comment "!fw4: Accept lan to wan forwarding"
                jump accept_to_wg_s2s comment "!fw4: Accept lan to wg_s2s forwarding"
                ct status dnat accept comment "!fw4: Accept port forwards"
                jump accept_to_lan
        }

        chain accept_to_wan {
                oifname "eth0" counter accept comment "!fw4: accept wan IPv4/IPv6 traffic"
        }
nat rules
- dstnat
- srcnat
- dstnat_zone
- srcnat_zone
        chain srcnat {
                type nat hook postrouting priority srcnat; policy accept;
                oifname { "eth1", "wg0", "ztyou4dlov" } jump srcnat_lan comment "!fw4: Handle lan IPv4/IPv6 srcnat traffic"
                oifname "eth0" jump srcnat_wan comment "!fw4: Handle wan IPv4/IPv6 srcnat traffic"
                oifname "wg_s2s" jump srcnat_wg_s2s comment "!fw4: Handle wg_s2s IPv4/IPv6 srcnat traffic"
        }

        chain srcnat_wg_s2s {
                ip saddr 10.0.33.0/24 counter snat 10.0.33.2 comment "!fw4: wg1-snat"
        }
raw rules mangle rules
自定义规则
[OpenWrt Wiki] Firewall configuration /etc/config/firewall
有时不满足于使用openwrt提供的方式设置防火墙,而想要直接运行iptable命令或者nftable命令。这种情况下可以使用/etc/config/firewall中include类型用于自定义规则。包含几种类型
- nftable方式,在一个文件中保存nftable规则
- scipt方式,直接运行iptable或者nftable命令 由于openwrt 22.04后nftable取代了iptable,因此官方推荐使用nftable方式。
nftable
在指定位置插入自定义table,chain或则rule 位置:
| ruleset-pre | At the very beginning, before the fw4 table definition |
|---|---|
| ruleset-post | At the very end, after the fw4 table definition |
| table-pre | At the beginning of the fw4 table, before any chain definition |
| table-post | At the end of the fw4 table, after all chains definition |
| chain-pre | At the beginning of $chain (defined in option chain), before rules in this chain |
| chain-post | At the end of $chain (defined in option chain), after rules in this chain |
# /etc/config/firewall
config include
 option type  'nftables'
 option path  '/etc/my_custom_firewall_rule.nft'
 option position 'chain-pre'
 option chain  'input_wan'

# /etc/my_custom_firewall_rule.nft
tcp dport 0-1023 log prefix "Inbound WAN connection attempt to low TCP port: "
script
可以使用iptables命令(fw3)或者nftables命令
config include
        option enabled  1
        option type  'script'
        option path  '/etc/firewall.user'
        option fw4_compatible 1   # 使用nftables命令需要指定
策略路由
GUI/配置文件
通过iproute2设置的策略路由不知如何保存。openwrt支持其它的方式设置,在luci中可以手动添加策略路由,如图所示。


会在network文件中生成如下两条
config rule
        option priority '20'
        option lookup '2'

config route
        option target '114.214.160.0/19'
        option gateway '114.214.236.254'
        option table '2'
        option interface 'wan'
系统
基本软件包
使用ZSH
参考:Install oh-my-zsh on openwrt/lede-project (github.com)
安装必要的包
安装oh-my-zsh,脚本安装可能会卡住,可以手动安装(见后)。
选择zsh为默认shell
为了避免因删除zsh导致无法登录,可以在启动脚本/etc/rc.local中设置自动fallback回ash
# Revert root shell to ash if zsh is not available
if grep -q '^root:.*:/usr/bin/zsh$' /etc/passwd && [ ! -x /usr/bin/zsh ]; then
    # zsh is root shell, but zsh was not found or not executable: revert to default ash
    [ -x /usr/bin/logger ] && /usr/bin/logger -s "Reverting root shell to ash, as zsh was not found on the system"
    sed -i -- 's:/usr/bin/zsh:/bin/ash:g' /etc/passwd
fi
oh-my-zsh手动安装
通常来说curl获得install脚本时会卡住,git clone仓库时也可能卡住,此时不如手动安装,查看install脚本,会发现其实只做了几件事情:
- 将oh-my-zsh仓库克隆到$HOME下
.oh-my-zsh- 可以从其他计算机scp到路由器里
- 复制zshrc文件:
cp .oh-my-zsh/templates/zshrc.zsh-template .zshrc- 直接复制即可,不用修改内容
- chsh
- openwrt没有chsh命令,需要修改/etc/passwd
- 注意,如果修改错误(如直接输入zsh而不是从根开始的完整路径)可能导致无法登录openwrt
fzf手动安装
想办法获得fzf仓库,可以从x86电脑scp。
git clone --depth 1 https://github.com/junegunn/fzf.git ~/.fzf
~/.fzf/install  # 依赖bash,可以手动改为zsh,会下载fzf可执行程序。复制到/bin目录
创建.fzf.zsh文件
# Auto-completion
# ---------------
[[ $- == *i* ]] && source "/root/.fzf/shell/completion.zsh" 2> /dev/null

# Key bindings
# ------------
source "/root/.fzf/shell/key-bindings.zsh"
zshrc中添加
procd
procd是用于替代init的系统启动管理软件(进程号为1,命令/sbin/procd)
示例
- START用于控制启动顺序(从小到大启动)
- 通过
ls -al /etc/rc.d/查看启动顺序
- 通过
- procd使用openwrt UCI配置接口。配置文件位于
/etc/config/myservice,通过CONFIGURATION=myservice指定 procd_set_param command设置服务运行命令procd_set_param stdout 1将输出重定向到logd。通过logread查看
#!/bin/sh /etc/rc.common

USE_PROCD=1

START=95
STOP=01

CONFIGURATION=myservice

start_service() {
    # Reading config
    config_load "${CONFIGURATION}"
    local name
    local every

    config_get name hello name
    config_get every hello every

    procd_open_instance

    # pass config to script on start
    procd_set_param command /bin/sh "/var/myscript.sh" "$name" "$every"
    procd_set_param file /etc/config/myservice
    procd_set_param stdout 1
    procd_set_param stderr 1
    procd_close_instance
}
其它
ssh key登录
- 一般发行版本的 Linux 系统都是使用的
sshd作为 ssh 服务端,我们将客户端的~/.ssh/id_rsa.pub拷贝到服务端的~/.ssh/authorized_keys即可 - openwrt 使用的
dropbear作为 ssh 的服务端程序,我们需要将公钥拷贝到/etc/dropbear/authorized_keys,最好保证其文件权限是 644
或者使用luci界面System-->Admin-->SSH key添加
ssh 连接 server
openwrt 作为 client 连接其它 server 时,由于 dropbear,会发现很多地方都不一样
- dropbear 没有看到哪里存储了公钥
- 安装 openkey-gen 生成公私钥对后,ssh 仍然不起作用。发现原来是 ssh 默认只使用 .ssh/id_dropbear。
正确做法(dropbearkey 代替了 sshkey-gen)
# 生成 私钥
mkdir .ssh
dropbearkey -t ed25519 -f ~/.ssh/id_dropbear

# 查看私钥对应公钥
dropbearkey -y -f ~/.ssh/id_dropbear  # -y 表示查看私钥对应公钥
增大无线的发射功率
修改路由器的国家地区,使得无线的功率更大,因此信号更好。
Network-->Wireless中选择Edit 2.4Ghz和5Ghz网络,在Advanced Setting中设置Country Code,可以修改为US。这样2.4Ghz和5Ghz信号功率变为30dBm和26dBm
软件安装在usb上
正常情况,路由器的flash都很小,比如16MB,很难装下多少软件。但是如果路由器有USB接口的话,就可以插上U盘作为额外的存储空间。以GB为单位后,就可以随意安装软件了。 过程:
-
/etc/opkg.conf中添加usb dest -
opkg 安装软件时,添加
-d usb选项,如安装 python -
不知为何,安装在 usb 上时,opkg 创建软链接时会报错,导致直接运行命令会报错。因此可能需要自己手动创建软连接,如 python 需要创建以下软连接
命令行无法显示中文
需要安装luci-i18n-base-zh-cn
但是 tmux 仍然无法显示中文
其它
webcam 设备
kmod-video-core kmod-video-uvc

luci-app-mjpg-streamer  # mjpg-streamer的每个组件需要单独安装
mjpg-streamer mjpg-streamer-input-uvc mjpg-streamer-output-http mjpg-streamer-www-simple
root@p2w:~# opkg list-installed |grep usb
kmod-usb-audio - 5.10.161-1
kmod-usb-core - 5.10.161-1
kmod-usb-dwc3 - 5.10.161-1
kmod-usb-dwc3-qcom - 5.10.161-1
kmod-usb-storage - 5.10.161-1
kmod-usb-xhci-hcd - 5.10.161-1
kmod-usb3 - 5.10.161-1
root@p2w:~# opkg list-installed |grep video
kmod-video-core - 5.10.161-1
kmod-video-uvc - 5.10.161-1
kmod-video-videobuf2 - 5.10.161-1
音频设备
驱动
此时已经有驱动了,通过/proc/asound查看设备
root@p2w:~# cat /proc/asound/cards
 0 [Lanseyaoji     ]: USB-Audio - Lanseyaoji
FEC Lanseyaoji at usb-xhci-hcd.0.auto-1, high speed
安装 alsa-utils,可以使用 arecord, aplay 工具
arecord, aplay - command-line sound recorder and player for ALSA soundcard driver
opkg install alsa-utils

root@p2w:~# opkg files alsa-utils
Package alsa-utils (1.2.6-1) is installed on root and has the following files:
/usr/share/alsa/init/ca0106
/usr/bin/amixer
/usr/share/alsa/init/test
/usr/share/alsa/init/info
/usr/share/alsa/init/hda
/usr/bin/alsamixer
/usr/share/alsa/init/default
/usr/bin/arecord
/usr/share/alsa/init/00main
/usr/share/alsa/init/help
/usr/bin/aplay
/usr/sbin/alsactl
alsa-utils
arecord -d 10 -f cd -t wav -D copy foobar.wav will record foobar.wav as a 10-second, CD-quality wave file
arecord -f cd -t wav --max-file-time 3600 --use-strftime %Y/%m/%d/listen-%H-%M-%v.wav
Record in stereo from the default audio source. Create a new file every hour. The files are placed in directories based on their start dates and have names which include their start times and file numbers.
pulseaudio
想要达到的效果:在 windows 上实时监听路由器 usb 麦克风的音频。 实现的效果:在 linux 上实时监听路由器 usb 麦克风的音频。
- 安装 pulseaudio:[OpenWrt Wiki] PulseAudio
opkg install pulseaudio-tools pulseaudio-profiles

root@p2w \u@\h:\w\$ opkg list-installed |grep pulse                                                                                                                                                                                                                               19:04:09
pulseaudio-daemon-avahi - 14.2-8
pulseaudio-profiles - 14.2-8
pulseaudio-tools - 14.2-8
- 修改 system.pa(system 模式启动使用该文件,per-user 模式启动使用 default.pa)
vim /etc/pulse/system.pa

# 开启tcp访问,有几种不同的访问控制

#load-module module-native-protocol-tcp # server和client需要有相同的cookie,位于`~/.config/pulse/cookie`
load-module module-native-protocol-tcp auth-anonymous=1  # 允许匿名
#load-module module-native-protocol-tcp auth-ip-acl=127.0.0.1;192.168.0.0/24 # 通过ip访问控制
- 启动 pulseaudio
- 在 client 上(比如 linux 笔记本),实时播放音频
#load-module module-tunnel-sink server=192.168.36.230
load-module module-tunnel-source server=192.168.36.230
遇到的问题
系统时间导致 opkg 无法下载
通过 wget url,发现以下错误
查找 SSL 证书错误原因,有一项是系统时间不一致导致的。 在 openwrt System -> System Localtime 中,可以选择 sync with browser。同步后问题解决。
ddns curl 48 错误
导致 ddns 无法正常运行
Sat May  6 23:28:44 2023 user.warn ddns-scripts[12337]: FreeDNS: Transfer failed - retry 7/0 in 60 seconds
Sat May  6 23:29:41 2023 user.err ddns-scripts[11285]: FreeDNS_2_ipv6: cURL Error: '48'
需要更新 curl:Using curl/libcurl4 for sending mails - Installing and Using OpenWrt - OpenWrt Forum
Error code 48 in curl refers to "
An unknown option was passed in to libcurl", which would be in line with OpenWrt's tendency to disable optional features for size reasons (apparently you can enableLIBCURL_SMTPwhen building from source).
图形化界面更新 curl 和 libcurl
ddns 无法自动启动
看到 22.03 还有人遇到一样问题:[OpenWrt Wiki] DDNS client 手动重启 ddns 服务可以,但是重启路由器后,ddns 仍然不在运行。
修改了 procd 顺序仍然不行,暂时通过 rc.local 中手动重启 ddns 解决
luci-proto 安装后不显示
Luci-proto won't appear in LuCI after installation - Installing and Using OpenWrt - OpenWrt Forum
如果安装是安装了 luci-app-xxx,想要在 luci 中显示。
- 方法一:登出然后登录
- 方法二:
/etc/init.d/rpcd restart
git: 'remote-https' is not a git command
git-http
- Git is a free & open source, distributed version control system designed to handle everything from small to very large projects with speed and efficiency. This package allows git push/fetch over http(s) and ftp(s)
wan 口因为错误设备的 ipv6 ra 而无法上网
学校信智楼二层没有做 vlan 隔离,导致有时其它设备错误的发送 ra 报文,便会使得整个网络的路由器 ipv6 路由出现问题。
发现 openwrt 有一条 MLD 防火墙规则,该规则允许 wan 口接收 ra,并且源地址为fe80::/10。
因此只需要限制源地址便可以屏蔽其它设备的 ra 报文了。缺点是如果之后设备移动,则需要添加其它地址。
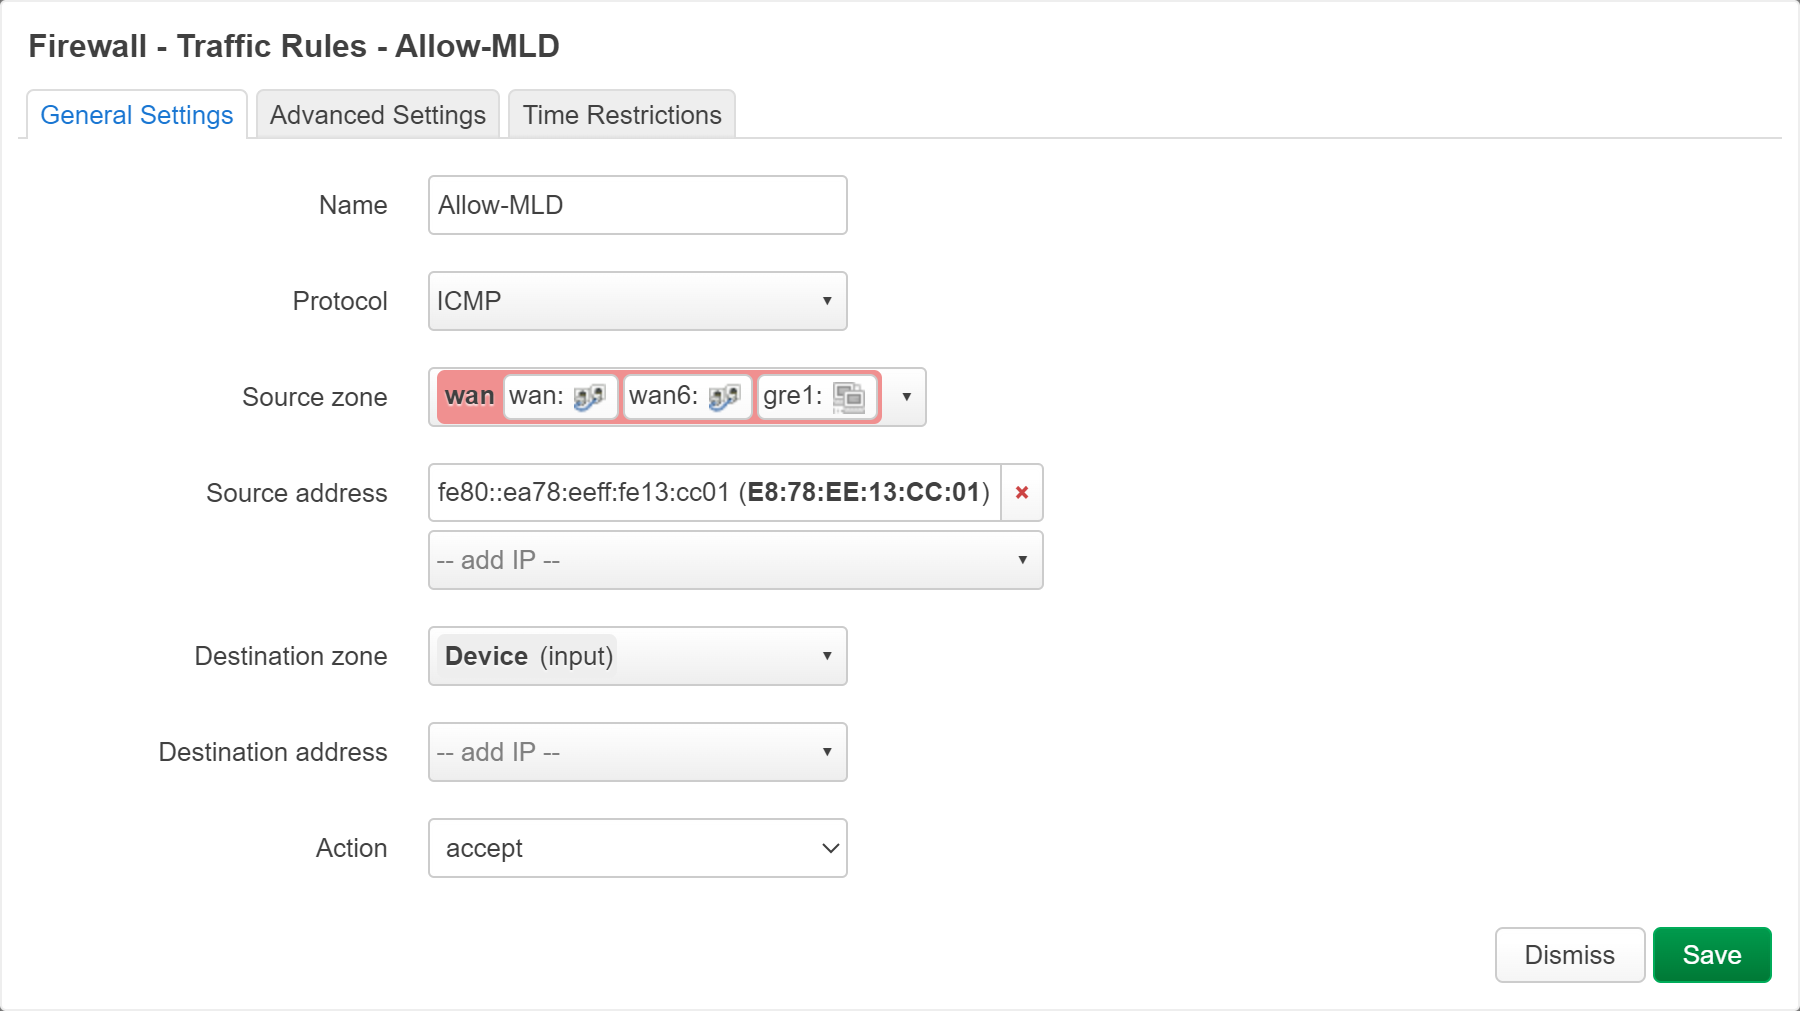
思考: 不知道为何默认行为不是,在接受新 ra 时让用户选择,否则先忽略。
nc 参数只能连接无法监听
原本的 nc 是 busybox 提供的
安装 ncat 即可有完整命令
ncat 是一个 multi-call binary
- nc 仍然是旧的命令
- ncat 才是完整命令
还有一个 ncat-full(install 可以,search 找不到),感觉没啥区别
还有一个 netcat,没有 ncat 好,参数少点
| netcat | 0.7.1-2 | 15.92 KiB | Netcat is a featured networking utility which reads and writes data across network connections, using the TCP/IP protocol.… |
|---|---|---|---|
| ncat | 7.93-3 | 69.04 KiB | Much-improved reimplementation of Netcat |