openwrt DNS 详解
openwrt DNS 说明
参考:
- openwrt DNS 和 DHCP 配置均位于/etc/config/dhcp
-
openwrt 使用 dnsmasq 和 odhcpd。它们功能如下:
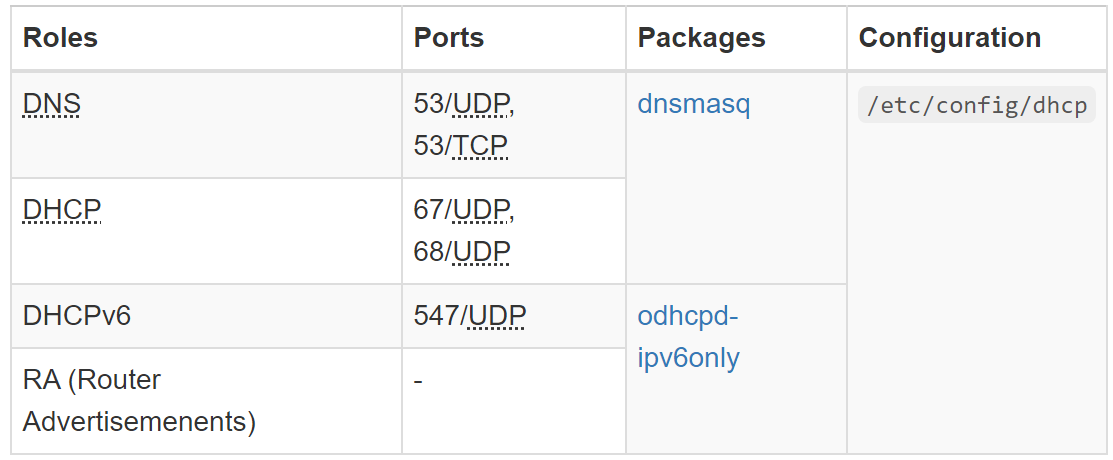
- 总结来说:
- dnsmasq 将自己设置为 DHCP 客户端的 DNS
- dnsmasq 使用缓存来提升性能。到达的 dns 请求如果没有命中则转发给上游 DNS
Dnsmasq serves as a downstream caching DNS server advertising itself to DHCP clients. This allows better performance and management of DNS functionality on your local network. Every received DNS query not currently in cache is forwarded to the upstream DNS servers.
设置 dnsmasq 上游 DNS
- openwrt 默认使用 peer dns 作为上游的 dns,通常由 ISP 上游 DHCP 服务器提供
- dnsmasq 定期查询所有的 dns(resolver),并使用最快的一个
- 多 dns provider
- 更能容忍 DoS 攻击
- 不同的 DNS 由于缓存、同步、负载均衡可能返回不同的结果。为了区分正确结果,需要使用 DNSSEC,可能会对性能造成损害。
To distinguish between correct and incorrect answers such as false-negatives, you need to utilize DNSSEC which may negatively impact fault tolerance and performance.
查看上游 dns
$ cat /tmp/resolv.conf.d/resolv.conf.auto
# Interface wan
nameserver 192.168.33.1
search lan
# Interface wan6
nameserver 2409:8a38:1610:9a80::1
Luci 界面设置
LuCI → Network → Interfaces → WAN & WAN6 → Edit
- Use DNS servers advertised by peer
- Use custom DNS servers
Uci 命令行设置
位于 network 配置文件中
# Configure DNS provider
uci -q delete network.wan.dns
uci add_list network.wan.dns="119.29.29.29"
uci add_list network.wan.dns="223.5.5.5"
uci add_list network.wan.dns="8.8.4.4"

# Configure IPv6 DNS provider
uci -q delete network.wan6.dns
uci add_list network.wan6.dns="2400:3200:baba::1"
uci add_list network.wan6.dns="2402:4e00::"
uci add_list network.wan6.dns="2001:4860:4860::8888"

# Disable peer DNS
uci set network.wan.peerdns="0"
uci set network.wan6.peerdns="0"

# Save and apply
uci commit network
/etc/init.d/network restart
常用 dns
谷歌
8.8.8.8
8.8.4.4
2001:4860:4860::8888
2001:4860:4860::8844

阿里
223.5.5.5
223.6.6.6
2400:3200::1
2400:3200:baba::1
设置客户端 DNS
可以在 windows 中自己设置 dns
使用 dhcp 选项设置客户端 dns
- 可以不使用路由器的 DNS,让手机等设备直接使用公共 DNS 如 8.8.8.8
- 手动修改每个客户端太麻烦,可以使用 DHCP 选项自动设置
# Configure dnsmasq
uci -q delete dhcp.lan.dhcp_option
uci add_list dhcp.lan.dhcp_option="6,8.8.8.8,8.8.4.4"
uci commit dhcp
/etc/init.d/dnsmasq restart

# Configure odhcpd
uci -q delete dhcp.lan.dns
uci add_list dhcp.lan.dns="2001:4860:4860::8888"
uci add_list dhcp.lan.dns="2001:4860:4860::8844"
uci commit dhcp
/etc/init.d/odhcpd restart
调试
logread
很多时候 dns 出现问题,都是 dnsmasq 没有正确启动导致的。可以通过logread -e dnsmasq查看日志。
开启 dns log
其它 DNS/DHCP 功能
DNS 过滤 (除广告)
# Blacklist
uci add_list dhcp.@dnsmasq[0].server="/example.com/"
uci add_list dhcp.@dnsmasq[0].server="/example.net/"
uci commit dhcp
/etc/init.d/dnsmasq restart

# Whitelist
uci add_list dhcp.@dnsmasq[0].server="/example.com/#"
uci add_list dhcp.@dnsmasq[0].server="/example.net/#"
uci add_list dhcp.@dnsmasq[0].server="/#/"
uci commit dhcp
/etc/init.d/dnsmasq restart
hostname
LuCI → Network → Hostnames
Define a custom domain name and the corresponding PTR record - assigns the IPv4 address 192.168.1.23 and IPv6 address fdce::23 to the domain name mylaptop and construct an appropriate reverse records.
uci add dhcp domain
uci set dhcp.@domain[-1].name="mylaptop"
uci set dhcp.@domain[-1].ip="192.168.1.23"
uci add dhcp domain
uci set dhcp.@domain[-1].name="mylaptop"
uci set dhcp.@domain[-1].ip="fdce::23"
uci commit dhcp
/etc/init.d/dnsmasq restart
A, AAAA, CNAME 记录
相当于 DNS 基本功能
-
A, AAAA 记录用于将域名解析到 IP
- 下面表示 home 被解析为 10.10.10.1
-
CNAME 用于将一个域名解析到另一个域名
PXE 网络启动
https://openwrt.org/docs/guide-user/base-system/dhcp_configuration#multi-arch_tftp_boot
DHCP relay
https://openwrt.org/docs/guide-user/base-system/dhcp#dhcp_relay
常用网络命令
ifconfig
windows ipconfig /all,可以看到 DNS
DHCP 服务器 . . . . . . . . . . . : 192.168.37.1
DHCPv6 IAID . . . . . . . . . . . : 69734824
DHCPv6 客户端 DUID  . . . . . . . : 00-01-00-01-29-89-29-F7-28-11-A8-27-40-3E
DNS 服务器  . . . . . . . . . . . : 2409:8a38:1610:9a80::1
192.168.37.1
nslookup
$ nslookup www.baidu.com
服务器:  public1.alidns.com
Address:  223.5.5.5

非权威应答:
名称:    www.a.shifen.com
Addresses:  182.61.200.6
          182.61.200.7
Aliases:  www.baidu.com
dig
netstat
- n:使用数值端口
- t:TCP 流
- l:显示正在监听的,否则为已经建立连接的
- p:显示对应程序
高级
多 dnsmasq 实例
由于我区分了 lan 和 guest 接口。
想要不同的接口绑定不同的 search domain。
经过查找,貌似只能通过启用多个 dnsmasq 实例来实现,然后通过 instance 参数,在不同接口上绑定到不同实例。 Different domain for each interface - Installing and Using OpenWrt / Network and Wireless Configuration - OpenWrt Forum [OpenWrt Wiki] DNS and DHCP examples --- [OpenWrt Wiki]DNS 和 DHCP 示例
但是实现后,发现两个 search domain 间不是隔离的,guest 下明明没有一些 host,但是仍然能够解析。 折腾了一圈貌似没有解决,因此还是使用单个 search domain 算了。
64 bytes from ubuntu22.op1 (192.168.35.192): icmp_seq=31 ttl=64 time=0.060 ms
64 bytes from ubuntu22.guest.op1 (192.168.35.192): icmp_seq=32 ttl=64 time=0.240 ms
64 bytes from ubuntu22.op1 (192.168.35.192): icmp_seq=33 ttl=64 time=0.058 ms
64 bytes from ubuntu22.guest.op1 (192.168.35.192): icmp_seq=34 ttl=64 time=0.080 ms
64 bytes from ubuntu22.guest.op1 (192.168.35.192): icmp_seq=35 ttl=64 time=0.063 ms
64 bytes from ubuntu22.guest.op1 (192.168.35.192): icmp_seq=36 ttl=64 time=0.072 ms
64 bytes from ubuntu22.op1 (192.168.35.192): icmp_seq=37 ttl=64 time=0.055 ms
64 bytes from ubuntu22.guest.op1 (192.168.35.192): icmp_seq=38 ttl=64 time=0.049 ms
64 bytes from ubuntu22.guest.op1 (192.168.35.192): icmp_seq=39 ttl=64 time=0.078 ms
64 bytes from ubuntu22.op1 (192.168.35.192): icmp_seq=40 ttl=64 time=0.045 ms
64 bytes from ubuntu22.op1 (192.168.35.192): icmp_seq=41 ttl=64 time=0.060 ms
遇到的问题
ipv6 图片显示不出来
qq、咸鱼等 app 图片加载不出来,关掉再开启 wifi 就恢复正常。 怀疑:
- ipv6 dns 的问题
- linux 下需要不断 flush neighbor,否则 ipv6 就会无法连接。是否和该问题有关?
- 有时需要 ping 一下路由器,否则 ipv6 无法连接网络。
ipv6 覆盖: