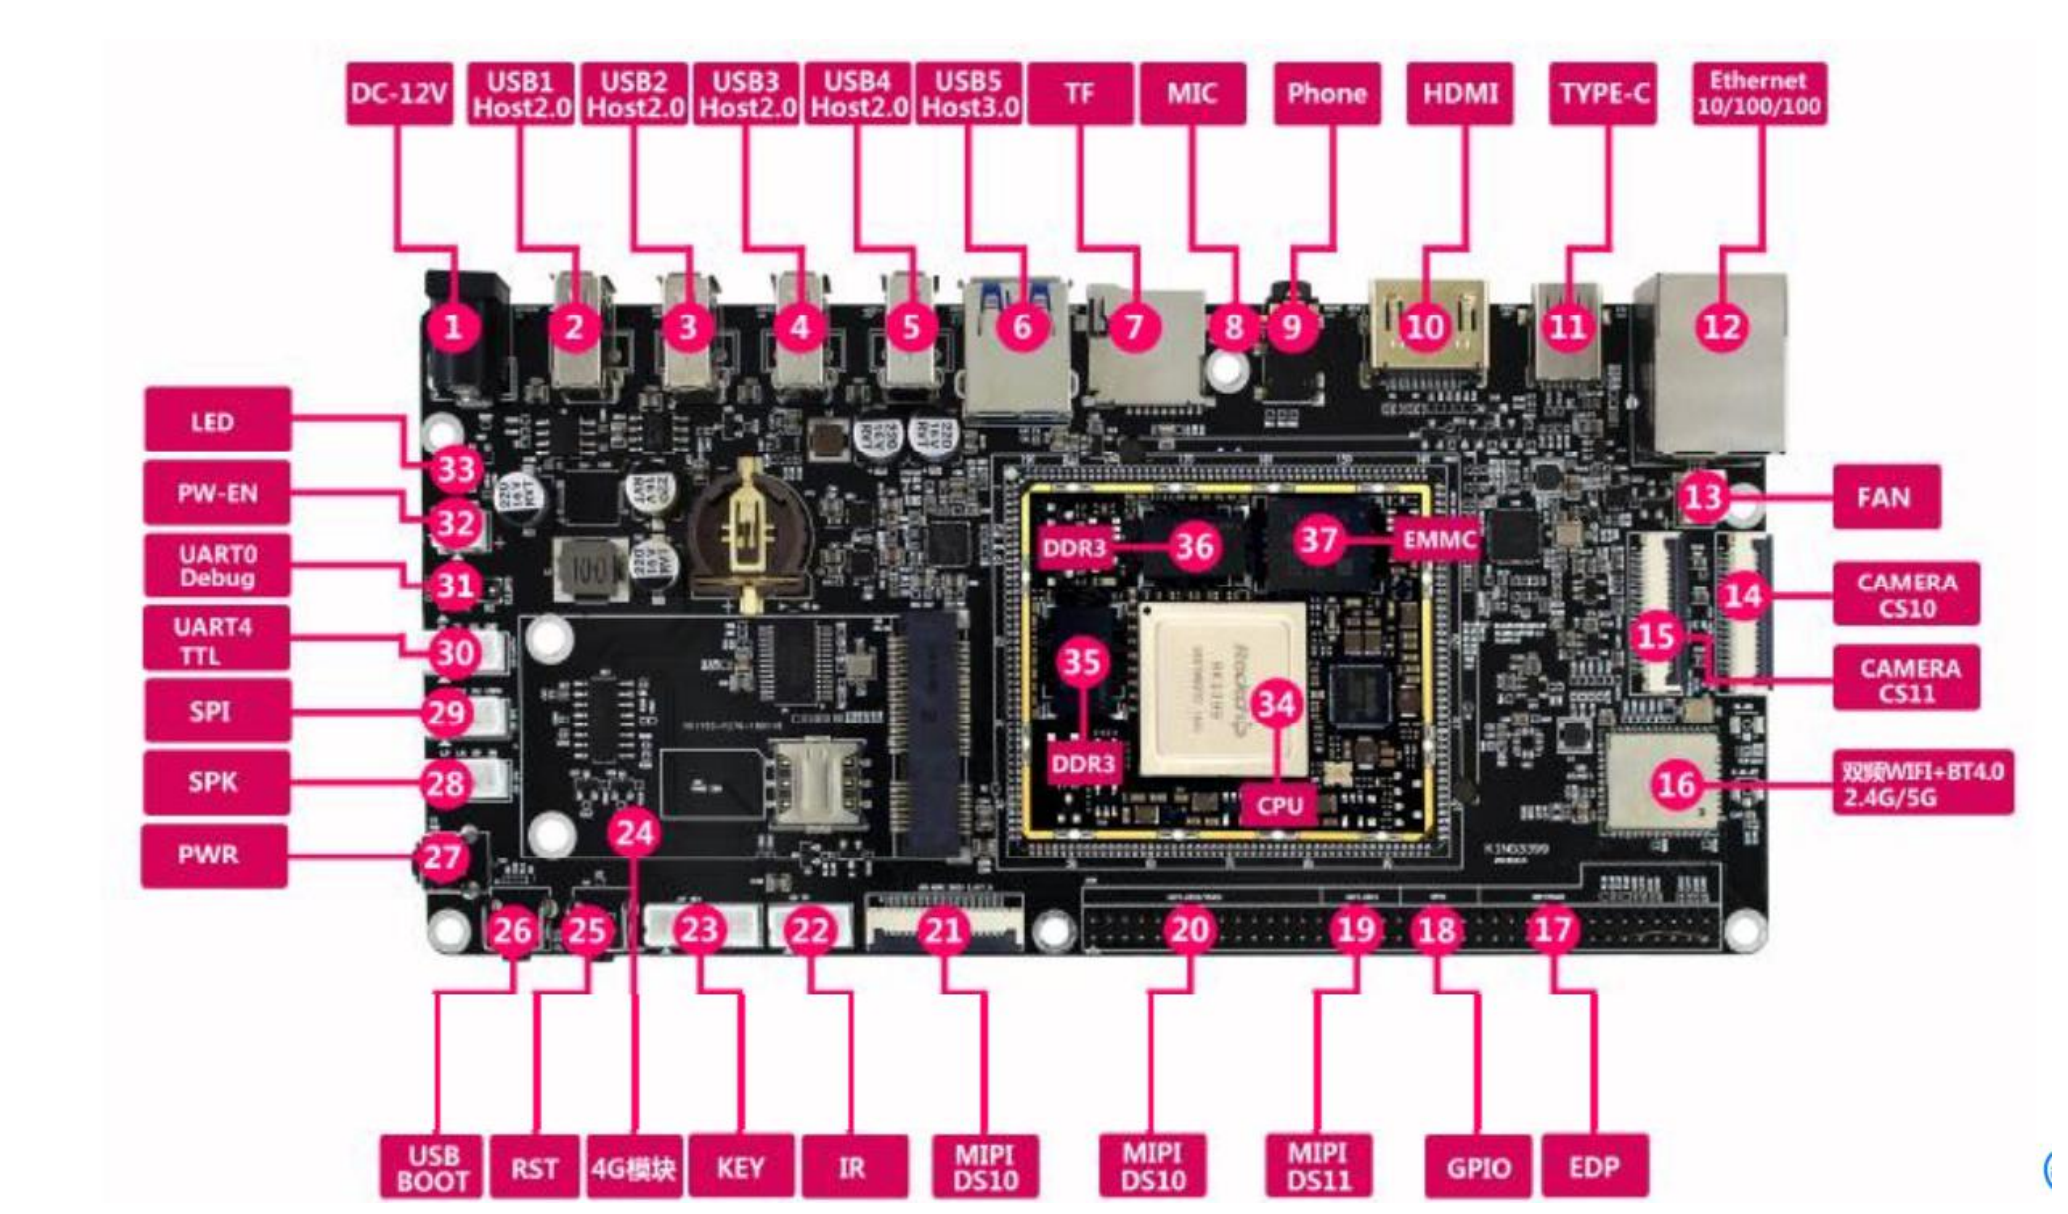
捡垃圾-rk3399 DIY KVM
由于我的台式机承载了 NAS,做种,Jellyfin,博客,文件同步等功能,已然成为一台服务器,因此其可靠性非常重要。但是我还是经历过几次由于网络故障导致其无法访问的情形,此时则只能去实验室维护比较麻烦,因此需要一个 IPMI 的管理功能,使得网络出故障情况下也能远程访问。
而家用 PC 主板很少有支持 IPMI 功能的,支持的板子一般都要 2000 元以上。因此需要一个成本低廉的方案,在网上搜索一阵后发现确实有基于树莓派 DIY 的方案,并且有一个比较大的开源项目 PI-KVM。
然而由于树莓派 400-500 昂贵的价格,使得 DIY 的成本仍然很高。直到我看到使用普通 arm 板子的方案。甚至可以使用 40 元的电视盒子。因此价格完全可以保证在 200 元以内,我觉的是一个可以接受的方案。
最后成本
- king3399 开发板:咸鱼 120
- ms2130 USB 采集卡,支持 1080p 60 帧:淘宝 60
开发板
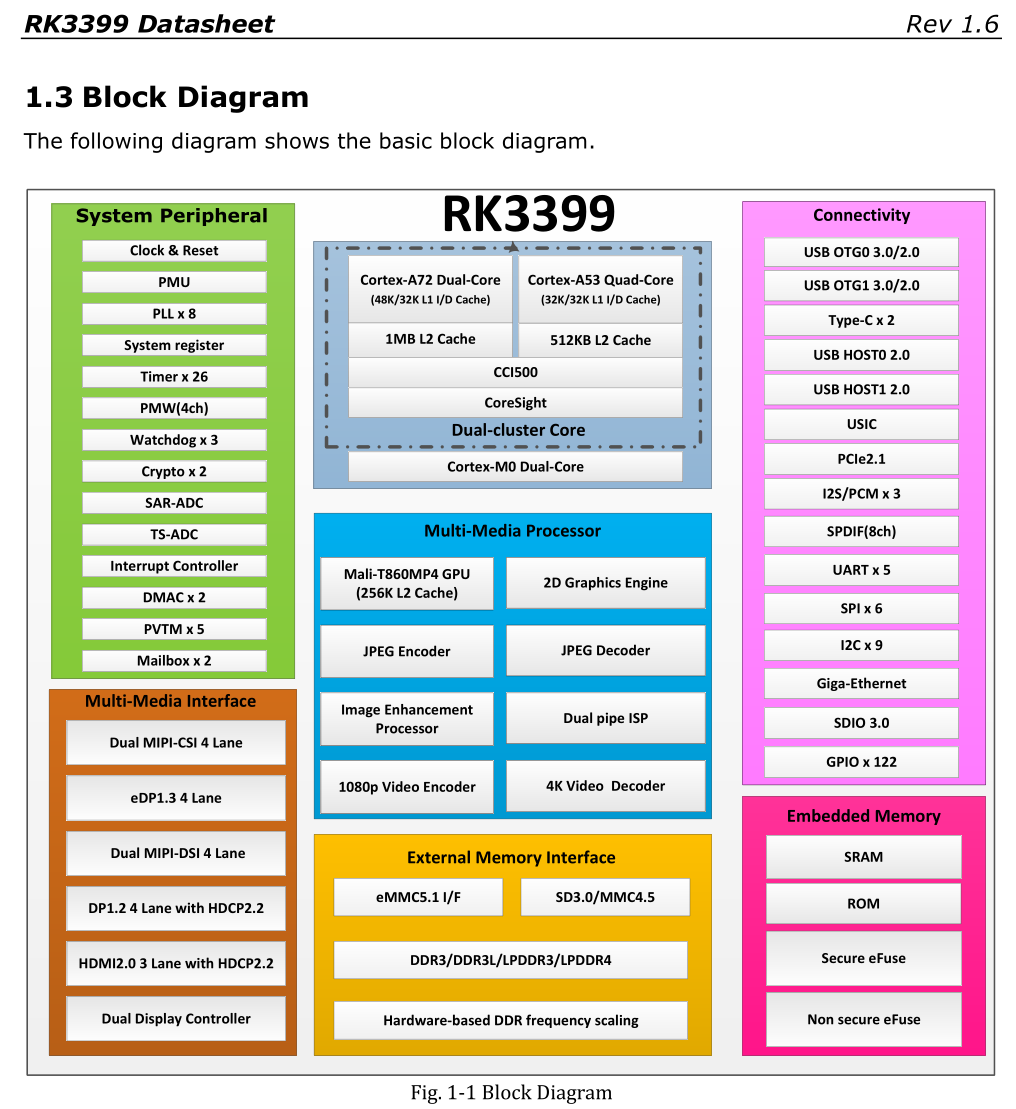
RK3399 是 Rockchip(瑞芯微)出的一款 SoC,在此基础上,许多开发板厂商设计了自己的开发板。
rk3399 硬件资源
主要特点
- 网络:
- 千兆以太网
- 支持 wifi+ 蓝牙
- 内部存储
- BootROM(32KB):支持从 SPI、eMMC、SD/MMC 接口启动
- Internal SRAM(200KB):Support security and non-security access
- 片外存储
- 板载 eMMC(16G)
- 支持 SD/MMC
- 两个 OTG usb 接口
- PCIe1.0 M.2 (Bkey)
- Mini PCIe 为 LTE 模块专用接口,板载 SIM 卡座,实现 IOT 应用
已知的开发板及资料
Firefly
Firefly:中山市天启智能科技有限公司于 2014 年创立的开源团队,致力于人工智能、智能硬件、嵌入式开发、系统开发、应用程序开发等研发,拥有开源系列产品、开源社区与网上商城。Firefly 开源产品包括核心板、行业主板、行业整机、集群服务器、开发套件、Station 等产品。
资料最全的开发板,厂家有自己的网站,提供详细教程。 1. 介绍 — Firefly Wiki (t-firefly.com)
king3399
容品深圳电子科技 从咸鱼购买,卖家提供了原厂的详细文档,包含:SDK(适配的 buildroot, ubuntu, debian, Android 源码,以及编译方法),编译好的镜像,硬件 datasheet 等
瑞芯微 King3399 扩展板 - 深圳荣品电子科技有限公司 (rpdzkj.com)
tn3399_v3
深圳市天诺
github 上有人折腾出的资料,也支持刷许多系统了:lanseyujie/tn3399_v3: TN3399_V3 开发板折腾记录 (github.com)
其它
- RK 平台资料收集:Xianlee's Log (lightembedded.com)
方案讨论
基本方案
DIY 一个运维神器 Open IP-KVM - 知乎 (zhihu.com)
这种方案如何呢:
1.使用 CH9329+CH340 模拟鼠标键盘
2.HDMI-USB 视频采集卡获取图像
3.ARM 开发板安装 Linux 系统
4.GPIO 扩展板控制目标电脑的开关机引脚实现开关机
5.采用远程光驱镜像共享技术。客户端选择安装的光盘镜像,通过 IP-KVM 网络发送到开发板。开发板接收到后,通过 iSCSI 等网络协议,将该光盘镜像挂载为目标电脑的一块虚拟光盘。目标电脑可以对该虚拟光盘进行引导和安装操作
ARM-KVM
b 站看到 IPKVM 的一个方案,请教下怎么实现 - V2EX
- 「教程」廉价的运维神器 ArmKVM 安装与使用_哔哩哔哩_bilibili
- ArmKVM 官方文档 (moeneko.xyz)
- B 站作者已经把它商业量产了,但是售价 330 起
- CPU 是全志 H610,感觉什么都缩水了,除了板子是新的外,相比于自己买二手开发板 DIY 没有性价比。
- 而且系统也不知道是什么,感觉可玩性比较差
基于 Armbian 的 PI-KVM
- 将 PI-KVM 移植到了 Armbian 系统上
- 打造普通 PC 拥有服务器 IPMI 硬件级别的远程运维方案 PI KVM 硬件级远程控制_哔哩哔哩_bilibili
- 作者的仓库:srepac/kvmd-armbian: KVMD For Armbian Install Script (github.com)
只需要开发板可以刷 Armbian 的镜像,硬件有支持 OTG 的 USB 接口即可。非常适合自己 DIY 的方案
Pi-KVM x86
有一些 40 元的 x86 板子。如果可以改造成 KVM 那么性价比会很高。
x86 板子的特点
- 可以 pcie 取电
- 没有 OTG 和 GPIO,因此需要连接额外的 MCU 板子。比如后面提到的 Arduino Lenard,只需要26元。
- x86 可以通过串口发送命令给 MCU 板子,MCU 板子执行操作。
参考
- GitHub - purplepalmdash/pikvmx86: Run Pi-KVM on x86
- 基于 PiKVM 制作 M1 Mac Mini KVM – 属于 CYY 自己的世界 (cyyself.name)
- HDMI-USB Dongle/35 RMB/USD 4.61
- Arduino Leonard R3/26 RMB/USD 3.74
- 扩展出 GPIO
- 扩展出 OTG,用于模拟键盘鼠标
- USB-TTL PL2303/3.1 RMB/USD 0.45
- 用于 x86 连接 arduino
- HDMI Line/7 RMB/USD 1
Leonardo | Arduino Documentation
The Arduino Leonardo is a microcontroller board based on the ATmega32u4. It has 20 digital input/output pins (of which 7 can be used as PWM outputs and 12 as analog inputs), a 16 MHz crystal oscillator, a micro USB connection, a power jack, an ICSP header, and a reset button. It contains everything needed to support the microcontroller; simply connect it to a computer with a USB cable or power it with a AC-to-DC adapter or battery to get started.
king3399 刷机
教程链接
2022 年新鲜矿渣,荣品 king3399 Linux 刷机教程与性能测试 - YouTube King3399/荣品3399刷机教程 - 心语博客 (vpset.com)
刷原厂镜像 vs 第三方
开发板厂家提供的 SDK 包中会包含原厂镜像,像 Firefly 则可以从官网下载。 刷原厂镜像:
- 优点
- 经过厂家测试,比较稳定
- 刷机比较容易
- 缺点
- 可能支持的内核版本比较低
- 镜像选择性比较少。可能厂家只适配了 debian,ubuntu 镜像。
- 要支持 Armbian,openwrt 等其它操作系统需要自己移植编译,一般需要板子的 dtb,可以从原厂系统中提取。通常网上有大佬移植过了
- king3399 厂家提供了以下系统镜像
- linux
- ubuntu(18.04)
- debian(buster 10)
- android: 7, 8, 10
- linux
刷机方法
Rockchip 平台刷机方法汇总:Xianlee's Log (lightembedded.com)
基本知识
镜像文件
- 通常包含以下几部分
- bootloader(如 uboot)
- kernel(linux kernel)
- rootfs(ubuntu, debian 等不同发行版都是该部分不同)
- 并且各部分所处地址空间分区是 SoC 厂商分配好的。
- 对于开发板这种设备,CPU 启动时会从片上的一小块 boot ROM 启动,作为第 0 级引导。之后再从 eMMC, SD 卡等设备加载引导程序启动。因此镜像文件包含以上全部部分,只需要将镜像完整写入外部存储。计算机启动时便会从正确位置开始引导启动
- 对于路由器刷 openwrt,CPU 通常从 flash 启动。因此刷系统时一般只会刷 flash 中 kernel + rootfs 分区。因为保留原厂 bootloader 可以保证之后可以通过原厂工具恢复原厂系统。同时 flash 中一些分区还包含网卡 MAC 地址等信息,因此不能修改。
- buildroot 项目可以很方便的定制 bootloader, kernel, rootfs 这三部分,生成定制化的系统镜像
boot ROM
- 开发板这种设备有片上 boot ROM 的好处就是,不用担心变砖。
Firefly-RK3399 有灵活的启动方式。一般情况下,除非硬件损坏,Firefly-RK3399 开发板是不会变砖的。如果在升级过程中出现意外,bootloader 损坏,导致无法重新升级,此时仍可以进入
MaskRom模式来修复。
刷入介质
要看 SoC 支持直接从哪些位置启动,一般支持 SD/tf, eMMC。从其余存储介质启动可能需要先将 bootloader 写入板载存储,然后再将剩余镜像写入其它存储
ROCK-5B 在主板上有一个 SPI 闪存,将引导加载程序安装到 SPI 闪存可以支持 SoC maskrom 模式不直接支持的其他启动介质(如 SATA、USB3 或 NVMe) https://github.com/ophub/amlogic-s9xxx-armbian/blob/main/build-armbian/documents/README.cn.md#8213-%E5%AE%89%E8%A3%85%E7%B3%BB%E7%BB%9F%E8%87%B3-nvme
将镜像写入 SD 卡这种外部存储比较容易
- Rufus - Create bootable USB drives the easy way
- balenaEtcher - Flash OS images to SD cards & USB drives
但是要将镜像写入板载的 eMMC 存储则需要专门的工具
- 一般这种板载存储都有官方开发工具可以直接写。比如 Rochchip 提供了 RKDevTool,通过 USB 连接上位机和开发板,开发板启动时,boot ROM 可以接受从 USB 获得 loader 启动,之后再从 USB 获得数据,最后写入 eMMC
- 也可以买一个 USB-eMMC 的转接器(编程器?),直接写
RKDevTool 使用
几种启动模式
- Normal:Normal 模式就是正常的启动过程,各个组件依次加载,正常进入系统。
- Loader:在 Loader 模式下,bootloader 会进入升级状态,等待主机命令,用于固件升级等。
- MaskRom:MaskRom 模式用于 bootloader 损坏时的系统修复。
- 一般情况下是不用进入
MaskRom 模式的,只有在 bootloader 校验失败(读取不了 IDB 块,或 bootloader 损坏)的情况下,BootRom 代码 就会进入此模式。此时 BootRom 代码等待主机通过 USB 接口传送 bootloader 代码,加载并运行之。当板子变砖无法正常启动或升级程序时,也可以手动进入MaskRom 模式.
- 一般情况下是不用进入
简单来说,如果 eMMC 上有好的 bootloader,则启动后按住板子上的 update 按键就会进入 loader 模式,等待从 USB 获得镜像升级 没有的话,就会进入 Maskrom 模式,可以通过工具直接写整个 eMMC。不过此时上位机要提供两个文件
- loader 文件,boot rom 加载后引导
- 要刷入 eMMC 的系统镜像
板载 16G eMMC,写应该有 40MB/s,所以刷机速度还是很快的。
踩坑经历
- 想直接从原厂镜像升级为 armbian 镜像,发现选择镜像直接就报错误。
- 现在觉得是二者 bootloader 不一样,导致无法直接升级。
- 然后想通过 maskrom 模式,按地址 0 写入 armbian 镜像即可,结果不行。
- 原来是需要额外一个 loader 文件,该文件在 armbian 的 github 仓库中有
- 我的 gihtub issue瑞芯微开发工具加载固件失败 · Issue #1562 · ophub/amlogic-s9xxx-armbian (github.com)
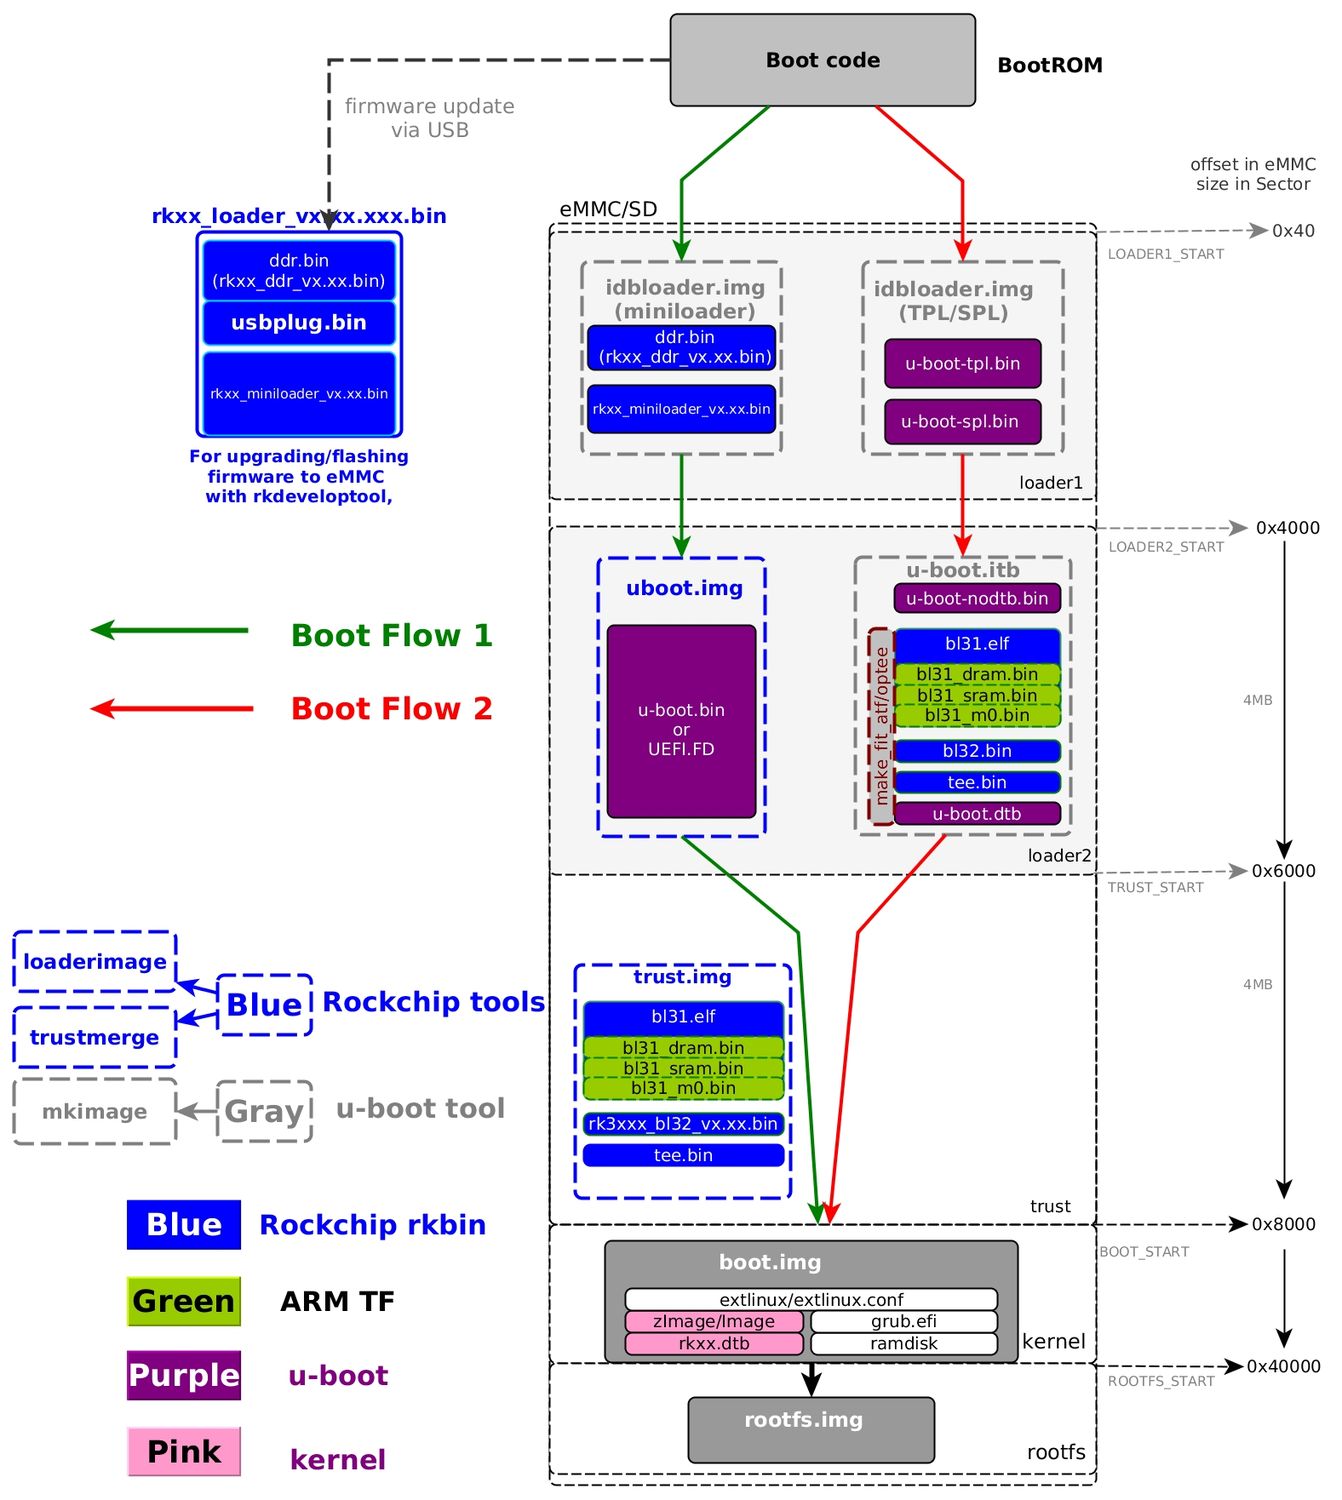
RK3399 启动过程探明
github 上一个大佬写的启动过程详解:RK33XX/RK35XX系列设备启动流程、写入系统及编译流程 · ophub/amlogic-s9xxx-armbian · Discussion #1634 (github.com)
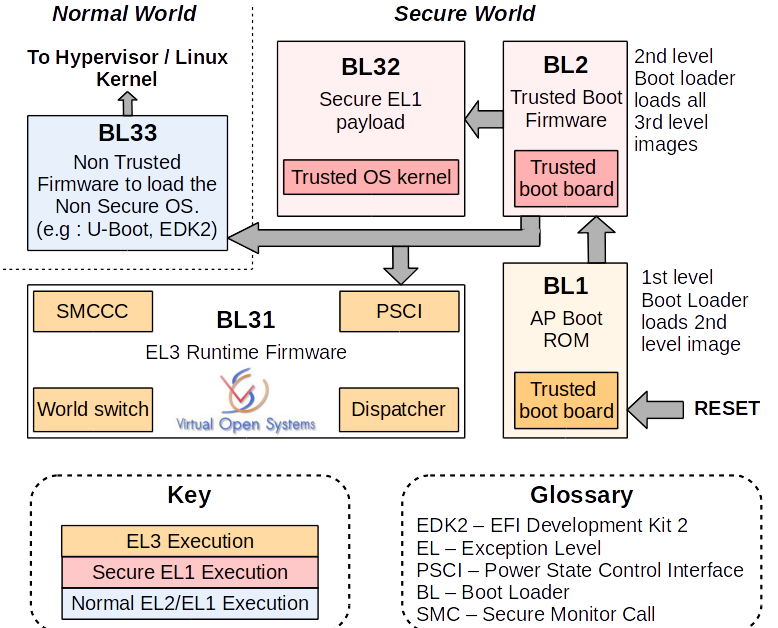
ATF:ARM Trusted Firmware 分析——启动、PSCI、OP-TEE 接口 - ArnoldLu - 博客园 (cnblogs.com))
- arm 处理器有这个功能,涉及 ARM 特权级如 ELF0(普通应用), ELF1(kernel),ELF2(hypervisor)
- 主要涉及到 BL1(bootrom) -> BL2(pre-loader) -> BL3x -> uboot -> kernel
- BL1 - AP Trusted ROM,一般为 BootRom。
- BL2 - Trusted Boot Firmware,一般为 Trusted Bootloader。
- BL31 - EL3 Runtime Firmware,一般为 SML,管理 SMC 执行处理和中断,运行在 secure monitor 中。
- BL32 - Secure-EL1 Payload,一般为 TEE OS Image。
- BL33 - Non-Trusted Firmware,一般为 uboot、linux kernel。
bootflow
+--------+----------------+----------+-------------+---------+
| Boot   | Terminology #1 | Actual   | Rockchip    | Image   |
| stage  |                | program  |  Image      | Location|
| number |                | name     |   Name      | (sector)|
+--------+----------------+----------+-------------+---------+
| 1      |  Primary       | ROM code | BootRom     |         |
|        |  Program       |          |             |         |
|        |  Loader        |          |             |         |
|        |                |          |             |         |
| 2      |  Secondary     | U-Boot   |idbloader.img| 0x40    | pre-loader
|        |  Program       | TPL/SPL  |             |         |
|        |  Loader (SPL)  |          |             |         |
|        |                |          |             |         |
| 3      |  -             | U-Boot   | u-boot.itb  | 0x4000  | including u-boot and atf
|        |                |          | uboot.img   |         | only used with miniloader
|        |                |          |             |         |
|        |                | ATF/TEE  | trust.img   | 0x6000  | only used with miniloader
|        |                |          |             |         |
| 4      |  -             | kernel   | boot.img    | 0x8000  |
|        |                |          |             |         |
| 5      |  -             | rootfs   | rootfs.img  | 0x40000 |
+--------+----------------+----------+-------------+---------+
Then when we talking about boot from eMMC/SD/U-Disk/net, they are in different concept:
- Stage 1 is always in boot rom, it loads stage 2 and may load stage 3(when SPL_BACK_TO_BROM option enabled).
- Boot from SPI flash means firmware for stage 2 and 3(SPL and U-Boot only) in SPI flash and stage 4/5 in other place;
- Boot from eMMC means all the firmware(including stage 2, 3, 4, 5) in eMMC;
- Boot from SD card means all the firmware(including stage 2, 3, 4, 5) in SD card;
- Boot from U-Disk means firmware for stage 4 and 5(not including SPL and U-Boot) in Disk, optionally only including stage 5;
- Boot from net/tftp means firmeware for stage 4 and 5(not including SPL and U-Boot) on the network;
Boot Flow 1 is typical Rockchip boot flow with Rockchip miniloader;
Boot Flow 2 is used for most SoCs with U-Boot TPL for ddr init and SPL for trust(ATF/OP-TEE) load and run into next stage;
Armbian
介绍
Armbian是兼容 debian 的专门针对各种 arm 开发板进行优化维护的发行版。由于更新比较即时,因此甚至可能比原厂镜像更加稳定。
和 Raspberry Pi OS, debian/arm对比:
- Compared: Raspberry Pi OS vs. Armbian vs. Debian GNU/Linux (linuxhint.com)
- Armbian doc faq: what-is-the-difference-between-armbian-and-debianubuntu
amlogic-s9xxx-armbian 项目
Armbian 官方并没有直接支持 king3399(是支持 Firefly 的)
- 适配 king3399 的提交:Add support for king3399 by 13584452567 · Pull Request #1080 · ophub/amlogic-s9xxx-armbian (github.com)
armbian 官方文档关于 rk3399 的一些注释,比如显卡只在 4.4 内核上正常工作Rockchip - Armbian Documentation
使用
- 官方文档很全了:Armbian Documentation
- network:How to switch from Network Manager to systemd-networkd on Linux (xmodulo.com)
连接 wifi 的简单方法
Armbian PI-KVM
- 打造普通 PC 拥有服务器 IPMI 硬件级别的远程运维方案 PI KVM 硬件级远程控制_哔哩哔哩_bilibili
- 作者的仓库:srepac/kvmd-armbian: KVMD For Armbian Install Script (github.com)
其它
ustreamer
发现串流画面用的是 ustreamer,ps 看到的完整命令
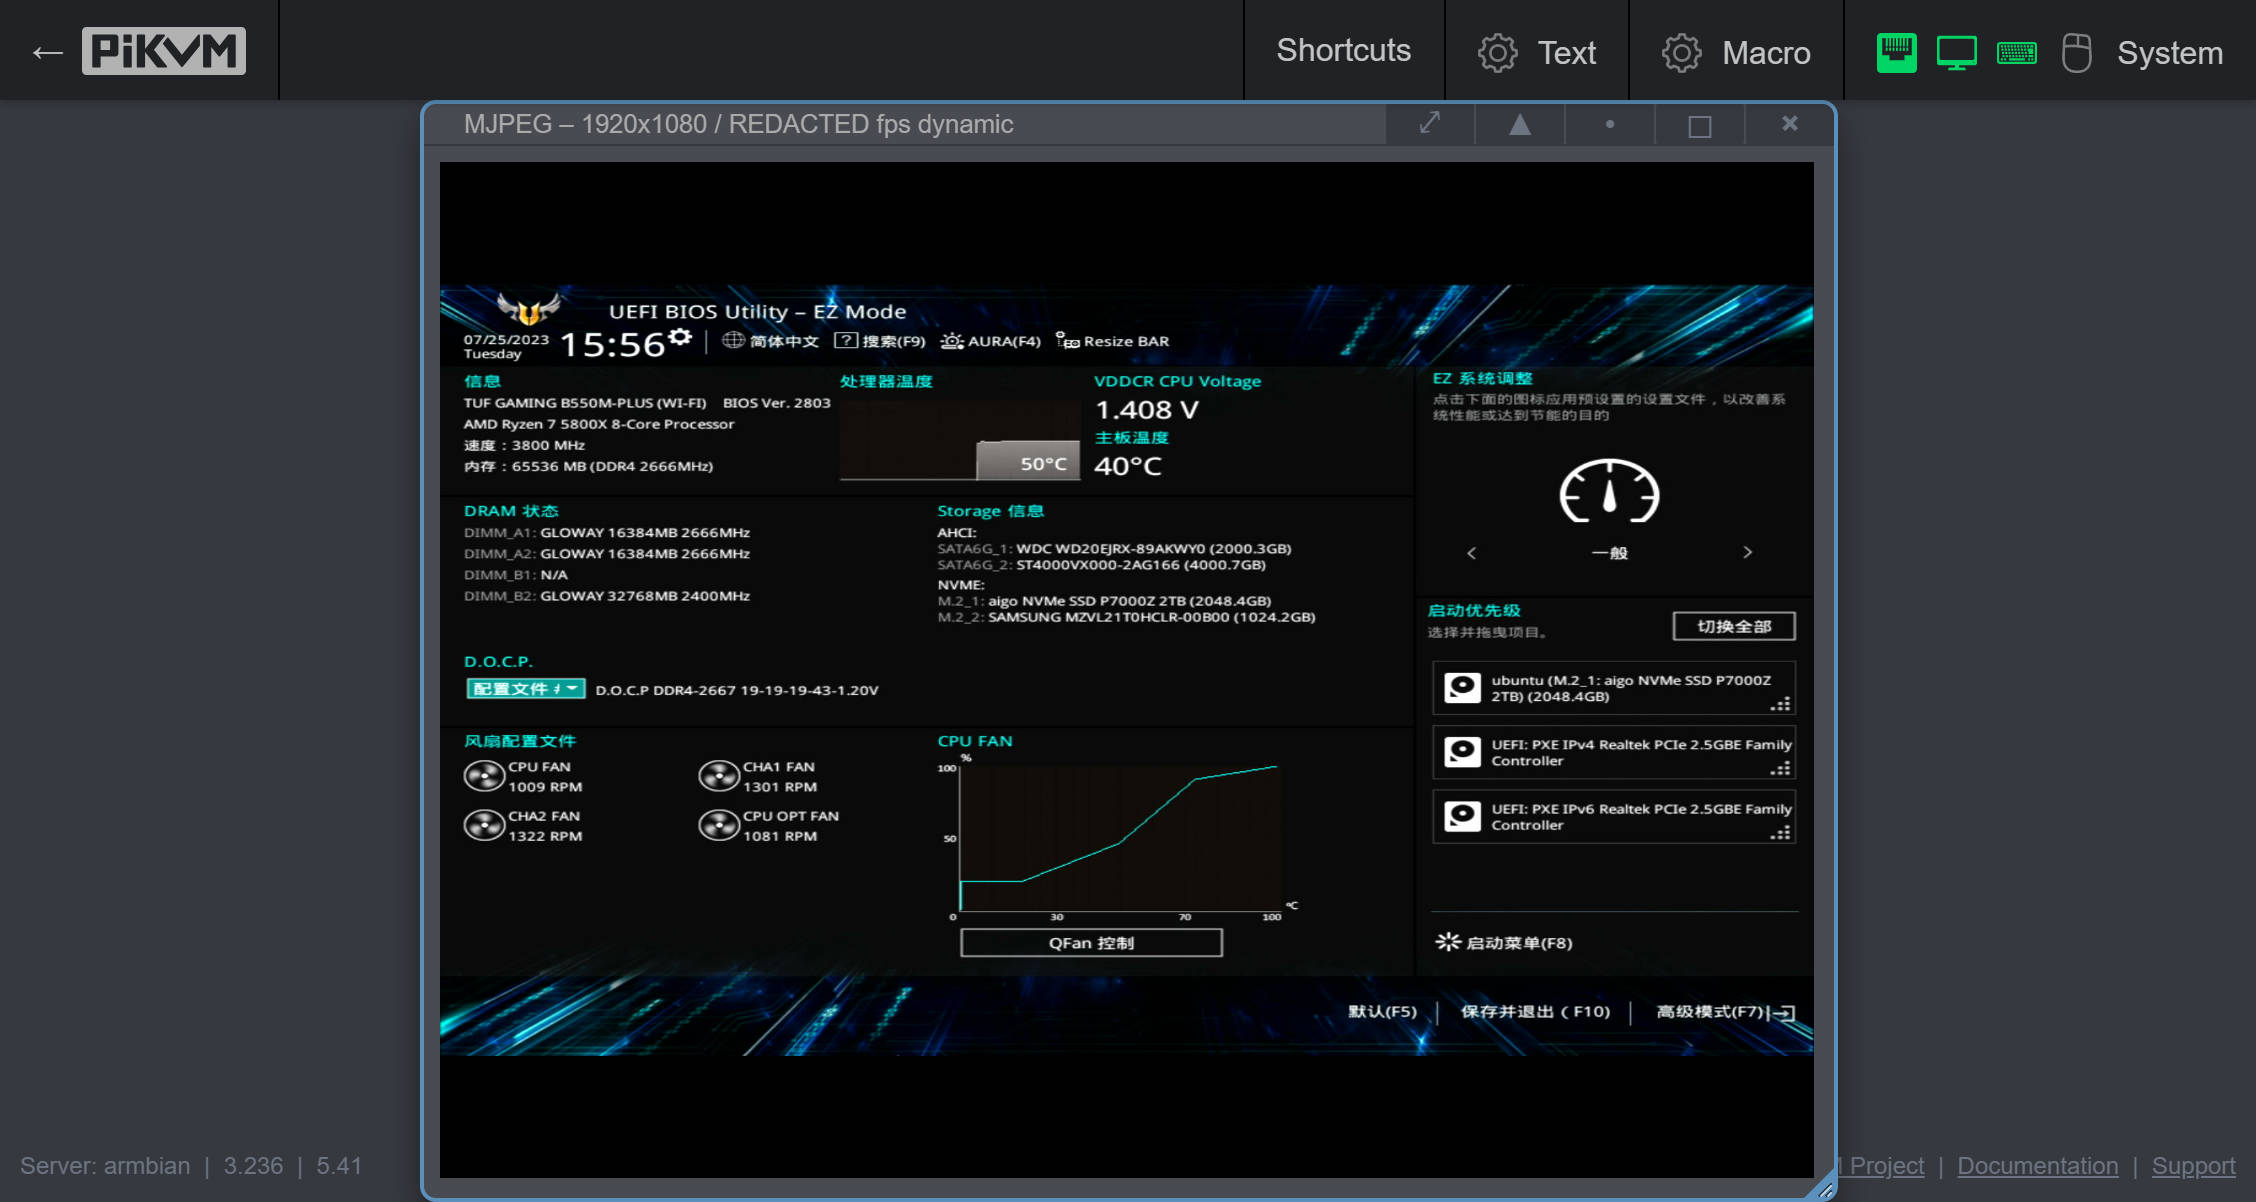
/usr/bin/ustreamer --device=/dev/kvmd-video --persistent --format=mjpeg --resolution=1280x720 --desired-fps=40 --drop-same-frames=30 --last-as-blank=0 --unix=/run/kvmd/ustreamer.sock --unix-rm --unix-mode=0660 --exit-on-parent-death --process-name-prefix=kvmd/streamer --notify-parent --no-log-colors --sink=kvmd::ustreamer::jpeg --sink-mode=0660 --slowdown
USB2.0 3.0 驱动区别

linux 查看 usb 视频设备
KVM 没有画面
最后发现买的 ms2130 在 linux 下,usb3.0 无法工作。只能 usb 接口插入一半,使其成为 2.0 时,linux 下才能正常工作。
报错,说设备不支持视频捕获。也就是采集卡不能用。
Jul 23 09:18:17 king3399 kvmd[382354]: kvmd.apps.kvmd.streamer           INFO --- => -- INFO  [36009.992    stream] -- Device fd=9 opened
Jul 23 09:18:17 king3399 kvmd[382354]: kvmd.apps.kvmd.streamer           INFO --- => -- ERROR [36009.992    stream] -- Video capture is not supported by device
Jul 23 09:18:17 king3399 kvmd[382354]: kvmd.apps.kvmd.streamer           INFO --- => -- INFO  [36009.992    stream] -- Device fd=9 closed
ms2109
[Tue Jul 25 14:54:59 2023] usb 1-3: new high-speed USB device number 8 using xhci_hcd
[Tue Jul 25 14:55:06 2023] usb 1-3: new high-speed USB device number 9 using xhci_hcd
[Tue Jul 25 14:55:06 2023] usb 1-3: New USB device found, idVendor=1de1, idProduct=f105, bcdDevice= 4.09
[Tue Jul 25 14:55:06 2023] usb 1-3: New USB device strings: Mfr=1, Product=2, SerialNumber=3
[Tue Jul 25 14:55:06 2023] usb 1-3: Product: Display capture-UVC05
[Tue Jul 25 14:55:06 2023] usb 1-3: Manufacturer: Actions Micro
[Tue Jul 25 14:55:06 2023] usb 1-3: SerialNumber: -1877663977
[Tue Jul 25 14:55:06 2023] usb 1-3: Found UVC 1.00 device Display capture-UVC05 (1de1:f105)
[Tue Jul 25 14:55:06 2023] usb 1-3: Warning! Unlikely big volume range (=7248), cval->res is probably wrong.
[Tue Jul 25 14:55:06 2023] usb 1-3: [3] FU [Mic Capture Volume] ch = 1, val = -7264/-16/1


➜  ~ v4l2-ctl --list-formats-ext
ioctl: VIDIOC_ENUM_FMT
        Type: Video Capture

        [0]: 'MJPG' (Motion-JPEG, compressed)
                Size: Discrete 1920x1080
                        Interval: Discrete 0.017s (60.000 fps)
                        Interval: Discrete 0.033s (30.000 fps)
                        Interval: Discrete 0.067s (15.000 fps)
                        Interval: Discrete 0.017s (60.000 fps)
                        Interval: Discrete 0.033s (30.000 fps)
                        Interval: Discrete 0.067s (15.000 fps)
                Size: Discrete 1360x768
                        Interval: Discrete 0.017s (60.000 fps)
                        Interval: Discrete 0.033s (30.000 fps)
                        Interval: Discrete 0.067s (15.000 fps)
                Size: Discrete 1280x1024
                        Interval: Discrete 0.017s (60.000 fps)
                        Interval: Discrete 0.033s (30.000 fps)
                        Interval: Discrete 0.067s (15.000 fps)
                Size: Discrete 1280x960
                        Interval: Discrete 0.017s (60.000 fps)
                        Interval: Discrete 0.033s (30.000 fps)
                        Interval: Discrete 0.067s (15.000 fps)
                Size: Discrete 1280x720
                        Interval: Discrete 0.017s (60.000 fps)
                        Interval: Discrete 0.033s (30.000 fps)
                        Interval: Discrete 0.067s (15.000 fps)
                Size: Discrete 1024x768
                        Interval: Discrete 0.017s (60.000 fps)
                        Interval: Discrete 0.033s (30.000 fps)
                        Interval: Discrete 0.067s (15.000 fps)
                Size: Discrete 800x600
                        Interval: Discrete 0.017s (60.000 fps)
                        Interval: Discrete 0.033s (30.000 fps)
                        Interval: Discrete 0.067s (15.000 fps)
                Size: Discrete 720x576
                        Interval: Discrete 0.017s (60.000 fps)
                        Interval: Discrete 0.033s (30.000 fps)
                        Interval: Discrete 0.067s (15.000 fps)
                Size: Discrete 720x480
                        Interval: Discrete 0.017s (60.000 fps)
                        Interval: Discrete 0.033s (30.000 fps)
                        Interval: Discrete 0.067s (15.000 fps)
                Size: Discrete 640x480
                        Interval: Discrete 0.017s (60.000 fps)
                        Interval: Discrete 0.033s (30.000 fps)
                        Interval: Discrete 0.067s (15.000 fps)


➜  ~ v4l2-ctl --all
Driver Info:
        Driver name      : uvcvideo
        Card type        : Display capture-UVC05: Display
        Bus info         : usb-0000:02:00.0-3
        Driver version   : 5.15.99
        Capabilities     : 0x84a00001
                Video Capture
                Metadata Capture
                Streaming
                Extended Pix Format
                Device Capabilities
        Device Caps      : 0x04200001
                Video Capture
                Streaming
                Extended Pix Format
Media Driver Info:
        Driver name      : uvcvideo
        Model            : Display capture-UVC05: Display
        Serial           : -1877663977
        Bus info         : usb-0000:02:00.0-3
        Media version    : 5.15.99
        Hardware revision: 0x00000409 (1033)
        Driver version   : 5.15.99
Interface Info:
        ID               : 0x03000002
        Type             : V4L Video
Entity Info:
        ID               : 0x00000001 (1)
        Name             : Display capture-UVC05: Display
        Function         : V4L2 I/O
        Flags            : default
        Pad 0x01000007   : 0: Sink
          Link 0x0200000d: from remote pad 0x100000a of entity 'Processing 2' (Video Pixel Formatter): Data, Enabled, Immutable
Priority: 2
Video input : 0 (Camera 1: ok)
Format Video Capture:
        Width/Height      : 1920/1080
        Pixel Format      : 'MJPG' (Motion-JPEG)
        Field             : None
        Bytes per Line    : 0
        Size Image        : 3110400
        Colorspace        : sRGB
        Transfer Function : Rec. 709
        YCbCr/HSV Encoding: ITU-R 601
        Quantization      : Default (maps to Full Range)
        Flags             :
Crop Capability Video Capture:
        Bounds      : Left 0, Top 0, Width 1920, Height 1080
        Default     : Left 0, Top 0, Width 1920, Height 1080
        Pixel Aspect: 1/1
Selection Video Capture: crop_default, Left 0, Top 0, Width 1920, Height 1080, Flags:
Selection Video Capture: crop_bounds, Left 0, Top 0, Width 1920, Height 1080, Flags:
Streaming Parameters Video Capture:
        Capabilities     : timeperframe
        Frames per second: 60.000 (60/1)
        Read buffers     : 0

Camera Controls

                  auto_exposure 0x009a0901 (menu)   : min=0 max=3 default=0 value=0 (Auto Mode)
                                0: Auto Mode
ms2130
➜  ~ sudo dmesg --color=always -W
[264156.578383] usb 2-3: new SuperSpeed USB device number 2 using xhci_hcd
[264156.614502] usb 2-3: LPM exit latency is zeroed, disabling LPM.
[264156.639256] usb 2-3: New USB device found, idVendor=345f, idProduct=2130, bcdDevice=31.00
[264156.641654] usb 2-3: New USB device strings: Mfr=1, Product=2, SerialNumber=3
[264156.644154] usb 2-3: Product: USB3 Video
[264156.646540] usb 2-3: Manufacturer: MACROSILICON
[264156.648972] usb 2-3: SerialNumber: 20210623
[264156.676445] usb 2-3: Found UVC 1.00 device USB3 Video (345f:2130)
[264156.735960] hid-generic 0003:345F:2130.000F: hiddev0,hidraw0: USB HID v1.10 Device [MACROSILICON USB3 Video] on usb-0000:02:00.0-3/input4

Bus 002 Device 002: ID 345f:2130 MACROSILICON USB3 Video

➜  ~ v4l2-ctl --list-formats-ext
ioctl: VIDIOC_ENUM_FMT
        Type: Video Capture

        [0]: 'YUYV' (YUYV 4:2:2)
                Size: Discrete 3840x2160
                        Interval: Discrete 0.056s (18.000 fps)
                Size: Discrete 2560x1600
                        Interval: Discrete 0.020s (50.000 fps)
                        Interval: Discrete 0.033s (30.000 fps)
                        Interval: Discrete 0.050s (20.000 fps)
                        Interval: Discrete 0.100s (10.000 fps)
                Size: Discrete 2560x1440
                        Interval: Discrete 0.020s (50.000 fps)
                        Interval: Discrete 0.033s (30.000 fps)
                        Interval: Discrete 0.050s (20.000 fps)
                        Interval: Discrete 0.100s (10.000 fps)
                Size: Discrete 2048x1152
                        Interval: Discrete 0.017s (60.000 fps)
                        Interval: Discrete 0.020s (50.000 fps)
                        Interval: Discrete 0.033s (30.000 fps)
                        Interval: Discrete 0.050s (20.000 fps)
                        Interval: Discrete 0.100s (10.000 fps)
                Size: Discrete 2048x1080
                        Interval: Discrete 0.017s (60.000 fps)
                        Interval: Discrete 0.020s (50.000 fps)
                        Interval: Discrete 0.033s (30.000 fps)
                        Interval: Discrete 0.050s (20.000 fps)
                        Interval: Discrete 0.100s (10.000 fps)
                Size: Discrete 1920x2160
                        Interval: Discrete 0.017s (60.000 fps)
                        Interval: Discrete 0.020s (50.000 fps)
                        Interval: Discrete 0.033s (30.000 fps)
                        Interval: Discrete 0.050s (20.000 fps)
                        Interval: Discrete 0.100s (10.000 fps)
                Size: Discrete 1920x1200
                        Interval: Discrete 0.017s (60.000 fps)
                        Interval: Discrete 0.020s (50.000 fps)
                        Interval: Discrete 0.033s (30.000 fps)
                        Interval: Discrete 0.050s (20.000 fps)
                        Interval: Discrete 0.100s (10.000 fps)
                Size: Discrete 1920x1080
                        Interval: Discrete 0.017s (60.000 fps)
                        Interval: Discrete 0.020s (50.000 fps)
                        Interval: Discrete 0.033s (30.000 fps)
                        Interval: Discrete 0.050s (20.000 fps)
                        Interval: Discrete 0.100s (10.000 fps)
                Size: Discrete 1360x768
                        Interval: Discrete 0.017s (60.000 fps)
                        Interval: Discrete 0.020s (50.000 fps)
                        Interval: Discrete 0.033s (30.000 fps)
                        Interval: Discrete 0.050s (20.000 fps)
                        Interval: Discrete 0.100s (10.000 fps)
                Size: Discrete 1280x1024
                        Interval: Discrete 0.017s (60.000 fps)
                        Interval: Discrete 0.020s (50.000 fps)
                        Interval: Discrete 0.033s (30.000 fps)
                        Interval: Discrete 0.050s (20.000 fps)
                        Interval: Discrete 0.100s (10.000 fps)
                Size: Discrete 1280x960
                        Interval: Discrete 0.017s (60.000 fps)
                        Interval: Discrete 0.020s (50.000 fps)
                        Interval: Discrete 0.033s (30.000 fps)
                        Interval: Discrete 0.050s (20.000 fps)
                        Interval: Discrete 0.100s (10.000 fps)
                Size: Discrete 1280x720
                        Interval: Discrete 0.017s (60.000 fps)
                        Interval: Discrete 0.020s (50.000 fps)
                        Interval: Discrete 0.033s (30.000 fps)
                        Interval: Discrete 0.050s (20.000 fps)
                        Interval: Discrete 0.100s (10.000 fps)
                Size: Discrete 1024x768
                        Interval: Discrete 0.017s (60.000 fps)
                        Interval: Discrete 0.020s (50.000 fps)
                        Interval: Discrete 0.033s (30.000 fps)
                        Interval: Discrete 0.050s (20.000 fps)
                        Interval: Discrete 0.100s (10.000 fps)
                Size: Discrete 720x480
                        Interval: Discrete 0.017s (60.000 fps)
                        Interval: Discrete 0.020s (50.000 fps)
                        Interval: Discrete 0.033s (30.000 fps)
                        Interval: Discrete 0.050s (20.000 fps)
                        Interval: Discrete 0.100s (10.000 fps)
                Size: Discrete 640x480
                        Interval: Discrete 0.017s (60.000 fps)
                        Interval: Discrete 0.020s (50.000 fps)
                        Interval: Discrete 0.033s (30.000 fps)
                        Interval: Discrete 0.050s (20.000 fps)
                        Interval: Discrete 0.100s (10.000 fps)
        [1]: 'MJPG' (Motion-JPEG, compressed)
                Size: Discrete 3840x2160
                        Interval: Discrete 0.056s (18.000 fps)
                Size: Discrete 2560x1600
                Size: Discrete 2560x1440
                        Interval: Discrete 0.020s (50.000 fps)
                        Interval: Discrete 0.033s (30.000 fps)
                        Interval: Discrete 0.050s (20.000 fps)
                        Interval: Discrete 0.100s (10.000 fps)
                Size: Discrete 2048x1152
                        Interval: Discrete 0.017s (60.000 fps)
                        Interval: Discrete 0.020s (50.000 fps)
                        Interval: Discrete 0.033s (30.000 fps)
                        Interval: Discrete 0.050s (20.000 fps)
                        Interval: Discrete 0.100s (10.000 fps)
                Size: Discrete 2048x1080
                Size: Discrete 1920x2160
                Size: Discrete 1920x1200
                Size: Discrete 1920x1080
                Size: Discrete 1360x768
                Size: Discrete 1280x1024
                Size: Discrete 1280x960
出问题
➜  ~ sudo dmesg --color=always --ctime -W
[Tue Jul 25 16:47:39 2023] usb 1-3: new high-speed USB device number 29 using xhci_hcd
[Tue Jul 25 16:47:39 2023] usb 1-3: New USB device found, idVendor=345f, idProduct=2130, bcdDevice=21.00
[Tue Jul 25 16:47:39 2023] usb 1-3: New USB device strings: Mfr=1, Product=5, SerialNumber=7
[Tue Jul 25 16:47:39 2023] usb 1-3: Product: USB2 Video
[Tue Jul 25 16:47:39 2023] usb 1-3: Manufacturer: MACROSILICON
[Tue Jul 25 16:47:39 2023] usb 1-3: SerialNumber: 20210621
[Tue Jul 25 16:47:39 2023] usb 1-3: Found UVC 1.00 device USB2 Video (345f:2130)
[Tue Jul 25 16:47:39 2023] hid-generic 0003:345F:2130.0012: hiddev0,hidraw0: USB HID v1.10 Device [MACROSILICON USB2 Video] on usb-0000:02:00.0-3/input4
[Tue Jul 25 16:47:39 2023] usb 1-3: USB disconnect, device number 29
[Tue Jul 25 16:47:49 2023] usb usb2-port3: Cannot enable. Maybe the USB cable is bad?
[Tue Jul 25 16:47:53 2023] usb 1-3: new high-speed USB device number 31 using xhci_hcd
[Tue Jul 25 16:47:53 2023] usb usb2-port3: Cannot enable. Maybe the USB cable is bad?
[Tue Jul 25 16:47:57 2023] usb usb2-port3: Cannot enable. Maybe the USB cable is bad?
[Tue Jul 25 16:48:01 2023] usb usb2-port3: Cannot enable. Maybe the USB cable is bad?
[Tue Jul 25 16:48:05 2023] usb usb2-port3: Cannot enable. Maybe the USB cable is bad?
[Tue Jul 25 16:48:09 2023] usb usb2-port3: Cannot enable. Maybe the USB cable is bad?
[Tue Jul 25 16:48:20 2023] usb 1-3: new high-speed USB device number 32 using xhci_hcd
[Tue Jul 25 16:48:21 2023] usb 1-3: New USB device found, idVendor=345f, idProduct=2130, bcdDevice=21.00
[Tue Jul 25 16:48:21 2023] usb 1-3: New USB device strings: Mfr=1, Product=5, SerialNumber=7
[Tue Jul 25 16:48:21 2023] usb 1-3: Product: USB2 Video
[Tue Jul 25 16:48:21 2023] usb 1-3: Manufacturer: MACROSILICON
[Tue Jul 25 16:48:21 2023] usb 1-3: SerialNumber: 20210621
[Tue Jul 25 16:48:21 2023] usb 1-3: Found UVC 1.00 device USB2 Video (345f:2130)
[Tue Jul 25 16:48:21 2023] hid-generic 0003:345F:2130.0013: hiddev0,hidraw0: USB HID v1.10 Device [MACROSILICON USB2 Video] on usb-0000:02:00.0-3/input4
[Tue Jul 25 16:50:24 2023] usb 1-3: USB disconnect, device number 32
[Tue Jul 25 16:50:44 2023] usb usb2-port3: Cannot enable. Maybe the USB cable is bad?
- ms2109 在 windows 下能正常工作
- 在 linux 下,ustream 报
-- INFO  [268879.670    stream] -- Device fd=8 opened
-- INFO  [268879.670    stream] -- Using input channel: 0
-- INFO  [268879.685    stream] -- Using resolution: 640x480
-- ERROR [268879.685    stream] -- Could not obtain the requested pixelformat=YUYV; driver gave us MJPEG
-- INFO  [268879.685    stream] -- Falling back to pixelformat=MJPEG
-- INFO  [268879.685    stream] -- Using pixelformat: MJPEG
-- INFO  [268879.700    stream] -- Using HW FPS: 0 -> 60 (coerced)
-- ERROR [268879.700    stream] -- Device does not support setting of HW encoding quality parameters
-- INFO  [268879.700    stream] -- Using IO method: MMAP
-- INFO  [268879.702    stream] -- Requested 5 device buffers, got 5
-- INFO  [268879.704    stream] -- Capturing started
-- INFO  [268879.704    stream] -- Switching to HW encoder: the input is (M)JPEG ...
-- INFO  [268879.704    stream] -- Using JPEG quality: encoder default
-- INFO  [268879.704    stream] -- Creating pool JPEG with 1 workers ...
-- INFO  [268879.704    stream] -- Capturing ...
-- ERROR [268880.714    stream] -- Mainloop select() error: Inappropriate ioctl for device
-- INFO  [268880.714    stream] -- Destroying workers pool JPEG ...
-- INFO  [268880.715    stream] -- Capturing stopped
-- INFO  [268880.715    stream] -- Device fd=8 closed

[Tue Jul 25 17:04:36 2023] uvcvideo 1-3:1.1: Non-zero status (-71) in video completion handler.
ms2130 插 USB3.0 没有反应,USB2.0,windows 和 linux 都能正常工作。
开发板 USB2.0 无反应
使用 ustream 测试是否能够使用
pikvm/ustreamer: µStreamer - Lightweight and fast MJPEG-HTTP streamer (github.com)
ms2109
-- INFO  [266472.324    stream] -- Device fd=8 opened
-- INFO  [266472.324    stream] -- Using input channel: 0
-- INFO  [266472.339    stream] -- Using resolution: 1920x1080
-- INFO  [266472.339    stream] -- Using pixelformat: MJPEG
-- INFO  [266472.354    stream] -- Using HW FPS: 0 -> 60 (coerced)
-- ERROR [266472.354    stream] -- Device does not support setting of HW encoding quality parameters
-- INFO  [266472.354    stream] -- Using IO method: MMAP
-- INFO  [266472.357    stream] -- Requested 5 device buffers, got 5
-- INFO  [266472.360    stream] -- Capturing started
-- INFO  [266472.360    stream] -- Switching to HW encoder: the input is (M)JPEG ...
-- INFO  [266472.360    stream] -- Using JPEG quality: encoder default
-- INFO  [266472.360    stream] -- Creating pool JPEG with 1 workers ...
-- INFO  [266472.360    stream] -- Capturing ...
-- ERROR [266473.375    stream] -- Mainloop select() error: Inappropriate ioctl for device
-- INFO  [266473.375    stream] -- Destroying workers pool JPEG ...
-- INFO  [266473.377    stream] -- Capturing stopped
-- INFO  [266473.379    stream] -- Device fd=8 closed
[Tue Jul 25 16:24:26 2023] uvcvideo 1-3:1.1: Non-zero status (-71) in video completion handler.
[Tue Jul 25 16:24:26 2023] uvcvideo 1-3:1.1: Non-zero status (-71) in video completion handler.
[Tue Jul 25 16:24:26 2023] uvcvideo 1-3:1.1: Non-zero status (-71) in video completion handler.
键盘问题
报错情况
插入主板 usb2.0 接口,ryzen dmesg,几种错误如下
usbhid 1-8:1.1: can't add hid device: -110usb usb1-port8: Cannot enable. Maybe the USB cable is bad?usbhid 1-8:1.1: can't add hid device: -71
# error 1
➜  ~ sudo dmesg --color=always --ctime -W
[Tue Jul 25 22:01:09 2023] usb 1-8: new high-speed USB device number 126 using xhci_hcd
[Tue Jul 25 22:01:09 2023] usb 1-8: device descriptor read/64, error -71
[Tue Jul 25 22:01:10 2023] usb 1-8: New USB device found, idVendor=1d6b, idProduct=0104, bcdDevice= 1.00
[Tue Jul 25 22:01:10 2023] usb 1-8: New USB device strings: Mfr=1, Product=2, SerialNumber=3
[Tue Jul 25 22:01:10 2023] usb 1-8: Product: Composite KVM Device
[Tue Jul 25 22:01:10 2023] usb 1-8: Manufacturer: PiKVM
[Tue Jul 25 22:01:10 2023] usb 1-8: SerialNumber: CAFEBABE
[Tue Jul 25 22:01:10 2023] input: PiKVM Composite KVM Device as /devices/pci0000:00/0000:00:01.2/0000:02:00.0/usb1/1-8/1-8:1.0/0003:1D6B:0104.0104/input/input257
[Tue Jul 25 22:01:10 2023] hid-generic 0003:1D6B:0104.0104: input,hidraw0: USB HID v1.01 Keyboard [PiKVM Composite KVM Device] on usb-0000:02:00.0-8/input0
[Tue Jul 25 22:01:56 2023] usbhid 1-8:1.1: can't add hid device: -110
[Tue Jul 25 22:01:56 2023] usbhid: probe of 1-8:1.1 failed with error -110
[Tue Jul 25 22:02:42 2023] usbhid 1-8:1.2: can't add hid device: -110
[Tue Jul 25 22:02:42 2023] usbhid: probe of 1-8:1.2 failed with error -110
[Tue Jul 25 22:02:42 2023] usb 1-8: USB disconnect, device number 126


# error 2
[Tue Jul 25 22:02:44 2023] usb 1-8: new high-speed USB device number 127 using xhci_hcd
[Tue Jul 25 22:02:44 2023] usb 1-8: device descriptor read/all, error -71
[Tue Jul 25 22:02:45 2023] usb usb1-port8: Cannot enable. Maybe the USB cable is bad?
[Tue Jul 25 22:02:45 2023] usb usb1-port8: attempt power cycle
[Tue Jul 25 22:02:46 2023] usb 1-8: new high-speed USB device number 6 using xhci_hcd
[Tue Jul 25 22:02:46 2023] usb 1-8: Device not responding to setup address.
[Tue Jul 25 22:02:46 2023] usb 1-8: Device not responding to setup address.
[Tue Jul 25 22:02:46 2023] usb 1-8: device not accepting address 6, error -71


# error 3
[Tue Jul 25 22:02:47 2023] usb 1-8: new high-speed USB device number 7 using xhci_hcd
[Tue Jul 25 22:02:47 2023] usb 1-8: New USB device found, idVendor=1d6b, idProduct=0104, bcdDevice= 1.00
[Tue Jul 25 22:02:47 2023] usb 1-8: New USB device strings: Mfr=1, Product=2, SerialNumber=3
[Tue Jul 25 22:02:47 2023] usb 1-8: Product: Composite KVM Device
[Tue Jul 25 22:02:47 2023] usb 1-8: Manufacturer: PiKVM
[Tue Jul 25 22:02:47 2023] usb 1-8: SerialNumber: CAFEBABE
[Tue Jul 25 22:02:47 2023] input: PiKVM Composite KVM Device as /devices/pci0000:00/0000:00:01.2/0000:02:00.0/usb1/1-8/1-8:1.0/0003:1D6B:0104.0105/input/input258
[Tue Jul 25 22:02:47 2023] hid-generic 0003:1D6B:0104.0105: input,hidraw0: USB HID v1.01 Keyboard [PiKVM Composite KVM Device] on usb-0000:02:00.0-8/input0
[Tue Jul 25 22:02:47 2023] usbhid 1-8:1.1: can't add hid device: -71
[Tue Jul 25 22:02:47 2023] usbhid: probe of 1-8:1.1 failed with error -71
[Tue Jul 25 22:02:47 2023] usbhid f1-8:1.2: can't add hid device: -71
[Tue Jul 25 22:02:47 2023] usbhid: probe of 1-8:1.2 failed with error -71
[Tue Jul 25 22:02:47 2023] usb 1-8: USB disconnect, device number 7
正常的情况
发现 otg 键盘接 windows 是没问题的,然后发现 ryzen 使用 usb 3.0 接口没问题 dmesg
[Tue Jul 25 22:04:38 2023] usb 3-3.3: reset low-speed USB device number 28 using xhci_hcd
[Tue Jul 25 22:04:39 2023] usb 3-3.1: reset full-speed USB device number 34 using xhci_hcd
[Tue Jul 25 22:20:12 2023] usb 3-4: new high-speed USB device number 35 using xhci_hcd
[Tue Jul 25 22:20:12 2023] usb 3-4: New USB device found, idVendor=1d6b, idProduct=0104, bcdDevice= 1.00
[Tue Jul 25 22:20:12 2023] usb 3-4: New USB device strings: Mfr=1, Product=2, SerialNumber=3
[Tue Jul 25 22:20:12 2023] usb 3-4: Product: Composite KVM Device
[Tue Jul 25 22:20:12 2023] usb 3-4: Manufacturer: PiKVM
[Tue Jul 25 22:20:12 2023] usb 3-4: SerialNumber: CAFEBABE
[Tue Jul 25 22:20:12 2023] input: PiKVM Composite KVM Device as /devices/pci0000:00/0000:00:08.1/0000:0a:00.3/usb3/3-4/3-4:1.0/0003:1D6B:0104.0106/input/input259
[Tue Jul 25 22:20:12 2023] hid-generic 0003:1D6B:0104.0106: input,hidraw0: USB HID v1.01 Keyboard [PiKVM Composite KVM Device] on usb-0000:0a:00.3-4/input0
[Tue Jul 25 22:20:12 2023] input: PiKVM Composite KVM Device as /devices/pci0000:00/0000:00:08.1/0000:0a:00.3/usb3/3-4/3-4:1.1/0003:1D6B:0104.0107/input/input260
[Tue Jul 25 22:20:12 2023] hid-generic 0003:1D6B:0104.0107: input,hidraw1: USB HID v1.01 Mouse [PiKVM Composite KVM Device] on usb-0000:0a:00.3-4/input1
[Tue Jul 25 22:20:12 2023] input: PiKVM Composite KVM Device as /devices/pci0000:00/0000:00:08.1/0000:0a:00.3/usb3/3-4/3-4:1.2/0003:1D6B:0104.0108/input/input261
[Tue Jul 25 22:20:12 2023] hid-generic 0003:1D6B:0104.0108: input,hidraw2: USB HID v1.01 Mouse [PiKVM Composite KVM Device] on usb-0000:0a:00.3-4/input2
lsusb 可以看到新出的设备
给 Web 添加证书
kvm 网站使用 nginx,配置位于/etc/kvmd/nginx/nginx.conf,证书相关配置位于 /etc/kvmd/nginx/ssl.conf
http {
        include /etc/kvmd/nginx/kvmd.ctx-http.conf;
        include /usr/share/kvmd/extras/*/nginx.ctx-http.conf;
        server {
                include /etc/kvmd/nginx/listen-http.conf;
                include /etc/kvmd/nginx/certbot.ctx-server.conf;
                include /etc/kvmd/nginx/redirect-to-https.conf;
        }

        server {
                include /etc/kvmd/nginx/listen-https.conf;
                include /etc/kvmd/nginx/ssl.conf;
                include /etc/kvmd/nginx/kvmd.ctx-server.conf;
                include /usr/share/kvmd/extras/*/nginx.ctx-server.conf;
        }
}
# /etc/kvmd/nginx/ssl.conf
ssl_protocols TLSv1.3 TLSv1.2 TLSv1.1 TLSv1;
ssl_ciphers "EECDH+AESGCM:EDH+AESGCM:AES256+EECDH:AES256+EDH";
ssl_certificate /etc/kvmd/nginx/ssl/server.crt;
ssl_certificate_key /etc/kvmd/nginx/ssl/server.key;
add_header Strict-Transport-Security "max-age=31536000; includeSubDomains" always;
因此我在我更新证书的机器上添加一个定时任务即可。
#!/usr/bin/bash

scp '/root/.acme.sh/*.yfycloud.site_ecc/fullchain.cer' king6:/etc/kvmd/nginx/ssl/server.crt
scp '/root/.acme.sh/*.yfycloud.site_ecc/*.yfycloud.site.key' king6:/etc/kvmd/nginx/ssl/server.key
ssh king6 'systemctl restart kvmd-nginx'
遇到的问题
wg-quick 无法自启动
Aug 07 23:17:57 king3399 wg-quick[1167]: [#] ip link add wg0 type wireguard
Aug 07 23:17:57 king3399 wg-quick[1167]: [#] wg setconf wg0 /dev/fd/63
Aug 07 23:17:57 king3399 wg-quick[1241]: Name or service not known: `op1.my.to:51820'
Aug 07 23:17:57 king3399 wg-quick[1241]: Configuration parsing error
Aug 07 23:17:57 king3399 wg-quick[1167]: [#] ip link delete dev wg0
Aug 07 23:17:58 king3399 systemd[1]: wg-quick@wg0.service: Main process exited, code=exited, status=1/FAILURE
PI-KVM 文档
- ustreamer 项目也是他们的
- kvmd
DIY: pikvm/pikvm: Open and inexpensive DIY IP-KVM based on Raspberry Pi (github.com)
mouse 类型 (absolute vs relative)
Mouse modes - PiKVM Handbook There are two modes of pointer device: absolute and relative.
By default, PiKVM uses absolute positioning mode as the most convenient for the user and software. However, this is not always supported by the BIOS/UEFI. For such cases, support is provided for the relative mode of operation, which can be enabled in the config.
Dynamic USB configuration - PiKVM Handbook 由于 bios 貌似对 absolute 鼠标兼容性不够好,可以直接禁用
In rare cases, the host BIOS/UEFI may not understand such a large number of emulated devices on single USB port, so some of them may need to be disabled.
The
kvmd-otgconfutility allows you to view and modify the USB configuration on the fly. It requires root permission and can be used for example from a web terminal.
查看当前 otg usb 配置
FAQ
Can I use PiKVM for gaming?
No, because:
- For HDMI-CSI bridge, bus bandwidth is not enough to transmit more than 1080p50.
- For HDMI-USB dongle, high latency and low video quality.
- General hardware video capture differs from software streaming and introduces additional latency.
Can I use PiKVM with non-Raspberry Pi boards (Orange, Nano, etc)?
Yes, but you will have to prepare the operating system yourself. For the PiKVM software, you will need to replace some config files (such as UDEV rules). If you are a developer or an experienced system administrator, you will not have any problems with this. In addition, we are open to patches. If you need help with this, please contact us via Discord (#unofficial_ports channel).
video problem
https://docs.pikvm.org/faq/#video-problems
CSI bridge vs USB dongle
The dongle is completely supported and PiKVM works great with it. But it has some disadvantages compared with recommended HDMI-CSI bridge: USB gives a lot of latency (200ms vs 100ms for MJPEG) and it doesn't support stream compression control (you won't be able to use PiKVM in a place with a poor internet connection). There is no H.264 support at the moment. It also cannot automatically detect screen resolution. All this is caused by the hardware limitations of the dongle itself. In addition, some users report hardware problems: the dongle may not work in the BIOS or simply stop working after a while. It's a black box, and no one knows what's inside it. If you have problems with it, it will not be possible to fix them.
开机 DIY 方案
ATX PWR 引脚
台式机的开关机,是由主板上的一组引脚控制的。主板手册中会把这些引脚叫做前面板引脚,因为这些引脚用于连接机箱前面板的一些 I/O。这些引脚,通常有 4 组。其中 PWR 和 RST 用于控制开关机和 Reset。而 PWR LED 和 HDD LED 用于在前面板显示开机状态和硬盘活动状态。
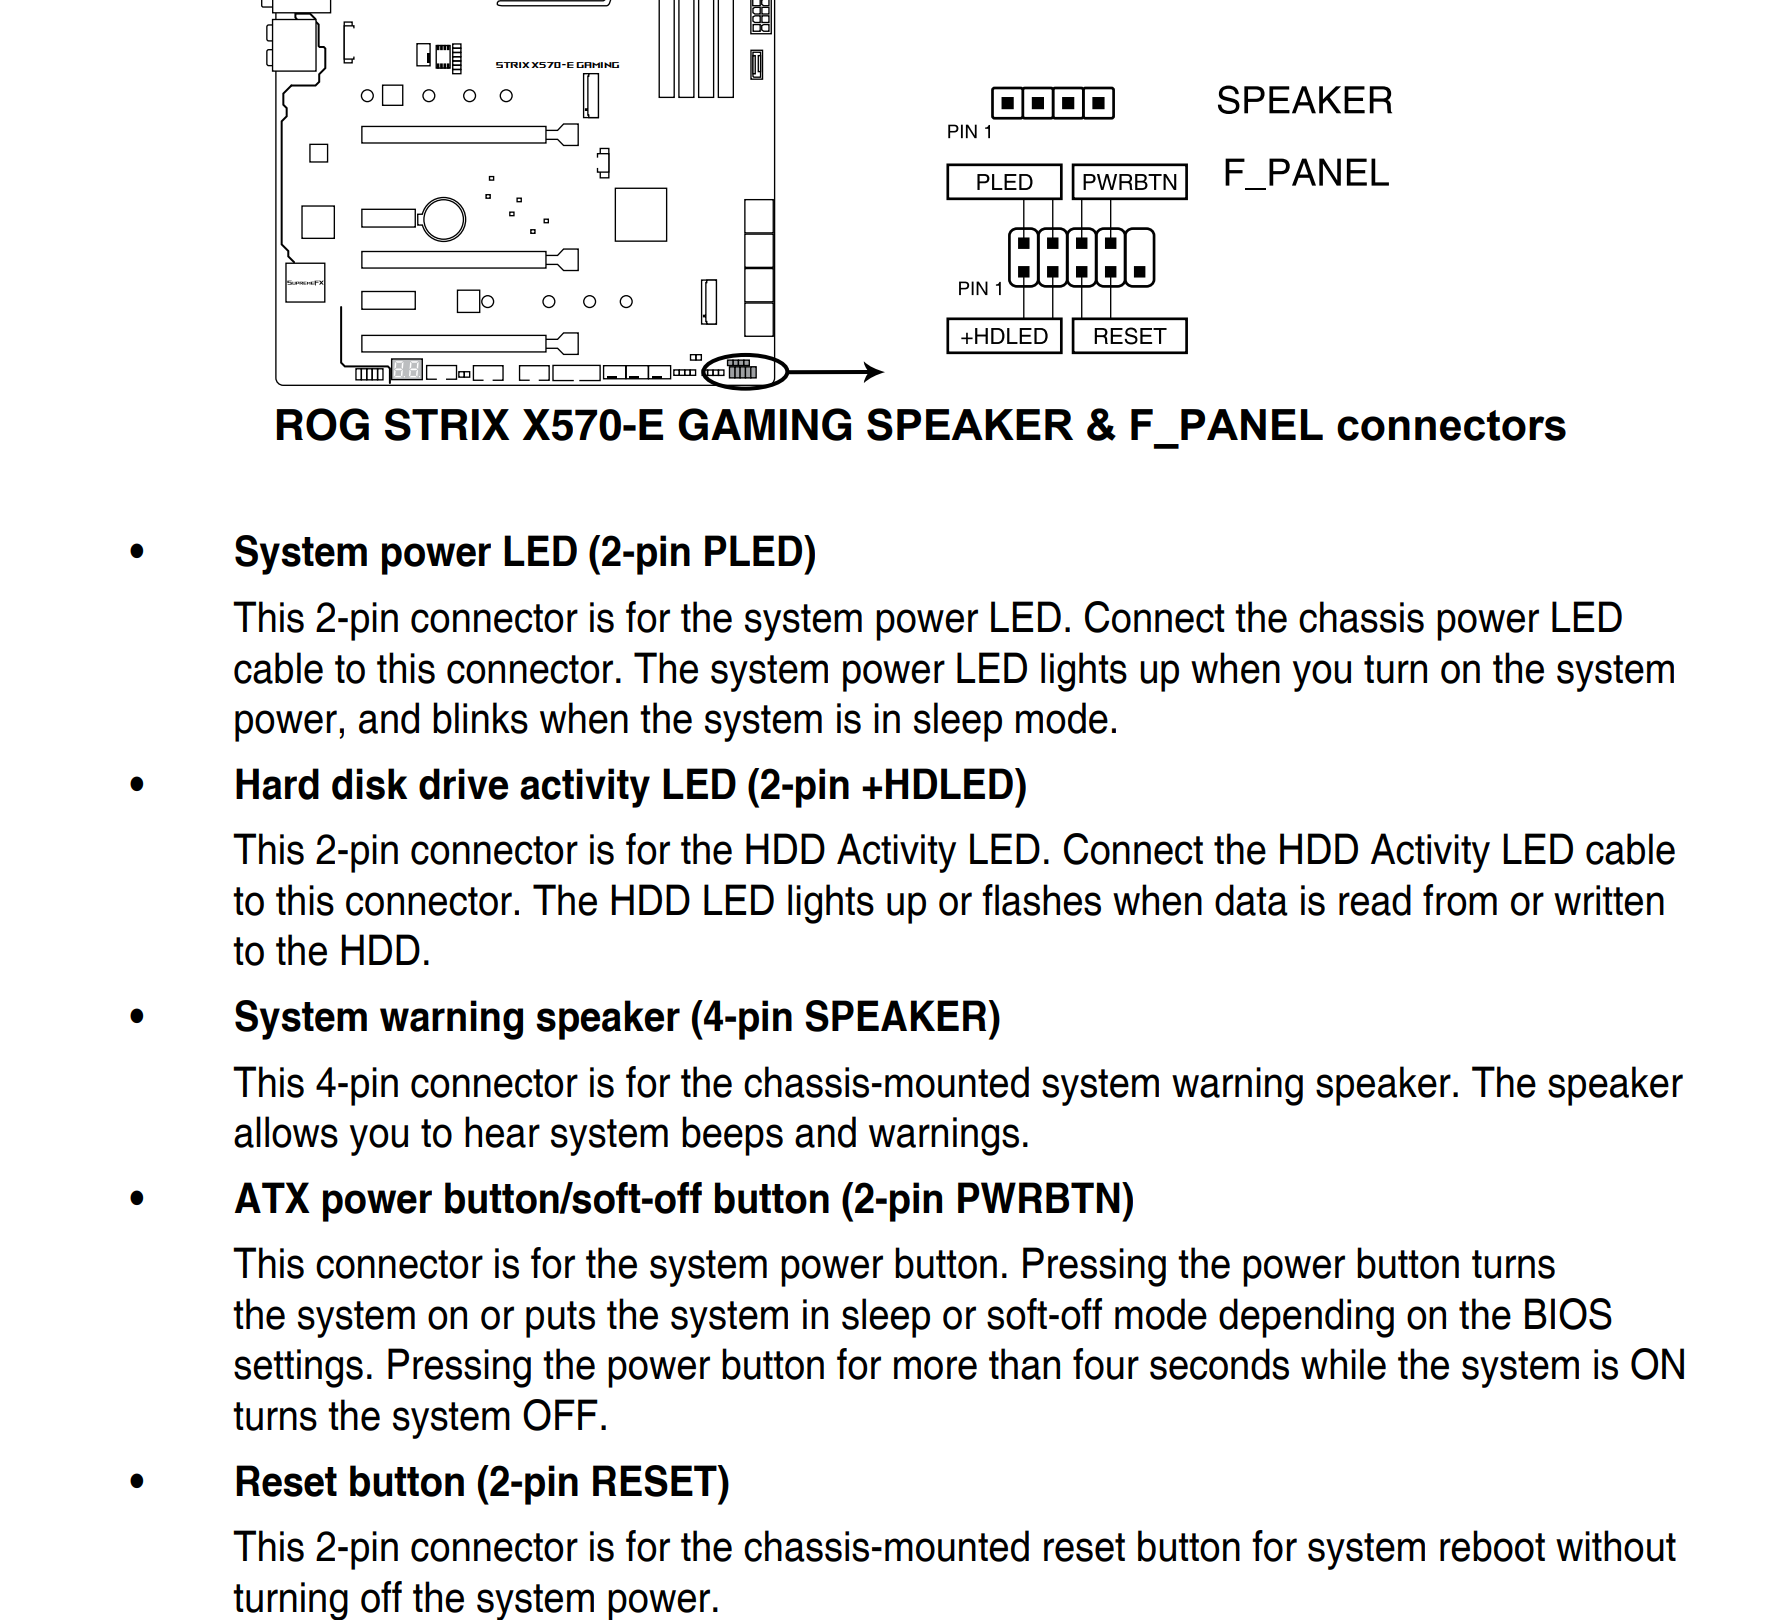
华硕 b550 重炮手主板手册内容如下。# 表示低电平有效。
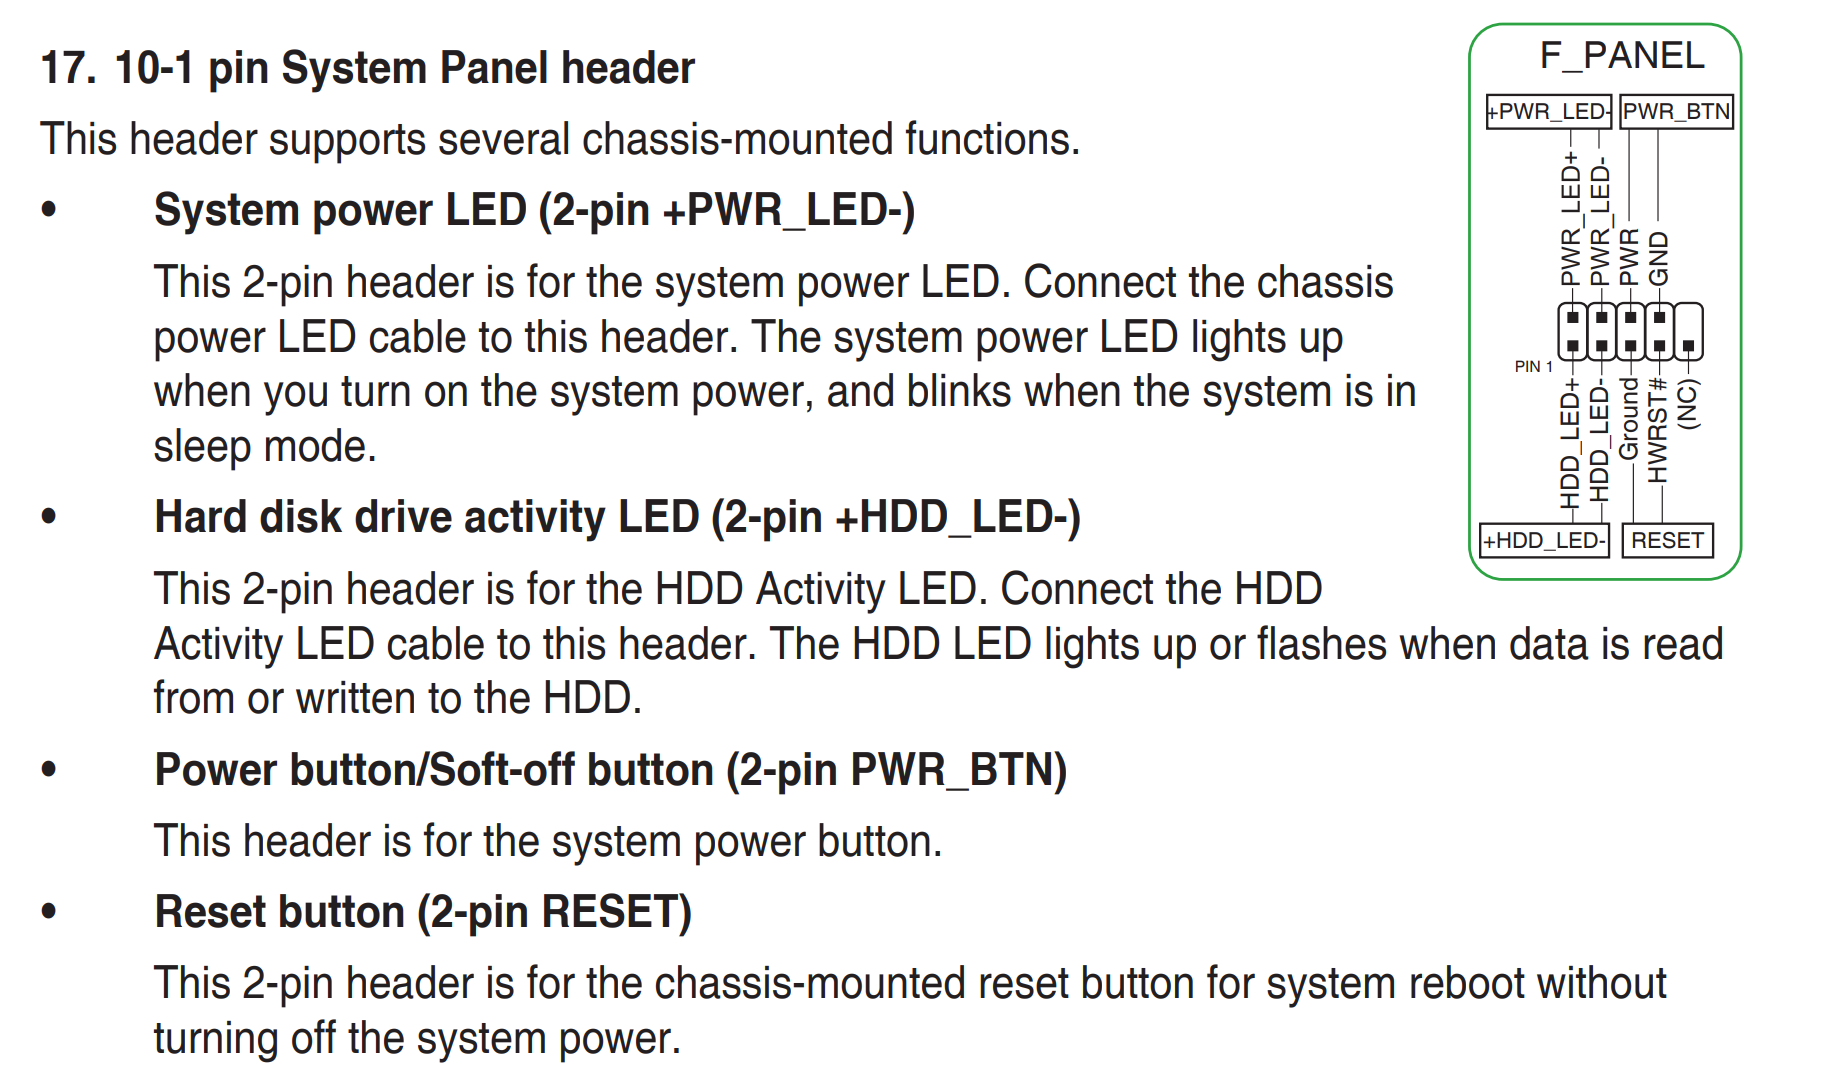
这是华硕 ROG Strix X570 的手册内容
Pi KVM 的方案
Pi KVM 的方案:ATX control board - PiKVM Handbook
连线
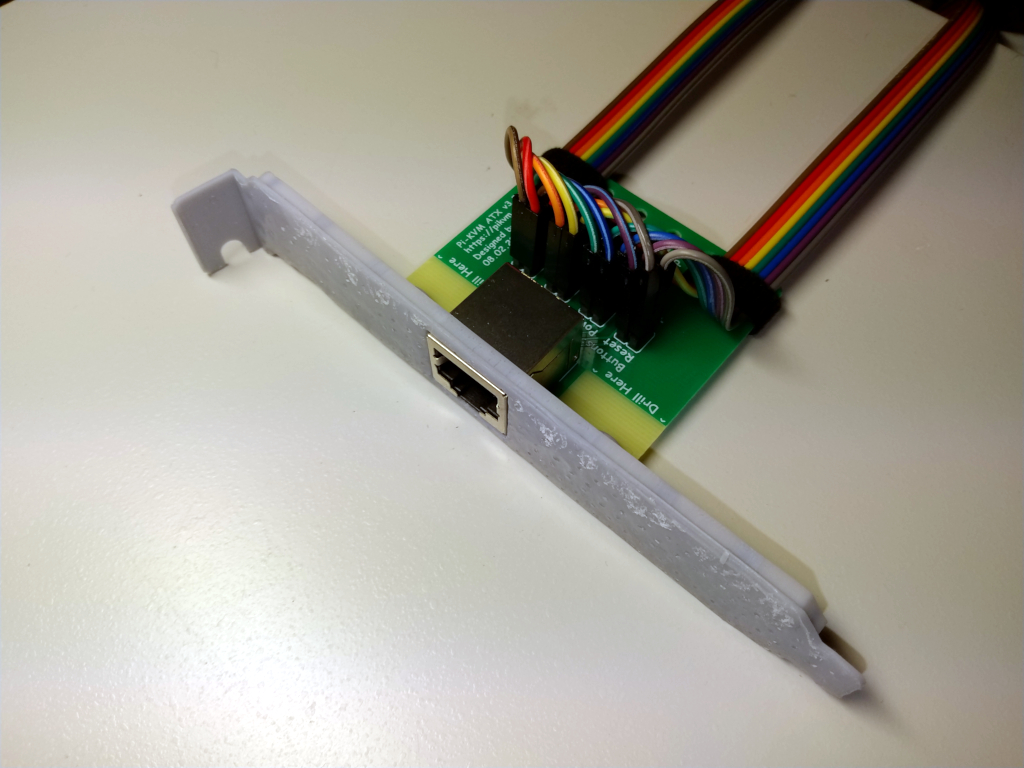
Pi KVM 方案的原理就是~~通过 GPIO 控制 ATX PWR 等引脚~~,通过 GPIO 控制光耦继电器开关,短接 PWR 引脚(电源键按下也是短接 PWR 引脚)。特点是连线方式做了优化。
- 首先,PIKVM 有一个板子用于将 atx 控制线转成 RJ45。板子可以 3d 打印一个 pcie slot 支架。这样,ATX 控制线就可以通过 pcie slot 暴露到机箱外了。
GPIO 控制
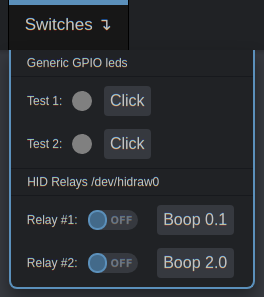
GPIO (pins, relays, lamps, etc) - PiKVM Handbook
Pi KVM 自己实现了一套对 GPIO 的控制方法,使用 yaml 配置文件配置。抽象了一些高级行为,这样就不用自己去直接操作 GPIO 驱动了。比如可以配置 pulse 模式,delay 时间等。
使用 Pi KVM 的方法,甚至还可以配置 Web 中显示的样式。实现自定义的按钮等。
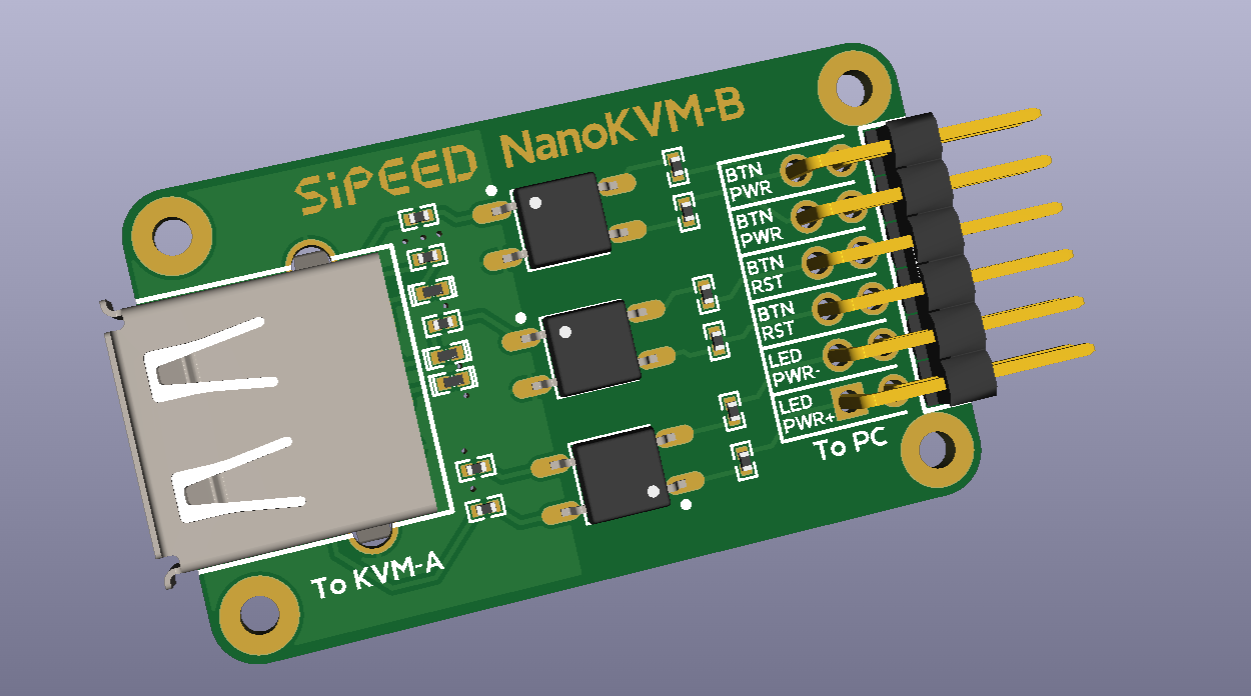
nanoKVM
其实除了像 PiKVM 使用 RJ45 引出 GPIO,还可以使用 usb 引出 GPIO,毕竟只是引脚。
主板 GPIO 转 usb
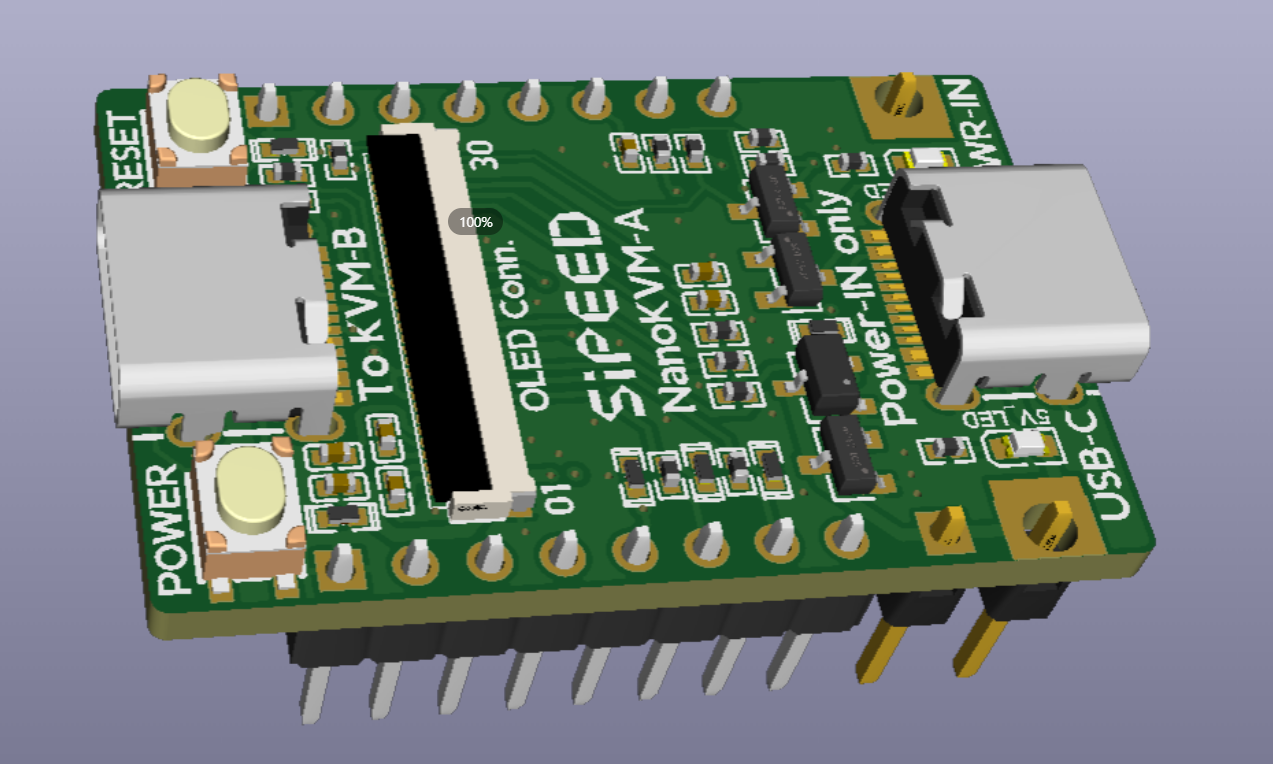
usb 接光耦继电器接 ATX PWR 引脚
SBC DIY 方案
自己使用普通单板计算机 DIY 有两种方案
- SBC 的 GPIO 直接连接 ATX 引脚
- 引入一个继电器,继电器连接台式机开机键。SBC 控制继电器的开和关。
不同主板引脚电压定义可能不同,第一种方案存在一定问题。
UPDATE(2024-07-17):我发现有一个误解,以为这里的 PWR+,- 需要产生高/低电平信号才行。其实这里两个引脚短接就能触发。这里讨论的 GPIO 直连方案,其实是因为短接的效果是让一边变为 GND(假设两根引脚 PWR, GND 布局),所以 GPIO 将其拉低能起到一样的效果。GPIO 直连方案的有点可能在于省了一个继电器(2-3 元)。
Tg 对话记录
请教下需要买什么线连接呢?gpio 和 ATX 引脚间需要继电器吗?有没有博客教程? 跟atx没关系 直接连到开机键前面板连接器上
我觉得你共地之后就可以直接去拉主板的电平了( 啊,那种模块也行 不过为什么不直接去拉电平呢
因为你不知道该拉哪根线,拉高还是拉低,拉错了还可能短路
梓瑶 | struct virt_dma_chan *, [2024/6/29 2:44] 肯定是拉 PWR_BUT# 啊,ATX 那边的引脚既然悬空状态也稳定并且低电平有效肯定有内部上拉,外部只需要手动拉低掉就可以了(
t, [2024/6/29 2:46] ATX那边引脚 你拉了也不一定开机
t, [2024/6/29 2:46] 最好的办法还是控制电源按钮
t, [2024/6/29 2:46] 像这种PW+ PW-
t, [2024/6/29 2:46] 你怎么知道拉哪一个
梓瑶 | struct virt_dma_chan *, [2024/6/29 2:47] 对地测一下电压就好了啊(
t, [2024/6/29 2:47] 一个3.3,一个0,你拉哪个?
t, [2024/6/29 2:48] 万一3.3那个是VCC,0那个才是实际控制的?
t, [2024/6/29 2:48] 你根本不知道
好吧( 我一直基于一个是 PWR# 一个是 GND 的板子在思考(我只遇到过这样的
King3399 GPIO 控制
资料手册
需要什么资料手册
- King3399底板-硬件规格书_20180105.pdf
- 包含了板子接口,对应的引脚定义。
- 比如可以知道板子上某个引脚为 GPIO 引脚,定义为 IO4_C5。通过计算得到对应的编号,从而在 linux 中进行控制。
- 包含了板子接口,对应的引脚定义。
- KING3399-20180712原理图.pdf
- 包含了所有的电路,但是不知道上面的引脚怎么看,怎么和实际板子对应起来。
Rockchip RK3399 datasheet,显示了 SoC 包含的 GPIO 资源。
GPIO
- 5 groups of GPIO (GPIO0~GPIO4), totally have 122 GPIOs
- All of GPIOs can be used to generate interrupt to CPU
- GPIO0 and GPIO1 can be used to wakeup system from low-power mode
- The pull direction (pull-up or pull-down) for all of GPIOs are software programmable
- All of GPIOs are always in input direction in default after power-on-reset
- The drive strength for all of GPIOs is software-programmable
两种控制 gpio 的方式
重新编译镜像方式
为了方便客户使用gpio,我们做了一个驱动导出了gpio控制节点供用户控制gpio的状态
- 适用平台:支持荣品大部分平台
- 适用对象:有能力修改编译源码
- 重新编译源码,烧录镜像后,方才生效
- 打开主设备树文件,如rp-rk3399:
kernel/arch/arm/boot/dts/rp3399-linux.dts -
找到 rp_gpio 节点添加配置
- 示例:配置GPIO5_C0功能输出功能
- 开发板上控制配置好的gpio:
  cat /proc/rp_gpio/gpio1b7 # 读取
  echo 1 > /proc/rp_gpio/gpio1b7 # 拉高
  echo 0 > /proc/rp_gpio/gpio1b7 # 拉低
更详细的配置和使用说明请查看网盘: 02-软件文档/荣品文档/驱动调试/GPIO
控制任意 GPIO
适用平台:任何支持 gpiolib 的平台 适用对象:不想编译SDK的情况下,亦可控制GPIO
GPIO 编号计算
GPIO编号 = BANK 32 + GPIO_PIN
GPIO<N>_<M><P> = N 32 + 8 * (M -1) + P
示例:
- GPIO7_C2 = 7 X 32 + 8 X (3-1) + 2 = 242
- GPIO2_A1 = 2 X 32 + 8 X (1-1) + 1 = 73
A对应1,B对应2,C对应3,以此类推
注意事项
1、通过原理图谨慎确认对应GPIO口连接情况,若操作不当,会造成严重后果 2、并非所有GPIO都能控制,若操作失败,请更换GPIO尝试 3、系统重启后需要重新导出GPIO、设置模式
示例:设置GPIO2_D1为高电平
- 导出GPIO2_D1引脚
- echo 89 > /sys/class/gpio/export
- 导出成功后,会生成/sys/class/gpio/gpio89目录
- 若没有生成,说明该引脚不可导出
- 设置GPIO2_D1引脚为输出模式
- echo out > /sys/class/gpio/gpio89/direction
- 设置GPIO2_D1引脚高电平
- echo 1 > /sys/class/gpio/gpio89/value
示例:读取GPIO7_C2电平
- 导出GPIO7_C2引脚
- echo 242 > /sys/class/gpio/export
- 设置GPIO7_C2引脚为输出模式
- echo in > /sys/class/gpio/gpio242/direction
- 设置GPIO7_C2引脚高电平
- cat /sys/class/gpio/gpio242/value
查看 GPIO 方式(ChatGPT)
嵌入式开发板,如何查看当前的所有 GPIO
- 使用
/sys/class/gpio文件系统- 查看已导出的 GPIO 引脚,如
gpio503 - 查看可用的 GPIO 芯片,如
gpiochip0,gpiochip1等。查看这些目录可以了解每个芯片上的 GPIO 引脚范围。
- 查看已导出的 GPIO 引脚,如
- 使用
gpioinfo命令- 如果系统上安装了
libgpiod工具集,可以使用gpioinfo命令来查看所有 GPIO 引脚的信息。libgpiod是一个新的 GPIO 控制库和工具集,旨在替代/sys/class/gpio接口。- apt-get install gpiod
- 如果系统上安装了
- 查看设备树(Device Tree)
- 在一些嵌入式系统中,GPIO 引脚配置在设备树文件中,可以通过查看设备树来了解 GPIO 引脚的信息。
- 设备树文件通常位于
/boot/目录或/proc/device-tree/目录中 - 设备树文件通常是二进制格式,可以使用
dtc(设备树编译器)来解码为人类可读的格式。例如:dtc -I dtb -O dts -o devicetree.dts /path/to/device-tree-file.dtb
- 查看开发板的文档和手册
实践
查看底板规格书。发现标号 18 的接口中(位于排针中一段),有几个 GPIO 引脚。
不清楚它的脚位是怎么数的。不过板子上也有文字,从文字和定义可以看出顺序。
| 脚位 | 定义 | 当前 IO 状态 | IO 电压 | 功能一 |
|---|---|---|---|---|
| 41 | SCL1 | 输出 | 1V8 | |
| 42 | SDA1 | 输入输出 | 1v8 | |
| 43 | ADC0 | 输入 | 1V8 | |
| 44 | IO4_C5 | 输入输出 | 3v | GPIO |
| 45 | IO4_D0 | 输入输出 | 3v | GPIO |
| 46 | GND | 接地 | 0v | |
| 47 | IO4_D5 | 输入输出 | 3v | GPIO |
| 48 | IO4_D1 | 输入输出 | 3v | GPIO |
| 49 | NC | NC | 0v | |
| 50 | GND | 接地 | 0v |
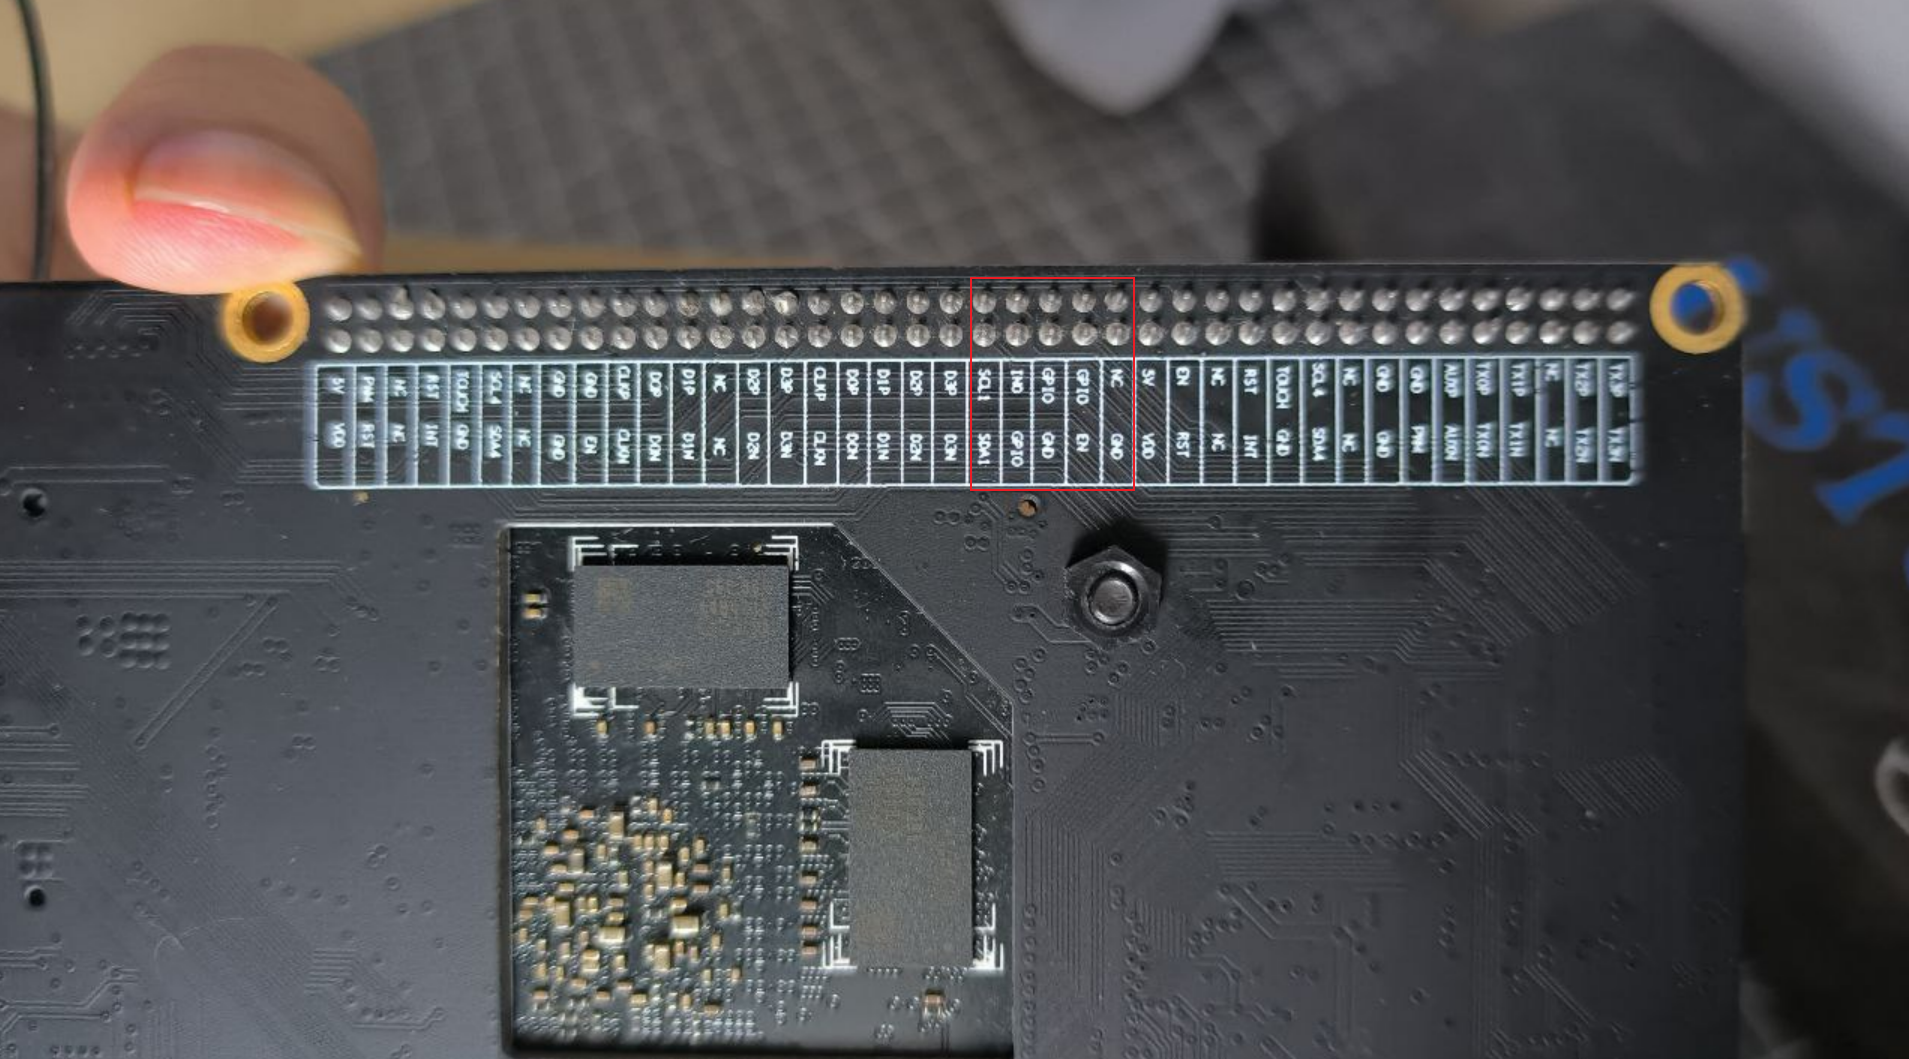
将 led 一端接在板子的 GND,一端接在上面 4 个 GPIO 中,发现接在 pin45 IO4_D0 上时,会和板子上的一个红色 led 灯同步闪烁。
之前也使用了 gpioinfo 查看了所有 GPIO 信息。可以猜测,IO4_D0 对应 gpiochip4 line 24 的 breathe_led
gpiochip4 - 32 lines:
        line   0:      unnamed       unused   input  active-high
        line   1:      unnamed       unused   input  active-high
        line   2:      unnamed       unused   input  active-high
        line   3:      unnamed       unused   input  active-high
        line   4:      unnamed       unused   input  active-high
        line   5:      unnamed       unused   input  active-high
        line   6:      unnamed       unused   input  active-high
        line   7:      unnamed       unused   input  active-high
        line   8:      unnamed       unused   input  active-high
        line   9:      unnamed       unused   input  active-high
        line  10:      unnamed       unused   input  active-high
        line  11:      unnamed       unused   input  active-high
        line  12:      unnamed       unused   input  active-high
        line  13:      unnamed       unused   input  active-high
        line  14:      unnamed       unused   input  active-high
        line  15:      unnamed       unused   input  active-high
        line  16:      unnamed       unused   input  active-high
        line  17:      unnamed       unused   input  active-high
        line  18:      unnamed       unused   input  active-high
        line  19:      unnamed       unused   input  active-high
        line  20:      unnamed       unused   input  active-high
        line  21:      unnamed       unused   input  active-high
        line  22:      unnamed "vcc3v3-gsm"  output  active-high [used]
        line  23:      unnamed       unused   input  active-high
        line  24:      unnamed "breathe_led" output active-low [used]
        line  25:      unnamed       unused   input  active-high
        line  26:      unnamed "vbus-typec-regulator" output active-high [used]
        line  27:      unnamed       unused  output  active-high
        line  28:      unnamed       unused   input  active-high
        line  29:      unnamed       unused   input  active-high
        line  30:      unnamed "vcc5v0-host-regulator" output active-high [used]
        line  31:      unnamed       unused   input  active-high
由此,可以发现剩余 3 个 gpio 都是 unused。通过前面的计算编号的方式,可以使用剩余 3 个 GPIO
io4_c5 = 21 = 149 io4_d0 = 24 io4_d5 = 29 = 157 io4_d1 = 25 = 153
dts
本来还想通过修改 dts 文件的方式使用 GPIO,最后发现并不能用。可能 rp_gpio 驱动没有集成,需要自己重新编译系统。
breathe_led 的 dts 配置
leds {
                compatible = "gpio-leds";
                pinctrl-names = "default";
                pinctrl-0 = <0xde>;

                led-breathe-led {
                        label = "breathe_led";
                        linux,default-trigger = "heartbeat";
                        default-state = "off";
                        gpios = <0xd4 0x18 0x01>;
                        phandle = <0x173>;
                };
        };
其中 0xd4 可以对应 pinctrl 中 gpio4 的 phandle
pinctrl {
                compatible = "rockchip,rk3399-pinctrl";
                rockchip,grf = <0x19>;
                rockchip,pmu = <0x11>;
                #address-cells = <0x02>;
                #size-cells = <0x02>;
                ranges;
                phandle = <0x139>;

                gpio@ff720000 {
                        compatible = "rockchip,gpio-bank";
                        reg = <0x00 0xff720000 0x00 0x100>;
                        clocks = <0x81 0x17>;
                        interrupts = <0x00 0x0e 0x04 0x00>;
                        gpio-controller;
                        #gpio-cells = <0x02>;
                        interrupt-controller;
                        #interrupt-cells = <0x02>;
                        phandle = <0x25>;
                };

                gpio@ff730000 {
                        compatible = "rockchip,gpio-bank";
                        reg = <0x00 0xff730000 0x00 0x100>;
                        clocks = <0x81 0x18>;
                        interrupts = <0x00 0x0f 0x04 0x00>;
                        gpio-controller;
                        #gpio-cells = <0x02>;
                        interrupt-controller;
                        #interrupt-cells = <0x02>;
                        phandle = <0x88>;
                };

                gpio@ff780000 {
                        compatible = "rockchip,gpio-bank";
                        reg = <0x00 0xff780000 0x00 0x100>;
                        clocks = <0x08 0x150>;
                        interrupts = <0x00 0x10 0x04 0x00>;
                        gpio-controller;
                        #gpio-cells = <0x02>;
                        interrupt-controller;
                        #interrupt-cells = <0x02>;
                        phandle = <0x44>;
                };

                gpio@ff788000 {
                        compatible = "rockchip,gpio-bank";
                        reg = <0x00 0xff788000 0x00 0x100>;
                        clocks = <0x08 0x151>;
                        interrupts = <0x00 0x11 0x04 0x00>;
                        gpio-controller;
                        #gpio-cells = <0x02>;
                        interrupt-controller;
                        #interrupt-cells = <0x02>;
                        phandle = <0x20>;
                };

                gpio@ff790000 {
                        compatible = "rockchip,gpio-bank";
                        reg = <0x00 0xff790000 0x00 0x100>;
                        clocks = <0x08 0x152>;
                        interrupts = <0x00 0x12 0x04 0x00>;
                        gpio-controller;
                        #gpio-cells = <0x02>;
                        interrupt-controller;
                        #interrupt-cells = <0x02>;
                        phandle = <0xd4>;
                };
SIM 卡上网
使用EC20模块配合asterisk及freepbx实现短信转发和网络电话 | Sparktour's Blog
king3399 支持插入 4G模块