openwrt x86 升级
我的台式机 pve 充当软路由功能,包含一个 openwrt LXC 容器。该容器使用了很长时间,配置了 wiregurad,以及复杂的防火墙和路由规则。但是在一开始创建 lxc 容器时,rootfs 选择了 x86/generic 版本。该版本实质上是 32 位的系统
Generic is for 32-bit-only hardware (either old hardware or some Atom processors), should be i686 Linux architecture, will work on Pentium 4 and later. Use this only if your hardware can't run the 64-bit version.
虽然不知道会对性能等有多大影响,但是对于有点完美主义的人来说还是无法接受。因此研究如何将其升级到 64 位版本。
本来以为应该是一件很简单的事情,但是阅读 openwrt wiki 后,发现并没有想象中的简单。并且也学习到了一些关于镜像、分区、文件系统的知识。特此记录。
openwrt x86 的不同之处
x86 不同 target
openwrt 提供了不同的 target,用于适应不同老的或新的硬件
- 64 is for modern PC hardware (anything from around 2007 onward), it is built for 64-bit capable computers and has support for modern CPU features. Choose this unless you have good reasons not to.
- Generic is for 32-bit-only hardware (either old hardware or some Atom processors), should be i686 Linux architecture, will work on Pentium 4 and later. Use this only if your hardware can't run the 64-bit version.
- Legacy is for very old PC hardware, Pentium MMX, what is called i586 in Linux architecture support. It will miss a lot of features you want/need on modern hardware like multi-core support and support for more than 4GB of RAM, but will actually run on ancient hardware while other versions will not.
- Geode is a custom Legacy target customized for Geode SoCs, which are still in use in many (aging) networking devices, like the older Alix boards from PCEngines.
镜像分区布局

按照 root 分区文件系统格式的不同,主要提供了 ext4 和 squshfs 两种类型的镜像文件。ext4 可以利用全部的磁盘空间,而提供的 squshfs 镜像 root 分区默认只有 100MB。因此 x86 平台用的比较广泛的是 ext4 格式的镜像。 p.s 猜测是 ext4 支持配置成动态的大小,而 squshfs 文件系统的大小需要静态指定
- ext4-combined-efi.img.gz
- 包含 boot(其实是ESP分区,包含 grubx64.efi,并且也包含了 op 内核)和 root 分区。另外还有一个128 分区位于前 512 个扇区,用于兼容 BIOS 启动。 It has both the boot and root partitions and Master Boot Record (MBR) area with updated GRUB2.
- root 分区可以利用整块磁盘
- 无法使用Failsafe Mode和恢复出厂设置
- squashfs-combined-efi.img.gz
- 传统的 openwrt 磁盘布局。
- 16MB 的/boot 分区,用于存储 grub2 和 linux kernel
- 104MB 的 root 分区,包含只读的 squashfs 文件系统和可读写的 f2fs 文件系统(overlay)
- 任何额外的空间是未分配的
- 不带 efi 版本,表示采用 BIOS 启动而不是 EFI 启动。分区表为 dos 格式。
- ext4(squashfs)-rootfs.img.gz,没有分区表。用于仅更新 root 分区,不像combined镜像会覆盖整个磁盘。
- 另外还提供了 rootfs 的压缩文件rootfs.tar.gz(不是磁盘镜像文件)。rootfs 可以直接用于创建 lxc 容器。
fdisk 和 lsblk 均无法读取镜像文件系统类型。但是 parted 可以(第一次感到它的优势)
# openwrt-23.05.3-x86-64-generic-ext4-combined.img

Model: Loopback device (loopback)
Disk /dev/loop0: 126MB
Sector size (logical/physical): 512B/512B
Partition Table: msdos
Disk Flags:

Number  Start   End     Size    Type     File system  Flags
 1      262kB   17.0MB  16.8MB  primary  ext2         boot
 2      17.3MB  126MB   109MB   primary  ext2

# openwrt-23.05.3-x86-64-generic-ext4-combined-efi.img
(parted) p
Error: The backup GPT table is corrupt, but the primary appears OK, so that will be used.
OK/Cancel? o
Warning: Not all of the space available to /dev/loop3 appears to be used, you can fix the GPT to use all of the space (an extra 30 blocks) or
continue with the current setting?
Fix/Ignore? i
Model: Loopback device (loopback)
Disk /dev/loop3: 126MB
Sector size (logical/physical): 512B/512B
Partition Table: gpt
Disk Flags:

Number  Start   End     Size    File system  Name  Flags
128     17.4kB  262kB   245kB                      bios_grub
 1      262kB   17.0MB  16.8MB  fat16              legacy_boot
 2      17.0MB  126MB   109MB   ext2


# openwrt-23.05.3-x86-64-generic-ext4-rootfs.img
Model: Loopback device (loopback)
Disk /dev/loop2: 109MB
Sector size (logical/physical): 512B/512B
Partition Table: loop
Disk Flags:

Number  Start  End    Size   File system  Flags
 1      0.00B  109MB  109MB  ext2


# openwrt-23.05.3-x86-64-generic-squashfs-combined.img.gz
Model: Loopback device (loopback)
Disk /dev/loop4: 126MB
Sector size (logical/physical): 512B/512B
Partition Table: msdos
Disk Flags:

Number  Start   End     Size    Type     File system  Flags
 1      262kB   17.0MB  16.8MB  primary  ext2         boot
 2      17.3MB  126MB   109MB   primary


# openwrt-23.05.3-x86-64-generic-squashfs-combined-efi.img

(parted) p
Error: The backup GPT table is corrupt, but the primary appears OK, so that will be used.
OK/Cancel? o
Warning: Not all of the space available to /dev/loop1 appears to be used, you can fix the GPT to use all of the space (an extra 30 blocks) or continue with the current setting?
Fix/Ignore? i
Model: Loopback device (loopback)
Disk /dev/loop1: 126MB
Sector size (logical/physical): 512B/512B
Partition Table: gpt
Disk Flags:

Number  Start   End     Size    File system  Name  Flags
128     17.4kB  262kB   245kB                      bios_grub
 1      262kB   17.0MB  16.8MB  fat16              legacy_boot
 2      17.0MB  126MB   109MB
升级方法介绍
If your installation used the ext4-combined.img.gz image to install, there are several options for upgrading:
- Write a new
ext4-combined.img.gzimage: this is the simplest option and is identical to first installation: all data, configs, packages and extra partitions will be erased and you'll have a brand new OpenWrt system with default packages and configs. You will need to reinstall all packages, copy config files back, and create any additional partitions you require. - Use
sysupgrade: this is default upgrading procedure but the least recommended option for x86 machines. Proceed to Sysupgrade for details. - Extract the boot partition image from
ext4-combined.img.gzand write it and theext4-rootfs.img.gz, leaving the Master Boot Record and partition table intact. - Extract the boot partition image from
ext4-combined.img.gzand write it and then uncompress therootfs.tar.gzto the existing root filesystem.
不像传统 target,没有sysupgrade.bin文件。另外官方 wiki 也不推荐使用 sysupgrade 升级(命令行或者 luci):[OpenWrt Wiki] Upgrading OpenWrt firmware using CLI
Download and use only OpenWrt firmware images ending in “-sysupgrade.bin” for command line upgrades. For x86 systems there is no “sysupgrade” image, just be sure the new firmware image has the same family of filesystem as your old one.
基本上需要覆盖整个 rootfs,并且不建议直接覆盖,而是将 old 覆盖到 clean 的新版本上。
至于如何获得 rootfs,可以从 image 文件中提取
- loseup
- dd
ImageBuilder 自定义镜像
Image Builder 用于自定义镜像,而不用从源码编译。它从 openwrt 官方仓库下载 packages 并将其打包到一个镜像文件。
openwrt 有一个 Attendedsysupgrade Server,可以在线构建自定义的镜像
- 配合 luci 客户端,可以实现保持原本的软件并且升级系统,详情:openwrt/asu: An image on demand server for OpenWrt based distributions (github.com) 并且还提供了一个 grafana 图表,用于观察各 cpu,路由器占比:Attended Sysupgrade Server - Grafana (openwrt.org)
firmware selector 也可以自定义镜像,速度很快。如果只是需要添加额外的软件包,使用官方的是最方便的。
官方教程:[OpenWrt Wiki] Using the Image Builder
安装
从 openwrt 下载镜像页面下载
使用需要一些依赖
sudo apt install build-essential libncurses-dev libncursesw-dev \
zlib1g-dev gawk git gettext libssl-dev xsltproc rsync wget unzip python3
使用
(可选)修改仓库
repositories.conf
如果自己有编译 openwrt,那么可以编译时指定生成 image builder。这样还能避免从 openwrt 下载 package。
(可选)增加 root 分区大小
修改.config,单位 MB
(可选)添加自定义 files
openwrt 备份时不会保存的配置
- root 目录
- .zsh_history
- bbr 配置
编译(选择 package)
编译支持的环境变量
| Variable | Description |
|---|---|
PROFILE |
Specifies the target image to build |
PACKAGES |
A list of packages to embed into the image |
FILES |
Directory with custom files to include |
BIN_DIR |
Alternative output directory for the images |
EXTRA_IMAGE_NAME |
Add this to the output image filename (sanitized) |
DISABLED_SERVICES |
A list of services to disable |
make help
make info

make image \
PACKAGES="luci -dnsmasq dnsmasq-full kmod-tcp-bbr bash zsh vim-full tmux git git-http htop tcpdump mtr-json curl wget ss ip-full ethtool-full iputils-arping ncat conntrack ip-bridge iperf3 bind-dig tree file qrencode lsblk fdisk parted losetup resize2fs luci-app-ddns ddns-scripts-cloudflare luci-app-upnp luci-app-wireguard wireguard-tools kmod-wireguard luci-proto-ipip luci-proto-gre gre kmod-gre kmod-gre6 luci-proto-vxlan kmod-vxlan vxlan adguardhome zerotier python3" \
FILES="files"

make clean

# more
luci-app-shadowsocks-libev shadowsocks-libev-config shadowsocks-libev-ss-server
硬路由
luci -dnsmasq dnsmasq-full kmod-tcp-bbr bash zsh vim-full tmux git git-http htop tcpdump mtr-json curl wget ss ip-full ethtool-full iputils-arping ncat conntrack ip-bridge iperf3 bind-dig tree file qrencode lsblk fdisk parted losetup resize2fs luci-app-ddns ddns-scripts-cloudflare luci-app-upnp luci-app-wireguard wireguard-tools kmod-wireguard luci-proto-ipip luci-proto-gre gre kmod-gre kmod-gre6 luci-proto-vxlan kmod-vxlan vxlan adguardhome
-wpad-basic-mbedtls -wpad-openssl wpad-mesh-openssl
- 指定的包会自动安装依赖
- x86 不需要指定 profile,或者指定为 generic
➜  make info
Current Target: "x86/64"
Current Architecture: "x86_64"
...
Available Profiles:

generic:
    Generic x86/64
    ...
生成的输出
bin/targets/x86/64
LXC+ImageBuilder 升级
升级思路:利用 ImageBuilder 创建一个包含原来配置的新镜像。重新创建 LXC 容器即可。为了避免需要重新配置 lxc 容器其它内容(比如权限设置啥的),可以创建临时容器,然后将 root 虚拟磁盘替换掉原来的即可。
为什么不直接 rootfs 覆盖
一个思路是:给 op 添加一块磁盘。包含新版文件系统,然后在 op 内,将旧版 root 覆盖到新版上。最后交换两个文件系统。但是这样做的话,bin 等旧版二进制程序也复制过去了。 另一个思路是,上面的步骤,只复制 /etc/config 等,和下面 ImageBuilder 中添加的 FILES 相同。以后可以试试这种方法。
- 创建rootfs镜像 - 指定需要安装的 package。注意别忘了 luci - 由于安装了很多包,因此需要增大 root 分区大小 - FILES 添加备份的配置文件(包含/etc/config) - 不包含/etc/init.d/,因此 lxc dnsmasq jail 的问题还在 - 不包含/root,因此需要额外添加
- pve 使用 rootfs 镜像创建一个临时的 lxc 容器
bin/targets/x86/64/openwrt-23.05.0-x86-64-generic-rootfs.tar.gz - 将原本容器的用新容器的 disk 替代。ZFS 的话只需要 rename 旧 disk,然后 rename 新 disk 为旧名称即可
pct create 102 local:vztmpl/op2-openwrt-23.05.0-x86-64-generic-rootfs.tar.gz \
--storage local-zfs \
--ostype unmanaged \
--unprivileged 1 \
--arch amd64 \
--hostname op9 \
--rootfs local-zfs:1 \
--cores 4 \
--memory 512 \
--swap 0 \
--features keyctl=1,nesting=1
遇到问题
ssh Permission denied (publickey)
无法 ssh 连接
debug1: Next authentication method: publickey
debug1: Offering public key: /home/yfy/.ssh/id_rsa RSA SHA256:z9yheNzateaIikTVkTXN1lmMPRIsp+H0ssbhU4Q8Kfg
debug1: Authentications that can continue: publickey
debug1: No more authentication methods to try.
root@192.168.35.1: Permission denied (publickey).
dropbear 日志
Mon Oct 30 19:11:11 2023 authpriv.info dropbear[34648]: Child connection from 192.168.35.5:15786
Mon Oct 30 19:11:11 2023 authpriv.info dropbear[34648]: /etc/dropbear must be owned by user or root, and not writable by others
Mon Oct 30 19:11:11 2023 authpriv.info dropbear[34648]: Exit before auth from <192.168.35.5:15786>: (user 'root', 0 fails): Exited normally
解决
参考
- 官方 wiki:[OpenWrt Wiki] OpenWrt on x86 hardware (PC / VM / server)
- Upgrade version (x86) - Installing and Using OpenWrt - OpenWrt Forum
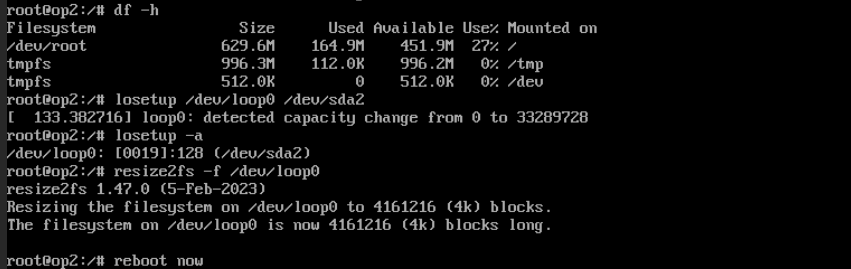
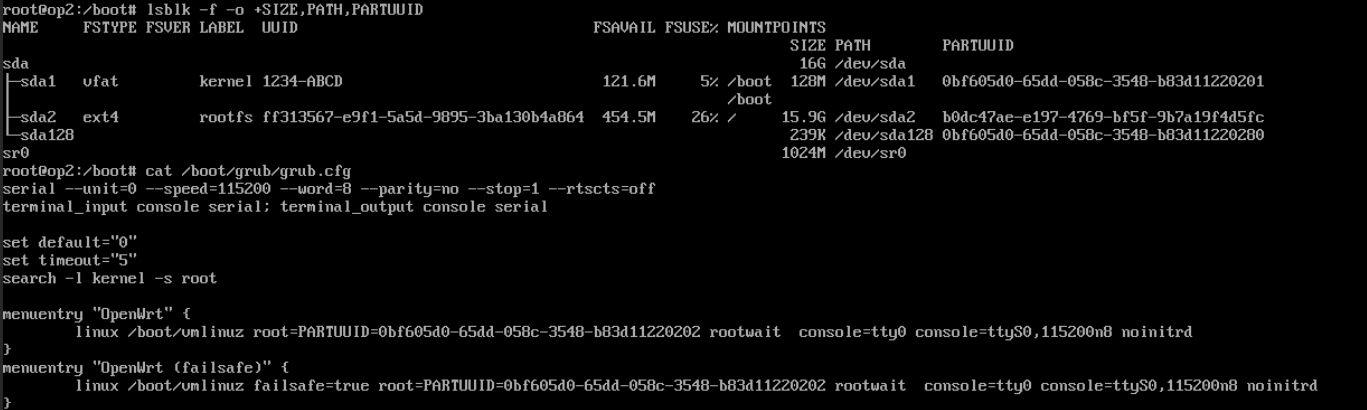
增加 root 磁盘大小
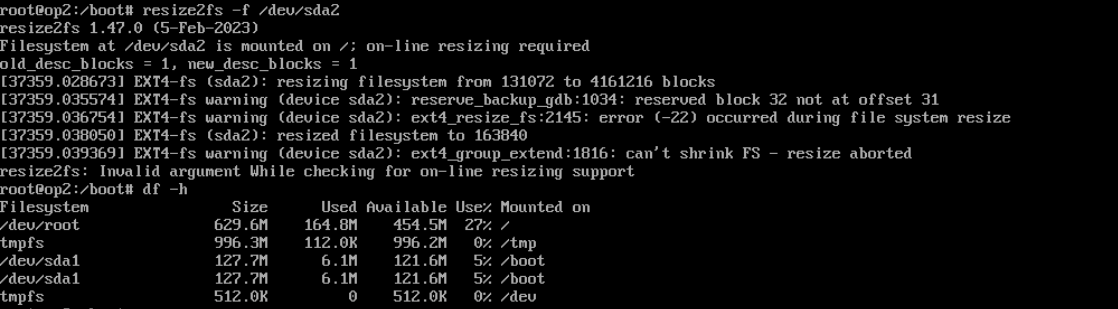
fdisk delet 再 create,会导致 PARTUUID 变化,从而导致 openwrt grub 引导失败。
resize2fs 直接对 /dev/sda2 操作,重启后仍然没变
不支持 on-line resizing
方法
[HOWTO] Resizing root partition on x86 - Installing and Using OpenWrt - OpenWrt Forum [OpenWrt Wiki] OpenWrt on x86 hardware (PC / VM / server)
- 第一步,修改分区大小
- parted 方案说是可以在不修改分区表的情况下,增大分区大小。但是我运行
parted -f -s /dev/sda resizepart 2 100%不起作用,于是还是使用 fdisk -
fdisk 会修改分区表,改变 PARTUUID,需要修改 grub 配置文件
- parted 方案说是可以在不修改分区表的情况下,增大分区大小。但是我运行
- 第二步,resize2fs。
-
不支持 online resize,需要使用 losetup
-