LXC 使用
1 说明
lxc vs docker
LXC 是一种轻量虚拟机,复用 host 内核。与 docker 尽可能每个容器只跑一个应用不同,lxc 的思路更接近虚拟机。
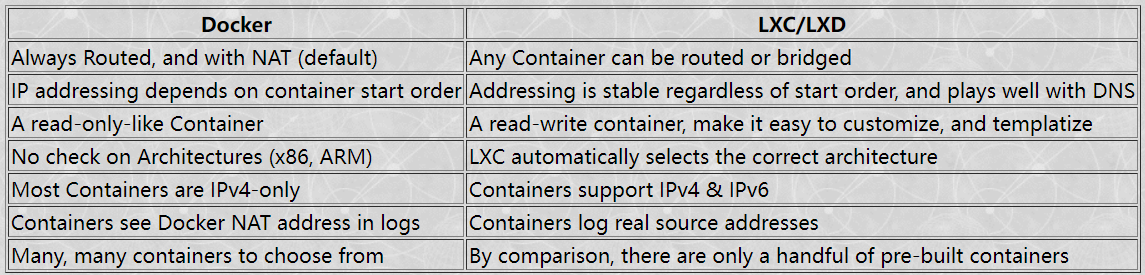
The key networking difference between Docker and LXC is that with LXC one can attach a container to any bridge on the Host. This includes a bridge on the outside interface. Via transparent bridging the container can have unfettered access to the existing IPv6 subnet, including picking up Global Unique Addresses (GUAs) without the host having to do router-like functions, such as adding routes, auto propagation of prefixes (with DHCPv6-PD), redistribution of routes, etc. Again, things which Docker doesn't support.
lxc vs lxd
LXD is actually two parts, the lxd daemon, and the lxc CLI client which makes calls to the lxd daemon
2 get started
安装
ubuntu 安装 lxd 会使用 snap。
要想使用 lxd 时非管理员,需要将用户添加到 lxd 组 p.s 现在安装时已经自动添加到 lxd 组了
第一次使用 lxd,需要进行初始化:sudo lxd init。初始化会设置网络和存储
 可以手动查看初始化结果
镜像
通过网站查看:Linux Containers - Image server 或命令行
容器管理
创建容器
lxc launch images:{**distro**}/{**version**}/{**arch**} {**container-name-here**}  #创建容器
lxc launch -p default -p extbridge images:ubuntu/jammy ubuntu22
lxc launch -p default -p extbridge images:debian/10 debian10
或者
管理
编辑
lxc config edit <instance_name>
lxc config show <instance_name> --expaned

lxc config device add <instance_name> <device_name> nic nictype=<nic_type> ...   #添加一个设备
自启动
执行命令
lxc exec containerName -- command
lxc exec containerName -- /path/to/script
lxc exec containerName --env EDITOR=/usr/bin/vim -- command

lxc exec {container-name} {shell-name}     #获得shell

lxc exec {container-name} --su --login yfy
文件移动
lxc file pull {continer-nane}/{path/to/file} {/path/to/local/dest}
lxc file push {/path/to/file} {continer-nane}/path/to/dest/dir/
3 快照
lxc snapshot {container} {snapshot-name} lxc info {container} lxc restore {container} {snapshot-name} lxc delete {container}/{snapshot}
lxc snapshot debian docker_base_image
lxc publish debian/docker_base_image --alias docker_image       # publish image to local:

# start a lxc/docker container called docker1
lxc launch -p default -p extbridge local:docker_image docker1
stateful 快照
快照大小
zfs 快照不是累加的_cumulative_,而是快照建立时和最新的文件系统差异:[ZFS] Destroy snapshots – nocin.eu 还没有实现:Calculating snapshot size - LXD - Linux Containers Forum
批量删除快照
lxc query "/1.0/instances/op2/snapshots?recursion=1" |jq -r '.[].name' | xargs -I SNAP echo lxc delete op2/SNAP

# 复制后手动执行
4 storage
About storage pools, volumes and buckets - LXD documentation (linuxcontainers.org)
storage pool
存储位置
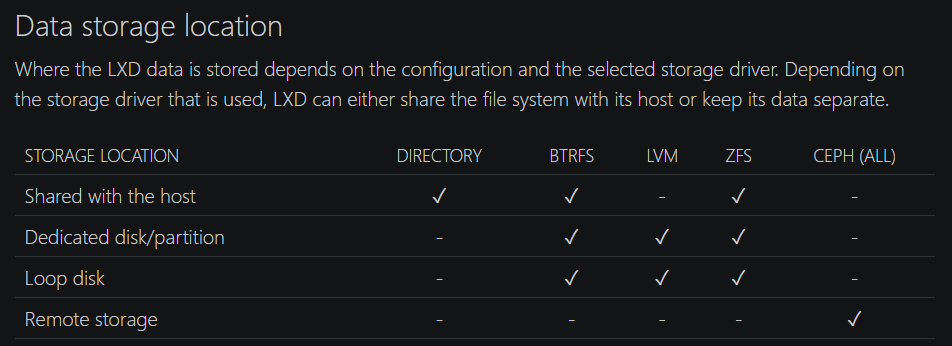
- 使用 host 文件系统:目录,btrfs(专门 sub-volume),zfs(专门 dataset)
- 专门分区
- loop disk:This means that every write must go through the storage driver and your main drive’s file system, which leads to decreased performance.
- 位于:
/var/snap/lxd/common/lxd/disks/(snap)或者/var/lib/lxd/disks/
- 位于:
创建
lxc storage create <pool_name> <driver> [configuration_options...]

lxc storage list
lxc storage show <pool_name>
btrfs
lxc storage create pool1 btrfs    # loop-backed

lxc storage create pool2 btrfs source=/some/path  # Use the existing Btrfs file system at `/some/path` for `pool2`

lxc storage create pool3 btrfs source=/dev/sdX
zfs
lxc storage create pool3 zfs source=my-tank   # use existing pool
lxc storage create pool4 zfs source=my-tank/slice # use existing dataset
均不支持自定义 loop back 文件位置
yfy@snode6 ➜  /extra lxc storage create pool0 zfs source=/extra/lxd_storage/zfs_lxd.img
Error: Custom loop file locations are not supported
volume
类型
按照功能分类
container/vm(i.e instance)
- 创建 instance 时自动创建,作为 instance 根文件系统。
- 删除 instance 时销毁 image
- lxd 自动创建一个 image 卷,when it unpacks an image to launch one or more instances from it.
- 存储自己创建的 image(包含文件系统和元信息) custom
- 用于单独存储数据
snapshot 和上面没有本质区别,list 的类型名为上述类型加上一个 (snapshot)
内容分类
- filesystem
- 用于容器和容器镜像
- 可以添加到容器和虚拟机,可以共享
- block
- 用于虚拟机和虚拟机镜像
- 不能共享
创建 volume
instance volume 是自动创建的
创建 custom volume
lxc storage volume create <pool_name> <volume_name> [configuration_options...]  # 默认filesystem类型
lxc storage volume create <pool_name> <volume_name> --type=block [configuration_options...]  # block类型
设置用于存储 backup 或 image tarball
lxc config set storage.backups_volume <pool_name>/<volume_name>
lxc config set storage.images_volume <pool_name>/<volume_name>
备份 volume
几种方式
- snapshot:存储在同一个 pool,因此可靠性不足。
- 导出文件:可以存储在不同 disk 上。可以 import 到不同 pool 上
- copy 到远程:需要 network-connected LXD server
lxc storage volume snapshot <pool_name> <volume_name> [<snapshot_name>]   # 类型为custom (snapshot)
lxc storage volume restore <pool_name> <volume_name> <snapshot_name>
lxc storage volume export <pool_name> <volume_name> [<file_path>]   # 默认为./backup.tar.gz
lxc storage volume import <pool_name> <file_path> [<volume_name>]  # 默认使用原本volume名字
移动复制 volume
- custom volume:移动复制到另一个存储池,或者重命名
lxc storage volume copy <source_pool_name>/<source_volume_name> <target_pool_name>/<target_volume_name>
- instance volume(自动生成的):使用 move 命令,移动 instance 到另一个存储池
当移动或复制 volume 到使用不同 driver 的存储池中,lxc 会自动转换。
高级
端口转发
https://lxdware.com/forwarding-host-ports-to-lxd-instances/
lxc profile create proxy
lxc profile edit proxy

devices:
  proxy8096:
    connect: tcp:127.0.0.1:8096
    listen: tcp:0.0.0.0:8097
    type: proxy
name: proxy-jellyfin
路径映射(挂载)
特权 vs 非特权
特权容器:
- 特权容器的所有功能基本都可以使用非特权容器实现,并不是更高级。因此更推荐使用非特权容器,更安全
- 容器内用户 id 和容器外用户 id 一样。因此创建挂载后,即可正常使用。
- 容器内 root 用户对应 host root 用户
非特权容器
- 容器内 uid 和 host uid 存在一套一一映射。默认情况容器内 0 开始的 uid 被映射到 host 高 uid(10000)
- 挂载后,容器内看 host 创建的文件一般为 nobody,host 看容器创建的文件为 10000+。
- Unprivileged containers are the safest containers. Those use a map of uid and gid to allocate a range of uids and gids to a container. That means that uid 0 (root) in the container is actually something like uid 100000 outside the container. So should something go very wrong and an attacker manages to escape the container, they'll find themselves with about as many rights as a nobody user.
设置特权或非特权容器
添加映射
lxc config device add {container-name} {name} disk source={/path/to/source/dir/} path={/path/to/dest/onto/container/}
移除 (unmount)
或者直接编译配置文件
设置用户映射
lxd/userns-idmap.md at master · lxc/lxd · GitHub
- User namespaces work by mapping a set of UIDs and GIDs on the host to a set of UIDs and GIDs in the container.
- For example, we can define that the host UIDs and GIDs from 100000 to 165535 may be used by LXD and should be mapped to UID/GID 0 through 65535 in the container.
- As a result a process running as UID 0 in the container will actually be running as UID 100000.
- Allocations should always be of at least 65536 UIDs and GIDs to cover the POSIX range including root (0) and nobody (65534).
- On most hosts, LXD will check
/etc/subuidand/etc/subgidfor allocations for thelxduser and on first start, set the default profile to use the first 65536 UIDs and GIDs from that range. - If none of those files can be found, then LXD will assume a 1000000000 UID/GID range starting at a base UID/GID of 1000000.
- lxd 读取/etc/{subuid, subgid}选择 lxd 可以分配的段。没有该文件的话,默认从 1000000 开始分配
- 文件格式:user:x:len,表示用户可以使用的空间是 x-(x+len)。
将特定容器内用户映射到 host 用户
uid 50-60 500-510  # 50-60 in host, map to, 500-510 in container
gid 100000-110000 10000-20000
both 1000 1000  # both uid and gid

# 当前用户映射到容器内1001用户(ubuntu镜像有默认用户ubuntu(1000),自己新建用户一般为1001)
echo -en "uid $(id -u) 1001\ngid $(id -g) 1001" | lxc config set ubuntu20 raw.idmap -
添加 gpu
profile
具体见 jellyfin 那篇文章
lxc 的端口映射没有那么直观,是通过在容器配置中添加 device 实现的。有两种方式给设备:1)通过lxc config给容器添加设备(也可以lxc config edit直接修改容器配置文件)2)创建 profile,并给容器添加 profile。
为了以后知道设置了哪些端口映射,推荐使用 profile 方式。
lxc profile device add <profile> <device name> <device type> <key=value>*
lxc profile add <container> <profile>

lxc config device add <container> <device name> <device type> <key=value>*
例子:
lxc profile create proxy-jellyfin
lxc profile device add proxy-jellyfin proxy8096 proxy connect="tcp:127.0.0.1:8096" listen="tcp:0.0.0.0:8096"
lxc profile add ubuntu20 proxy-jellyfin
查看容器配置文件
lxc config show ubuntu20 --expanded

devices:
  proxy8096:
    connect: tcp:127.0.0.1:8096
    listen: tcp:0.0.0.0:8097
    type: proxy
其它
lxc 创建 openwrt 镜像
makikiweb.com/Pi/lxc_openwrt.html
- Download the OpenWrt rootfs tarball
- Create a metadata.yaml file, and place into a tar file
- Import the rootfs tarball and metadata tarball to create an image
关于架构[OpenWrt Wiki] OpenWrt on x86 hardware (PC / VM / server)
- 64 is for modern PC hardware (anything from around 2007 onward), it is built for 64-bit capable computers and has support for modern CPU features. Choose this unless you have good reasons not to.
- Generic is for 32-bit-only hardware (either old hardware or some Atom processors), should be i686 Linux architecture, will work on Pentium 4 and later. Use this only if your hardware can't run the 64-bit version.
- Legacy is for very old PC hardware, Pentium MMX, what is called i586 in Linux architecture support. It will miss a lot of features you want/need on modern hardware like multi-core support and support for more than 4GB of RAM, but will actually run on ancient hardware while other versions will not.
- Geode is a custom Legacy target customized for Geode SoCs, which are still in use in many (aging) networking devices, like the older Alix boards from PCEngines.
lxd-dashboard
---
version: "2.1"
services:
  lxd-dashboard:
    image: lxdware/dashboard:latest
    container_name: lxd-dashboard
    environment:
      - PUID=1000
      - PGID=1000
      - TZ=Asia/Shanghai
      - ADMIN_PASS=lxdware
    volumes:
      - /mnt/Disk2/lxdware:/var/lxdware
    ports:
      - 9002:80
    restart: unless-stopped
#lxd开启http API
lxc config set core.https_address [::]

#从浏览器复制证书到lxc host
lxc config trust add lxdware.crt
备份
Backup the container and install it on another server - LXD - Linux Containers Forum
- 将一个
方法一:压缩包方式
容器导出为镜像文件
lxc snapshot blah backup
lxc publish blah/backup --alias blah-backup
lxc image export blah-backup .
lxc image delete blah-backup
恢复
lxc image import TARBALL-NAME --alias blah-backup
lxc launch blah-backup some-container-name
lxc image delete blah-backup
This is still pretty indirect and abusing the image mechanism to use it as a backup mechanism though. One alternative you could use is to just generate a tarball of /var/lib/lxd/containers/NAME and dump that on your NAS.
Restoring that is a bit harder though. You’ll need to create a /var/lib/lxd/storage-pools/POOL-NAME/containers/NAME path matching the name of the backed up container. Then if the storage pool is zfs or btrfs or lvm, you’ll need to create the applicable dataset, subvolume or lv and mount it on /var/lib/lxd/storage-pools/POOL-NAME/containers/NAME and then unpack your backup tarball onto it. Lastly, you can call “lxd import NAME” to have LXD re-import the container in the database.
I would add to this thread and suggest everyone to use by default no compression, especially if using ZFS compression. The images are fast.
lxc publish xenial/snap0 --compression none --alias export-xenial-snap0
自动备份所有容器脚本 https://discuss.linuxcontainers.org/t/backup-the-container-and-install-it-on-another-server/463/14
方法二:第二个 lxd 将第一个 lxd server 作为源
如果仅是想在第二台机器上运行相同的容器,有更简洁的方法。
The cleanest and possibly easiest way to do so would be to add your second server as a remote with “lxc remote add”. You’ll then be able to just do
And the target LXD will download the snapshot from the source LXD and then re-created the container with the exact same settings it had on the source.
遇到的问题
zfs container 目录为空
可以直接强行挂载,但是这样的话文件权限是错误的,需要手动修改。
参考
How to use Linux Containers with LXD, and why you might want to (robinwinslow.uk)
- ubuntu 安装 LXC 教程:How To Install LXD on Ubuntu 20.04 LTS using apt - nixCraft (cyberciti.biz)
- 在树莓派上使用 LXC: www.makikiweb.com/Pi/lxc_on_the_pi.html