PVE
PVE 用法、配置个人记录
安装
安装注意事项
- 之后修改 hostname 很麻烦,因此一开始就确定好
- zfs 是我比较推荐的系统盘格式,后面创建虚拟机,lxc 容器,磁盘镜像都会直接使用 zfs 的 zvol 功能,因此可以使用 zfs 自己管理这些磁盘镜像,非常方便。
换源:Proxmox 源使用帮助 — USTC Mirror Help 文档
常用命令工具:Command Line Tools - Proxmox VE
PVE 配置
网络配置
PVE使用ifupdown2进行网络设置,配置文件位于/etc/network/interfaces
- 修改配置文件后,应用更改:
ifreload -a使用GUI设置,apply后自动应用更改
interfaces配置文件
man interfaces(5)
- auto
- "auto" are used to identify the physical interfaces to be brought up when ifup is run with the -a option.
- "allow-" are used to identify interfaces that should be brought up automatically by various subsystems. This may be done using a command such as "ifup --allow=hotplug eth0 eth1", which will only bring up eth0 or eth1 if it is listed in an "allow-hotplug" line
- iface
- iface is normally given a interface name as its first non-option argument
- inet/inet6 + method
- 默认:inet/inet6 and static
inet or inet6
loopback   //This method may be used to define the loopback interface
 static    //define ethernet interfaces with statically allocated addresses
 dhcp      //This method may be used to obtain an address via DHCP

inet6
 auto    //This method may be used to obtain an address via SLAAC.
- Additional interface options/attributes can be given on subsequent lines in the iface stanza
常见网络模式
bridge
- pve作为一个交换机,pve host和VMs 和外部 物理网络位于一个LAN
The Bridged model makes the most sense in this case, and this is also the default mode on new Proxmox VE installations. Each of your Guest system will have a virtual interface attached to the Proxmox VE bridge. This is similar in effect to having the Guest network card directly connected to a new switch on your LAN, the Proxmox VE host playing the role of the switch.
routed
- 运行商可能不允许同一个物理接口有多个MAC上网。 Most hosting providers do not support the above setup. For security reasons, they disable networking as soon as they detect multiple MAC addresses on a single interface.
masqueue
- VM通过PVE上网
ipv6相关
ipv6无法获得地址
IPv6 Slaac not working · Issue #178 · CumulusNetworks/ifupdown2 (github.com) 添加pre-up行才能够获得ipv6地址
auto vmbr0
iface vmbr0 inet dhcp
        bridge-ports enp2s0
        bridge-stp off
        bridge-fd 0
        pre-up echo 2 > /proc/sys/net/ipv6/conf/$IFACE/accept_ra
刚开始pve iface enp2s0 inet dhcp无法获得ipv4地址。开启bridge-stp on就可以了 发现还是不行,需要将bridge-fd从0改为更大的值(比如15),才可以 vmbr0: the has_elasticity option has been deprecated and is always 16
禁用 vmbr0 ipv6
vmbr0 用于软路由的 wan 口,pve host 自身并不想直接暴露在公网。然而 pve 却总是给 vmbr0 设置 ipv6 地址,即使 vmbr0 配置如下,仍然禁用不掉 ipv6。
# /etc/network/interfaces
auto vmbr0
iface vmbr0 inet6 manual
iface vmbr0 inet manual
        bridge-ports enp2s0
        bridge-stp off
        bridge-fd 0
解决办法为设置 sysctl.conf
# /etc/sysctl.d/1-vmbr0-v6.conf
net.ipv6.conf.vmbr0.disable_ipv6=1

sysctl -p /etc/sysctl.d/1-vmbr0-v6.conf
也可以不完全禁用 v6,保留 fe80 地址
net.ipv6.conf.vmbr0.disable_ipv6=0
net.ipv6.conf.vmbr0.autoconf=0

net.ipv6.conf.all.autoconf=0  # 好像也需要把all关了,否则会被覆盖
检查是否生效
参考
手动添加路由
创建两个 br,居然不支持设置两个 default route。解决办法是在 interface 配置文件中通过 post-up 自己添加
auto vmbr0
iface vmbr0 inet static
        address 210.45.76.204/24
        bridge-ports enp7s0
        bridge-stp off
        bridge-fd 0
        post-up ip ru add from 210.45.76.204 lookup vmbr0 prior 3
        post-up ip ro add table vmbr0 default via 210.45.76.254 dev vmbr0
        post-up ip ro add default via 210.45.76.254 dev vmbr0 metric 200

auto vmbr1
iface vmbr1 inet static
        address 192.168.35.254/24
        bridge-ports enxf8e43b0a274a
        bridge-stp off
        bridge-fd 0
        post-up ip ro add default via 192.168.35.1 dev vmbr1 metric 100
        pre-down ip ro del default dev vmbr1
网络配置-vlan(new)
pve 几种 vlan 配置方式
Host System Administration (proxmox.com)
- vlan awarensess on linux bridge
- 创建 VM 网卡时指定 vid,虚拟机不需要知道自己连接在 vlan 上。最无感的方式
- tranditional: eno1.5 and vmbr0v5
- 需要显示地创建多个网卡
- guest configured vlan
- 在虚拟机内部创建 vlan
vlan awareness 方式理解
- untagged 和 tag 表示发出该 vlan 包时是否 打上 tag。
- primary id,表示收到包时如果没有 vlan id,应该判定为哪个 vlan。
tunk port 和 access port
tunk 的特点就是复用端口(tg 里大佬认为全 tag 和 tag + untag 都是 trunk)
- accessing port 被完全分配给单个 vlan,tagged 流量被丢弃(理解:untagged,并且没有其它 tagged?)
- trunk port。a trunk port can transmit data from multiple VLANs.
想要实现的效果
问问有大佬知道 pve 的 vlan awareness bridge 怎么配置 untagged 和 primary vlan id 吗?我想实现的就是两个机器通过一根线连接,传输 vlan 10 和 vlan 20 的数据。
- 如果端口上收到的包没有 tag,那么就属于 vlan 10,vlan 10 发出去的包也应该是 untagged的。
- 对于 vlan 20,则需要收发都带上 tag。
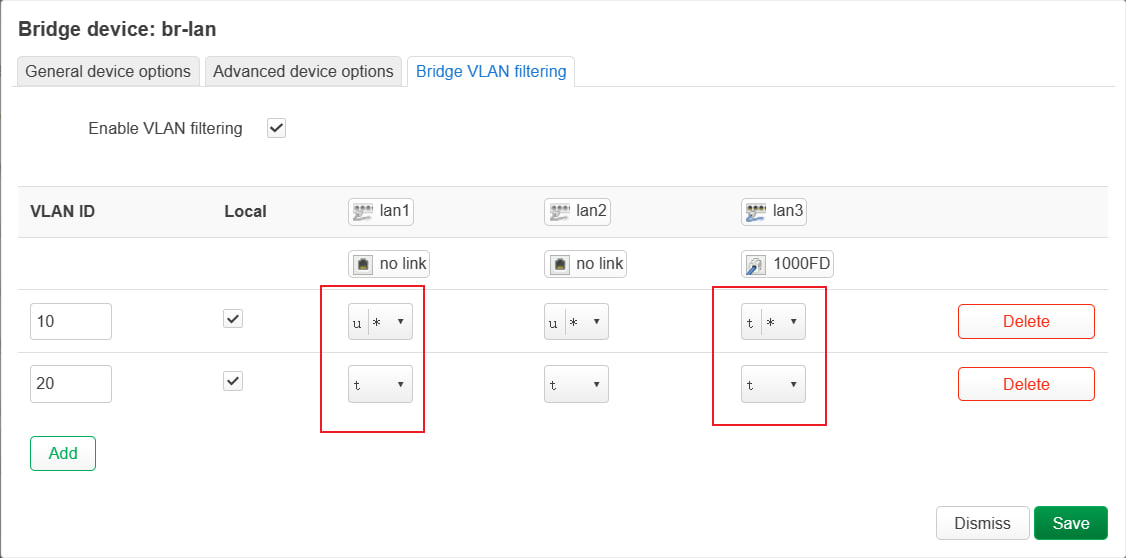 这是我 pve 对端的设备,我想实现的其实是左侧的效果。但是目前只能连接右面这个。因为 pve 不知道怎么设置 untagged,这导致它的包都是有 tag 的,没法直接连接笔记本等设备?
看了 bridge vlan show 后,感觉 PVID 和 untagged 的是强绑定的。因为 pvid 和 untagged 分别对应收和发,只有是同一个 vlan 才不容易造成混淆。
上图中,左右两侧都设置了 pvid 为 10,那么这个端口无论接收什么样的包都是没问题的。(有 tag 的包可以直接区分 vlan,没有 tag 的判定为 pvid)。但是发送情况则不同,untagged 情况需要对面也设置 pvid 为 10,否则对面可能判定为默认的 pvid=1。好处是可以连接非 vlan 设备(比如笔记本、手机)。tag 情况,则对面不需要设置 pvid,缺点是只能连接开启 vlan 的设备。
总结
- 全 tag 适合连接两个 vlan 设备。不用设置 pvid
- untagged + pvid 适合连接普通设备。但是要想连接 vlan 设备,需要对面也设置 pvid 相同
注意到 vlan 的接口的 mac 地址都是相同的,这样会有问题吗?(答:vlan 隔离了,所以没有问题)
13: vmbr1.10@vmbr1: <BROADCAST,MULTICAST,UP,LOWER_UP> mtu 1500 qdisc noqueue state UP mode DEFAULT group default qlen 1000
    link/ether 7c:2b:e1:13:7e:10 brd ff:ff:ff:ff:ff:ff
14: vmbr1.20@vmbr1: <BROADCAST,MULTICAST,UP,LOWER_UP> mtu 1500 qdisc noqueue state UP mode DEFAULT group default qlen 1000
    link/ether 7c:2b:e1:13:7e:10 brd ff:ff:ff:ff:ff:ff
ifupdown 配置
man ifupdown-addons-interfaces bridge 部分说明:
Supports both vlan aware and non vlan aware bridges. For the vlan aware bridge, the port specific attributes must be specified under the port. And for vlan unaware bridge port specific attributes must be specified under the bridge.
也就是 port 相关的属性(如 enp2s0 的 pvid)需要定义在 port 的配置中,而不是定义在 bridge 的配置中。
可以定义 bridge 支持的 vlan id
bridge-vids
  help: bridge port vids. Can be specified under the bridge or under the port. If specified under the bridge the ports inh erit it unless overridden by a bridge-vids attribuet under the port
  required: False
  example:
    bridge-vids 4000
    bridge-vids 2000 2200-3000
可以为每个端口设置 pvid
bridge-pvid
  help: bridge port pvid. Must be specified under the bridge port
  required: False
  example:
    bridge-pvid 1
没有找到如何定义端口是否 untagged,相反 bridge 一条命令就可以做这两件事,更加方便直观
bridge 命令配置
貌似使用 bridge 命令设置更方便?
bridge vlan { add | del } dev DEV vid VID [ tunnel_info TUNNEL_ID ] [ pvid ] [ untagged ] [ self ] [ master ]
bridge vlan show 非常直观可以看到每个端口的状态
- 对于 vmbr0
- 连接了虚拟机 op2 的端口 0(veth100i0)和物理接口 enp2s0
- 由于不需要 vlan 划分,因此对应端口都是 1 PVID 和 Untagged
- 对于 vmbr1
- 连接了 3 个物理接口和虚拟机 lan1 和 lan2 两个接口
- 由于 vlan awarensess bridge 的特点就是对虚拟机不可见,因此可以看到所有 veth100ix 的端口都是以自己所在的 vid 为 PVID 并且是 untagged 的。
比较神奇的是,物理接口都保留了 vid 1,并且是 untagged。理论上一个 port 是不能有两个 untagged 的。另外,vmbr0 不是实际端口,因此不清楚这里 vmbr0, vmbr1 的输出表示什么。
root@n5105-pve ➜  ~ brctl show
bridge name     bridge id               STP enabled     interfaces
vmbr0           8000.7c2be1137e0f       no              enp2s0
                                                        veth100i0
vmbr1           8000.7c2be1137e10       no              enp3s0
                                                        enp4s0
                                                        enp5s0
                                                        veth100i1
                                                        veth100i2

root@n5105-pve ➜  ~ bridge vlan show
port              vlan-id
enp2s0            1 PVID Egress Untagged
enp3s0            1 Egress Untagged
                  10 PVID Egress Untagged
                  20
                  99
enp4s0            1 Egress Untagged
                  10 PVID Egress Untagged
                  20
                  99
enp5s0            1 Egress Untagged
                  10 PVID Egress Untagged
                  20
                  99
vmbr0             1 PVID Egress Untagged
vmbr1             1 PVID Egress Untagged
                  10
                  20
                  99
veth100i0         1 PVID Egress Untagged
veth100i1         10 PVID Egress Untagged
veth100i2         20 PVID Egress Untagged
贴下配置
auto vmbr0
iface vmbr0 inet6 manual
iface vmbr0 inet manual
        bridge-ports enp2s0
        bridge-stp off
        bridge-fd 0
#wan

auto vmbr1.10
iface vmbr1.10 inet6 auto
iface vmbr1.10 inet static
        address 192.168.36.254/24
        gateway 192.168.36.1

auto vmbr1.20
iface vmbr1.20 inet dhcp

auto vmbr1.99
iface vmbr1.99 inet static
        address 192.168.99.1/24

auto vmbr1
iface vmbr1 inet manual
        bridge-ports enp3s0 enp4s0 enp5s0
        bridge-stp off
        bridge-fd 0
        bridge-vlan-aware yes
        bridge-vids 10 20 99
        post-up   bridge vlan add vid 10 dev enp3s0 pvid untagged
        post-up   bridge vlan add vid 10 dev enp4s0 pvid untagged
        post-up   bridge vlan add vid 10 dev enp5s0 pvid untagged
网络配置-vlan
Proxmox Management Interface VLAN tagging configuration - Virtualization Howto
两种模式,推荐使用第一种,最简洁
- VLAN awareness on the Linux bridge
- in this case, each guest’s virtual network card is assigned to a VLAN tag, which is transparently supported by the Linux bridge. Trunk mode is also possible, but that makes configuration in the guest necessary.
- traditional” VLAN on the Linux bridge
- creates a VLAN device with associated bridge for each VLAN
- Guest configured VLAN
- VLANs are assigned inside the guest. In this case, the setup is completely done inside the guest and can not be influenced from the outside. The benefit is that you can use more than one VLAN on a single virtual NIC.
- vmbr0, vlan aware
- 连接pve的物理交换机(假如有)需要设置成trunk port,这样才能理解tag包
- 虚拟机设置vlan tag就会加入该vlan。Once we have made the default Linux bridge VLAN aware, virtual machines can also have a VLAN tag associated with their network configuration. It allows the virtual machine to tag VLAN traffic and be placed on that particular VLAN. When you create VMs, you can choose to tag the network traffic with a VLAN ID. This allows sending the virtual machine traffic through the physical device VLAN interface to the rest of the physical network.
旧笔记本PVE单网口,实现openwrt软路由实例
补图
单网口软路由起码得有两个vlan,一个用于容器openwrt wan,一个用于容器openwrt lan。lan还包括pve host,和pve 下的VM
由于是通过vlan实现单网口软路由。笔记本(用于配置pve)要访问pve,还要访问pve里的虚拟机实在有点不方便。因此配置需要保证一定的顺序,否则就会出现访问不了pve的尴尬局面(还好我的pve还有一个100M的网口,最差情况还能抢救一下)
- 把硬路由器的VLAN设置好(软路由至少需要2个vlan,一个用作wan,一个用作lan)
- 硬路由上一个接口(如wan口)用于管理,这样避免访问不了硬路由
- 另一个接口br-lan.200设置一个静态ip(即软路由lan的网段),虽然可以设置成dhcp client,软路由配置好后自动设置地址,但是静态ip能方便访问硬路由。
- 给pve host分配一个lan vlan的ip
- 可以创建vmbr.200,然后静态分配ip

- 连接硬路由和pve的单网口
- 这样至少保证能通过硬路由访问pve了(比如笔记本连接硬路由的wifi,由于op虚拟机还没配置好,所以需要连接后手动设置ip)
- 设置openwrt容器
- 添加两个网络设备,可以选择同一个bridge,选择硬路由设置的vlan id。
- 这里添加额外一个vmbr2,是因为如果eth1没有成功设置ip地址,pve还是无法访问op容器。因此可以添加一个bridge,专门用于连接pve和op容器。用完之后可以删除。

- 启动openwrt容器
- 通过pve web控制台,给op容器设置lan和wan的接口。(也可以通过ssh -L pve端口转发(经过上步,pve可以访问op容器),访问openwrt web进行设置)
- 完成配置。软路由启动成功,应该已经可以正常工作了。pve可以上网,笔记本也可以通过硬路由wifi上网。
配置文件
auto lo
iface lo inet loopback

iface enp2s0 inet manual

iface wlp3s0 inet manual

auto enxa0cec8dfd632
iface enxa0cec8dfd632 inet manual

auto vmbr0
iface vmbr0 inet dhcp
        bridge-ports enp2s0
        bridge-stp off
        bridge-fd 0
        pre-up echo 2 > /proc/sys/net/ipv6/conf/$IFACE/accept_ra

auto vmbr1
iface vmbr1 inet manual
        bridge-ports enxa0cec8dfd632
        bridge-stp off
        bridge-fd 0
        bridge-vlan-aware yes
        bridge-vids 2-4094

auto vmbr1.200
iface vmbr1.200 inet static
        address 192.168.36.215/24
        gateway 192.168.36.1

auto vmbr2
iface vmbr2 inet static
        address 10.3.0.1/24
        bridge-ports none
        bridge-stp off
        bridge-fd 0
存储配置
基础概念
storage(池)类型
- file level:可以存储任何类型内容
- block:存储大的 raw images
1: Disk images for VMs are stored in ZFS volume (zvol) datasets, which provide block device functionality. 2: On file based storages, snapshots are possible with the qcow2 format.
存储的数据类型
A storage can support several content types, for example virtual disk images, cdrom iso images, container templates or container root directories. Not all storage types support all content types. One can set this property to select what this storage is used for.
- images: QEMU/KVM VM images.
- rootdir: Allow to store container data.
- vztmpl: Container templates.
- backup: Backup files (vzdump).
- iso: ISO images
- snippets: Snippet files, for example guest hook scripts
配置文件
/etc/pve/storage.cfg
dir: local
        path /var/lib/vz
        content iso,vztmpl,backup

# default image store on ZFS based installation
zfspool: local-zfs
        pool rpool/data
        sparse
        content images,rootdir
local 更像是存储只读的数据 local-zfs 则存放读写的数据
- 虚拟机的 disk 为 zvol
- lxc 容器的 rootdir 为 dataset
Volume id 格式(许多命令都需要该格式参数)
local:230/example-image.raw

local:iso/debian-501-amd64-netinst.iso

local:vztmpl/debian-5.0-joomla_1.5.9-1_i386.tar.gz

iscsi-storage:0.0.2.scsi-14f504e46494c4500494b5042546d2d646744372d31616d61
命令行工具
pvesm add <TYPE> <STORAGE_ID> <OPTIONS>
pvesm add dir <STORAGE_ID> --path <PATH>
pvesm add nfs <STORAGE_ID> --path <PATH> --server <SERVER> --export <EXPORT>
pvesm add lvm <STORAGE_ID> --vgname <VGNAME>
pvesm add iscsi <STORAGE_ID> --portal <HOST[:PORT]> --target <TARGET>

pvesm set <STORAGE_ID> <OPTIONS>
pvesm set <STORAGE_ID> --shared 1
pvesm set local --format qcow2
pvesm set <STORAGE_ID> --content iso

pvesm alloc <STORAGE_ID> <VMID> <name> <size> [--format <raw|qcow2>]
pvesm alloc local <VMID> '' 4G  # name为空则自动生成

pvesm free <VOLUME_ID>

pvesm status
pvesm list <STORAGE_ID> [--vmid <VMID>]

pvesm path <VOLUME_ID> #查看实际路径
不同 backend
dir
可以存储任何类型数据(virtual disk images, containers, templates, ISO images or backup files.)
You can mount additional storages via standard linux /etc/fstab, and then define a directory storage for that mount point. This way you can use any file system supported by Linux.
默认 layout
| Content type | Subdir |
|---|---|
| VM images | images/<VMID>/ |
| ISO images | template/iso/ |
| Container templates | template/cache/ |
| Backup files | dump/ |
| Snippets | snippets/ |
例子
dir: backup
        path /mnt/backup
        content backup
        prune-backups keep-last=7
        max-protected-backups 3
        content-dirs backup=custom/backup/dir
zfs
lvm
Proxmox VE Storage Proxmox Storage Guide | Programster's Blog
| Content types | Image formats | Shared | Snapshots | Clones |
|---|---|---|---|---|
| images rootdir | raw | possible | no | no |
lvm-thin
支持 thin provisioning(稀疏分配)
LVM normally allocates blocks when you create a volume. LVM thin pools instead allocates blocks when they are written. This behaviour is called thin-provisioning
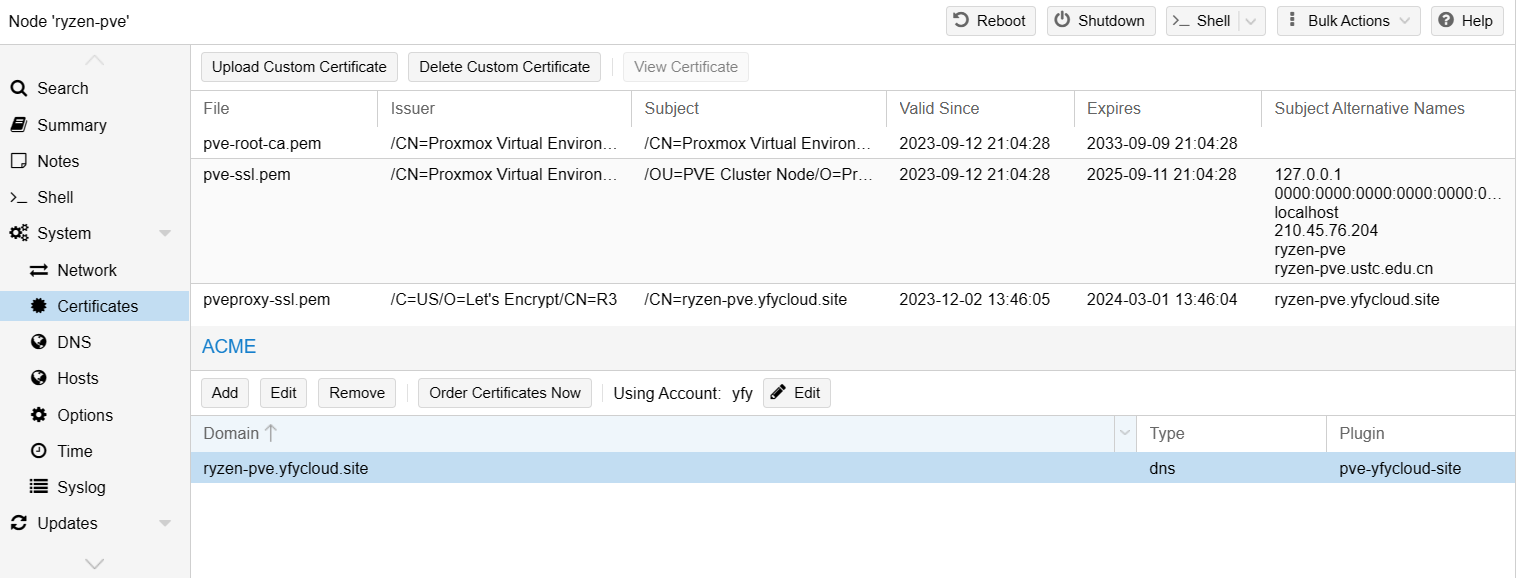
证书管理
pve 的 REST API 和 web GUI 是由pveproxy服务提供的,它使用的证书可以是以下几种
- By default the node-specific certificate in
/etc/pve/nodes/NODENAME/pve-ssl.pemis used. This certificate is signed by the cluster CA and therefore not automatically trusted by browsers and operating systems. - use an externally provided certificate (e.g. signed by a commercial CA).
- use ACME (Let’s Encrypt) to get a trusted certificate with automatic renewal, this is also integrated in the Proxmox VE API and web interface.
在 2 和 3 的情况下,使用的证书位于
/etc/pve/nodes/NODENAME/pveproxy-ssl.pem
-rw-r----- 1 root www-data 3.2K Dec  2 14:46 pveproxy-ssl.key
-rw-r----- 1 root www-data 5.8K Dec  2 14:46 pveproxy-ssl.pem
-rw-r----- 1 root www-data 1.7K Sep 13 21:04 pve-ssl.key
-rw-r----- 1 root www-data 1.8K Sep 13 21:04 pve-ssl.pem
证书使用 pvenode 命令管理
Trusted certificates via Let’s Encrypt (ACME)
-
首先需要注册一个 ACME 账号,仅需要提供邮箱用于接收通知
- web 界面:Datacenter -> ACME
- 命令行
- 然后添加一个 ACME plugin,用于自动申请和更新证书,支持许多 dns 服务商
- plugin ID:自己取一个标识名称,后面为 node 申请证书时需要指定
- DNS API:选择自己的 DNS 服务商(如果没有的话,并且有其它支持的域名的话,可以搜索 DNS Validation through CNAME Alias 方案)
- 后面的数据则根据 API 的不同是不同的
- cloudflare 支持粗粒度的 Global API Key 和 API Token 两种验证方式:User API Tokens | Cloudflare
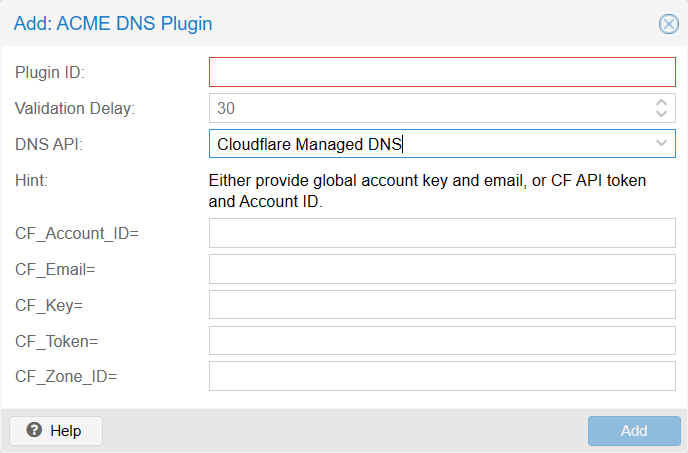
- cloudflare 支持粗粒度的 Global API Key 和 API Token 两种验证方式:User API Tokens | Cloudflare
- 然后就是为 node 添加证书
- Node -> Certificates,ACME 选择 Add
- 选择 challenge type 并填写证书对应的域名
- 然后选择 Account 然后 Order Certificates Now 即可
Bootloader
pve 会创建三个分区
- 1M BIOS 分区
- 512M EFI 分区(也叫 ESP 分区,EFI system partition (ESP),通常挂载在 /efi/, /boot, 或者 /boot/efi)
- 剩余大小创建 pve 的 storage
支持的两个引导程序
- grub
- linux 事实标准
- 丰富的文档
- systemd-boot
- 简单
- kernel 和 initrd 直接放在 ESP 分区
- 配置也全部放在 ESP 分区 /loader
PVE 对于没有安全启动的 zfs 类型采用 systemd-boot,其余使用 grub。
查看使用的哪个引导程序
- pve grub 为蓝色界面,界面比较复杂。systemd-boot 为黑白界面,只有简单的 entry 选择。
efibootmgr -v可以查看所有 eif 引导项以及引导顺序。\EFI\UBUNTU\GRUBX64.EFI的是 grub\EFI\SYSTEMD\SYSTEMD-BOOTX64.EFI的是 systemd-boot
grub 配置
/etc/default/grub
通过 update-grub 将配置同步到 /boot/grub/grub.cfg,这也是 grub 运行时读取的配置。
修改 kernel cmdline
The kernel commandline needs to be placed in the variable
GRUB_CMDLINE_LINUX_DEFAULTin the file/etc/default/grub. Runningupdate-grubappends its content to all linux entries in/boot/grub/grub.cfg.
systemd-boot 配置
位于 ESP 分区的 loader/loader.conf,将 ESP 挂载到 /boot/efi 后即 /boot/efi/loader/loader.conf
.
├── EFI
├── loader
│   ├── entries
│   │   ├── proxmox-6.2.16-20-pve.conf
│   │   └── proxmox-6.5.13-1-pve.conf
│   ├── entries.srel
│   ├── loader.conf
│   └── random-seed
root@ryzen-pve ➜  efi cat loader/entries/proxmox-6.5.13-1-pve.conf
title    Proxmox Virtual Environment
version  6.5.13-1-pve
options  root=ZFS=rpool/ROOT/pve-1 boot=zfs amd_iommu=on iommu=pt pcie_acs_override=multifunction
linux    /EFI/proxmox/6.5.13-1-pve/vmlinuz-6.5.13-1-pve
initrd   /EFI/proxmox/6.5.13-1-pve/initrd.img-6.5.13-1-pve
The kernel commandline needs to be placed as one line in
/etc/kernel/cmdline. To apply your changes, runproxmox-boot-tool refresh, which sets it as the option line for all config files inloader/entries/proxmox-*.conf.
proxmox-boot-tool 用于创建、同步 ESP 配置
proxmox-boot-tool is a utility used to keep the contents of the EFI System Partitions properly configured and synchronized.
可以管理多个 ESP 分区
proxmox-boot-tool status  #view the currently configured ESPs and their state

proxmox-boot-tool format /dev/sda2

proxmox-boot-tool init /dev/sda2
proxmox-boot-tool init /dev/sda2 grub
其它
startup/boot scripts
Start-up/boot script | Proxmox Support Forum 因为非特权 lxc openwrt 需要修改 /dev/ppp 权限(我直接 chmod 777),因此需要系统重启后保持。
开机键
虚拟机
命令行 qm
不必填所有参数,创建后在 web 中再添加
qm create 120 --cores 2 --cpu host --memory 1024 --name u22-test --scsihw virtio-scsi-single --scsi0 local-zfs:vm-120-disk-root
直通磁盘
Passthrough Physical Disk to Virtual Machine (VM) - Proxmox VE
这里的直通不是 pci 设备直通(比如网卡),host 中仍然能看到对应的磁盘,并且能够挂载。如果在 host 修改的话,可能导致数据损坏。 pci 直通是把磁盘控制器(如 nvme 控制器)直通给 VM,host 中对应磁盘驱动绑定到 vifo-pci,因此 host 看不到该磁盘。
这里的直通和使用虚拟镜像基本没区别,都是给虚拟机提供了一个块设备。host 将虚拟机的写入翻译到 host 中执行。
- Hot-Plug/Add physical device as new virtual SCSI disk
- Hot-Unplug/Remove virtual disk
直通分区
只需要把上面 by-id 路径指定具体分区即可
I think "qm set" disk passthrough should work with partitions too:
https://pve.proxmox.com/wiki/Passthrough_Physical_Disk_to_Virtual_Machine_(VM)
Then its just for exampleqm set 592 -scsi2 /dev/disk/by-id/ata-ST3000DM001-1CH166_Z1F41BLC-part3instead ofqm set 592 -scsi2 /dev/disk/by-id/ata-ST3000DM001-1CH166_Z1F41BLC
显示设备
介绍
VGA and other display devices in qemu | 🇺🇦 kraxel’s news
qxl
- 支持 2d 加速,但是该功能现在已经变得不再有用了。软件通常使用 OpenGL 或 Vulkan,3d 渲染。
This device has support for 2D acceleration. This becomes more and more useless though as modern display devices don't have dedicated 2D acceleration support any more and use the 3D engine for everything. The same happens on the software side, modern desktops are rendering with opengl or vulkan instead of using 2D acceleration.
virtio vga
- 支持硬件辅组的 opengl 加速
- 目前只有 linux 下有驱动,因此只在 linux 工作
This device has (optional) hardware-assisted opengl acceleration support. This can be enabled using the
virgl=onproperty, which in turn needs opengl support enabled (gl=on) in the qemu display.
virgl
(7) VirGL vs GPU passthrough vs VirtIO or QXL : VFIO (reddit.com)
为了显示 3D 图形,游戏需要为 GPU 打开一个“上下文”。(无论是 Direct3D,OpenGL,Vulkan 等)。打开此上下文后,他们可以向 GPU 发送命令以上传纹理、运行着色器、渲染内容等。 VirGL 允许访客在主机的 GPU 上打开这些上下文。为此,它需要在 VM 中拥有自己的特殊驱动程序,这些驱动程序独立于底层 GPU 类型。 未来很可能是 GPU-P (or GPU partitioning).。此功能允许物理 GPU 提供多个虚拟分区,允许主机和来宾使用相同的物理 GPU。有几种方法可以做到这一点,但目前它不受官方支持(在消费者卡中)。
适合轻量的 3d 加速(桌面 compositor)
if you need 3D accel (eg even for desktop compositor effects, no heavy gaming) this is what you want. Otherwise you go with Intel GVT-g or full GPU passthrough.
目前还不支持 HW Video 编解码加速
One feature I would like is being able to use HW video decode too, but presently that requires passing in full GPU or vGPU.
设置后,在 win10 中样子
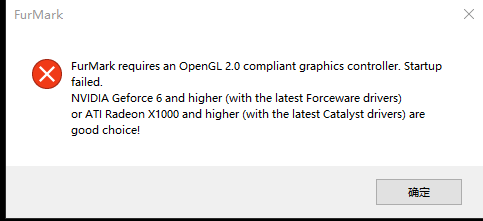
可以玩简单 OpenGL 游戏:测试了东方 不能玩 yuzu 模拟器,选择 OpenGL 时,可以选择 GLSL,但是不能运行游戏。选 vulkan 没有设备。
隐藏 KVM
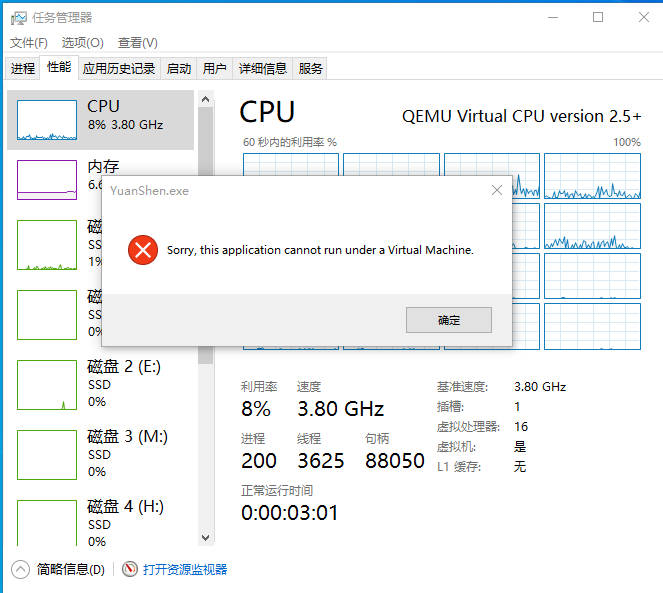
著名二字游戏无法在虚拟机中运行
https://forum.proxmox.com/threads/hide-vm-from-guest.34905/post-176978
args: -cpu 'host,-hypervisor,+kvm_pv_unhalt,+kvm_pv_eoi,hv_spinlocks=0x1fff,hv_vapic,hv_time,hv_reset,hv_vpindex,hv_runtime,hv_relaxed,kvm=off,hv_vendor_id=intel'
Guest operating systems can test bit 31 of ECX of CPUID leaf 0x1, so -hypervisor flag prevent this.
I can't add links. You can read more about virtual machine detection mechanism in vmware knowledge base. Article is called "Mechanisms to determine if software is running in a VMware virtual machin e"
更新一点的 2022 Can't hide 'VM' status in Windows guest | Proxmox Support Forum
In VM config:
args: -cpu host,hv_vapic,hv_stimer,+invtsc,[more-flags],-hypervisor
经尝试上面的命令启动时会报错,需要添加更多 flag
root@ryzen-pve ➜  ~ qm start 200
kvm: Hyper-V synthetic timers (hv-stimer) requires Hyper-V clocksources (hv-time)
start failed: QEMU exited with code 1
root@ryzen-pve ➜  ~ vim /etc/pve/qemu-server/200.conf
root@ryzen-pve ➜  ~ qm start 200
kvm: Hyper-V synthetic timers (hv-stimer) requires Hyper-V synthetic interrupt controller (hv-synic)
start failed: QEMU exited with code 1
root@ryzen-pve ➜  ~ vim /etc/pve/qemu-server/200.conf
root@ryzen-pve ➜  ~ qm start 200
kvm: Hyper-V synthetic interrupt controller (hv-synic) requires Hyper-V VP_INDEX MSR (hv-vpindex)
start failed: QEMU exited with code 1
最后需要补充完整到
注意,不要再加 cpu: x86-64-v3 这样的参数了。我刚开始加了,导致进入 vm,N 卡驱动报 43 错误
其它
- virt-manger 中类似方法:求助!win11 wm 打开原神 显示虚拟机下无法运行 - Chinese / 简体中文 - Unraid
- Proxmox VE(PVE) 虚拟机绕过软件的虚拟机检查来玩原神 - 某咸鱼的笔记 (wunote.cn)
创建 openwrt 实例
因为 openwrt 的使用场景和普通 linux 发行版不同。并没有提供包含 installer 的 iso 镜像。而是直接提供了一个分好区的磁盘镜像(类似于 dd if=/dev/sda of=openwrt.img)。因此安装 openwrt 的过程就是直接把磁盘镜像 dd 到整个磁盘中。
openwrt x86 提供了 UEFI 和 BIOS 两种启动类型,和 ext4 和 squarshfs 两种文件系统,组合下来 4 种的磁盘镜像。这里请参考文档[OpenWrt Wiki] OpenWrt on x86 hardware (PC / VM / server)或者
下载镜像
- combined-efi 既支持 uefi 启动,也支持 BIOS 启动。
import existing disk image
创建虚拟机,需要将 image 镜像直接作为一个磁盘添加到 vm 中。但是 pve web 界面没有这个功能57 – KVM: enhance GUI import of disk images (proxmox.com),只有添加 ISO 镜像,以及创建新的指定大小的空的磁盘的功能。因此需要使用命令行。 google: pve vm add existing disk image Add import existing disk image into Proxmox (github.com)
先用 disk import 将镜像作为虚拟磁盘添加到虚拟机,但是这个命令不支持修改磁盘大小。需要额外一条命令 qm disk resize
<storage>为虚拟磁盘的存储池。默认的 lvm 安装,用于存储磁盘镜像的为 local-lvm。(local 用于存储 iso 等)- import 后,disk 默认是 unused,需要编辑配置文件 /etc/pve/qemu-server/500.conf,将磁盘分配到 scsi0 等控制器上。也可以在 web 中 edit unused 磁盘,选择即可。还可以命令行
qm set --scsi - 默认磁盘大小是镜像文件大小,之后扩容比较麻烦,可以使用 resize 修改。resize 是立即生效的,不用重启 vm。(web 界面 resize 是需要重启的)
qm disk import <vmid> <source> <storage> [OPTIONS]
# qm disk import 500 openwrt-23.05.3-x86-64-generic-squashfs-combined-efi.img local-lvm
# pvesm list local-lvm 中可以看到新建的磁盘镜像

qm set 500 --scsi0 local-zfs:vm-500-disk-0

qm disk resize <vmid> <disk> <size> [OPTIONS]
# qm disk resize 500 scsi0 16G
uefi 无法启动
efi shell 中可以看到 EFI/boot/grubx64.efi。但是启动时 Access denied
兼容 BIOS 启动
- /boot 下没有 efi 目录
PVE uefi 图形界面手动添加 boot entry OVMF/UEFI Boot Entries - Proxmox VE
也有 efi shell 命令行添加的方式Update EFI boot entries with UEFI shell (stigok.com)
- ESC 先进入 bios,再选择进入 efi shell
bcfg boot dump -v -b  # List all boot entries (`-v` verbose, `-b` paged)

FS1:\> bcfg boot add 0 fs1:\EFI\grub\grubx64.efi grub
Target = 0000
bcfg: Add Boot0000 as 0

FS1:\> reset # reset to reboot
参考资料
- efi 重要命令:Unified Extensible Firmware Interface - ArchWiki (archlinux.org)
- efi intel 手册:UEFI Shell | Intel® Software (archive.org)
LXC 容器
https://pve.proxmox.com/wiki/Linux_Container
容器镜像
 pveam update
 pveam available
pveam available --section system

pveam download local debian-10.0-standard_10.0-1_amd64.tar.gz
导入容器镜像 只能通过 webui upload?
PCT 命令行
Linux Container - Proxmox VE pct(1) (proxmox.com)
pct list
pct console <vmid> [OPTIONS]
pct enter <vmid>

pct start

pct destroy 100 --purge # --purge_, if you want to additionally remove the container from replication jobs, backup jobs and HA resource configurations.
set 修改 hostname
在容器内修改 hostname 重启后会失效,需要使用 pct 命令行修改
ummanged OS
网页创建 openwrt 可能遇到以下错误
需要使用ummanged类型,只能使用命令行操作
unmanaged can be used to skip and OS specific setup
lvm
pct create 100 /mnt/ryzen-pve-storage/template/cache/openwrt-23.05.0-x86-64-rootfs.tar.gz \
--storage local-lvm \
--ostype unmanaged \
--unprivileged 1 \
--hostname op1 \
--rootfs local-lvm:8 \
--cores 4 \
--memory 1024 \
--swap 1024 \
--features keyctl=1,nesting=1

--password xxxx
zfs
pct create 700 local:vztmpl/openwrt-23.05.0-x86-64-generic-rootfs.tar.gz \
--storage local-zfs \
--ostype unmanaged \
--unprivileged 1 \
--hostname op1 \
--rootfs local-zfs:1 \
--cores 4 \
--memory 1024 \
--swap 0 \
--features keyctl=1,nesting=1
配置文件
Currently there are three types of mount points: storage backed mount points, bind mounts, and device mounts.
- Storage Backed Mount Points
- Image based
- ZFS subvolumes
- Directories
- Bind Mount Points: Bind mounts allow you to access arbitrary directories from your Proxmox VE host inside a container
特权容器
特权容器转非特权容器
Convert privileged to unprivileged container | Proxmox Support Forum
pct restore 1234 var/lib/vz/dump/vzdump-lxc-1234-2016_03_02-02_31_03.tar.gz -ignore-unpack-errors 1 -unprivileged
转个特权级结果这么麻烦。community有通过挂载镜像,然后修改其内容的方法,但是看上去貌似有点野,因此还是不使用了。
尝试了
- 编辑配置文件直接添加 unprivileged: yes。但是打开容器后,所有文件都变成了 nobody。(也许手动 chown 以下就可以了?)
- 尝试按照官方通过 backup 恢复。
- 但是恢复后,jellyfin docker 启动不起来,貌似是权限的问题。jellyfin 配置文件不知为何就是无法 chown,root 用户 chown 结果报没有权限。
pct restore 111 /var/lib/vz/dump/vzdump-lxc-110-2023_09_29-23_05_38.tar.zst -ignore-unpack-errors 1 -unprivileged --features keyctl=1,nesting=1 --storage local-zfs
算了,还是用原来特权容器。
路径映射(挂载)
参考
- Proxmox: bind mountpoint from host to unprivileged LXC container :: It's Embedded! (itsembedded.com)
- Unprivileged LXC containers - Proxmox VE
Bind mounting:类似于目录的硬链接(linux 目录不能硬链接)
直接映射(基本上只读)
- 需要重启容器生效
- host 创建的文件在 guest 中为 nobody(只要文件权限不严格,应该是可读的)
- guest 创建的文件在 host 上为 high-mapped(100000+) uid
# pct命令
pct set 300 -mp0 /mnt/Disk2/BT/downloads/links,mp=/media

# 配置文件
mp0: /mnt/bindmounts/shared,mp=/shared
用户映射
编辑容器配置文件
- 0 100000 1005 表示 0 开始的 1005 长度段映射到 host 10000 开始 1005 长度段
- 以下配置将 1005 单独映射到 host 1005
# uid map: from uid 0 map 1005 uids (in the ct) to the range starting 100000 (on the host), so 0..1004 (ct) → 100000..101004 (host)
lxc.idmap = u 0 100000 1005
lxc.idmap = g 0 100000 1005
# we map 1 uid starting from uid 1005 onto 1005, so 1005 → 1005
lxc.idmap = u 1005 1005 1
lxc.idmap = g 1005 1005 1
# we map the rest of 65535 from 1006 upto 101006, so 1006..65535 → 101006..165535
lxc.idmap = u 1006 101006 64530
lxc.idmap = g 1006 101006 64530
lxc.idmap = u 0 100000 1000
lxc.idmap = g 0 100000 1000
lxc.idmap = u 1000 1000 1
lxc.idmap = g 1000 1000 1
lxc.idmap = u 1001 101001 64534
lxc.idmap = g 1001 101001 64534
编辑/etc/suuid(subgid),使得 root 用户允许使用 1000 的 uid
否则会报如下错误
lxc_map_ids: 3701 newuidmap failed to write mapping "newuidmap: uid range [1000-1001) -> [1000-1001) not allowed": newuidmap 793824 0 100000 1000 1000 1000 1 1001 101001 64534
lxc_spawn: 1788 Failed to set up id mapping.
__lxc_start: 2107
TASK ERROR: startup for container '110' failed
添加 gpu
容器配置文件中添加
lxc.cgroup2.devices.allow: c 226:0 rwm
lxc.cgroup2.devices.allow: c 226:128 rwm
lxc.cgroup2.devices.allow: c 29:0 rwm
lxc.mount.entry: /dev/dri dev/dri none bind,optional,create=dir
lxc.mount.entry: /dev/fb0 dev/fb0 none bind,optional,create=file
lxc.apparmor.profile: unconfined
lxc.cgroup2.devices.allow 设置允许在 LXC 容器中使用的设备规则
c表示字符设备。195:*是一个设备规则,它指定了一组允许的字符设备。在这里,195是主设备号(major number),而*表示允许任何次设备号(minor number),这意味着允许使用主设备号为 195 的所有字符设备。rwm表示权限设置,r表示允许读取,w表示允许写入,m表示允许创建设备文件。
lxc.mount.entry: /dev/dri dev/dri none bind,optional,create=dir
- 这个配置条目将主机上的
/dev/dri目录挂载到 LXC 容器内的dev/dri目录。 none表示没有特定的文件系统类型。bind表示使用绑定挂载(bind mount),这意味着容器内的dev/dri目录会映射到主机上的/dev/dri目录,容器内的操作将影响到主机上的设备。optional表示这个挂载是可选的,如果/dev/dri在主机上不存在,容器仍然会启动。create=dir表示如果容器内的目录不存在,它将在容器内创建一个目录。create=file表示如果容器内的文件不存在,它将在容器内创建一个文件
AppArmor 是一个 Linux 内核安全模块,用于限制程序的能力,包括容器,以增强安全性。
lxc.apparmor.profile 被设置为 "unconfined",这意味着容器不受 AppArmor 个人资料的限制。它有更多自由,但也有较少的安全限制。
openwrt
LXC 优点
- 容器内的文件系统在 host 中可以直接看到,虚拟机磁盘是个镜像,需要自己 mount。
- 不涉及到 boot,备份时只需要保留 rootfs 即可。
非特权容器开启权限
- ppp (pppoe)
- tun(openvpn, clash)
lxc.apparmor.profile: unconfined
lxc.cgroup.devices.allow: a
lxc.cap.drop:
lxc.cgroup2.devices.allow: c 10:200 rwm
lxc.mount.entry: /dev/net dev/net none bind,create=dir
lxc.cgroup2.devices.allow: c 108:0 rwm
lxc.mount.entry: /dev/ppp dev/ppp none bind,create=file
root@n5105-pve ➜  ~ lsmod |grep pp
pppoe                  20480  0
pptp                   24576  0
pppox                  12288  2 pppoe,pptp
ppp_synctty            16384  0
pppoatm                16384  0
atm                    77824  1 pppoatm
ppp_async              16384  0
ppp_deflate            12288  0
ppp_mppe               12288  0
libarc4                12288  1 ppp_mppe
gre                    12288  3 ip6_gre,ip_gre,pptp
rootfs 获取
- download openwrt 处下载
- 使用imagebuilder创建
导入镜像方法:
- 从web上传
- move:
mv op2-openwrt-23.05.0-x86-64-generic-rootfs.tar.gz /var/lib/vz/template/cache/
创建LXC 容器
从 openwrt 下载的 rootfs 无法创建 lxc 容器了
必须命令行设置 ostype
pct create 102 local:vztmpl/op2-openwrt-23.05.0-x86-64-generic-rootfs.tar.gz \
--storage local-zfs \
--ostype unmanaged \
--unprivileged 1 \
--arch amd64 \
--hostname op9 \
--rootfs local-zfs:1 \
--cores 4 \
--memory 512 \
--swap 0 \
--features keyctl=1,nesting=1
pppoe 的坑
总结
- host 需要 modprobe 所有 pppoe 的包。可以配置在
/etc/modules中 - 非特权 openwrt 容器配置文件需要配置 ppp devices
- 默认情况下权限为 600, nobody, nobody,导致 Permission denied 错误
- 可以 host chmod 666 /dev/ppp
- 或者 device hook(该方法怀疑已经过时,测试 Proxmox VE 8.1.4 x86_64, 6.5.13-1-pve 无法启动容器,报错运行 hook 失败)
- 默认情况下权限为 600, nobody, nobody,导致 Permission denied 错误
mkdir -p ${LXC_ROOTFS_MOUNT}/dev/net
mknod -m 666 /${LXC_ROOTFS_MOUNT}/dev/ppp c 108 0
mknod -m 666 /${LXC_ROOTFS_MOUNT}/dev/net/tun c 10 200
systemctl edit fix-ppp
[Unit]
Description=Fix lxc openwrt pppoe by chmod 666 ppp device
After=multi-user.target

[Service]
Type=oneshot
ExecStart=/bin/chmod 666 /dev/ppp
RemainAfterExit=true

[Install]
WantedBy=multi-user.target
参考资料
- fw867/pve-edge-kernel: Newer Linux kernels for Proxmox VE (github.com)
- 其中一些Shell脚本包含许多重要的配置
- [SOLVED] - PVE 7 - How to make all new CTs have PPP enabled | Proxmox Support Forum
- 也遇到了
Couldn't open the /dev/ppp device: Operation not permitted - 提到使用 cgroup2 可以解决
- 有人补充还需要 host
chown 100000:100000 /dev/ppp
- 也遇到了
- autodev 已经不需要了,改用 entry 了。lxc.audodev=1 doesn't work with unprivileged LXC container? : r/Proxmox (reddit.com)
调试过程
刚开始报错如下。这里其实有 no module folders for kernel version 6.5.13-1-pve found 和 Couldn't open the /dev/ppp device: Permission denied 两个错误。
Wed Jun 12 19:13:54 2024 daemon.notice netifd: Interface 'wan' is now down
Wed Jun 12 19:13:54 2024 daemon.notice netifd: Interface 'wan' is setting up now
Wed Jun 12 19:13:54 2024 daemon.err modprobe: no module folders for kernel version 6.5.13-1-pve found
Wed Jun 12 19:13:54 2024 daemon.info pppd[143974]: Plugin pppoe.so loaded.
Wed Jun 12 19:13:54 2024 daemon.info pppd[143974]: PPPoE plugin from pppd 2.4.9
Wed Jun 12 19:13:54 2024 daemon.err pppd[143974]: Couldn't open the /dev/ppp device: Permission denied
Wed Jun 12 19:13:54 2024 daemon.err pppd[143974]: Sorry - this system lacks PPP kernel support
Wed Jun 12 19:13:54 2024 daemon.notice netifd: wan (143974): /usr/sbin/pppd: Sorry - this system lacks PPP kernel support
Wed Jun 12 19:13:54 2024 daemon.notice netifd: wan (143974):
n4500 上使用了特权容器,因此 600 的权限是没问题的。但是 非特权容器 owner 为 nobody nogroup。
root@n4500 ➜  ~ l /dev/ppp
crw------- 1 root root 108, 0 Jun 11 11:44 /dev/ppp

root@op3 ➜  ~ l /dev/ppp
crw-------    1 root     root      108,   0 Jun 11 11:45 /dev/ppp
尝试改为使用 cgroup2,还是不行。pve chmod 777 /dev/ppp 报错变了。
Wed Jun 12 19:28:09 2024 daemon.warn pppd[149937]: Timeout waiting for PADS packets
Wed Jun 12 19:28:09 2024 daemon.err pppd[149937]: Unable to complete PPPoE Discovery
Wed Jun 12 19:28:09 2024 daemon.info pppd[149937]: Exit.
Wed Jun 12 19:28:09 2024 daemon.info pppd[150272]: Plugin pppoe.so loaded.
Wed Jun 12 19:28:09 2024 daemon.info pppd[150272]: PPPoE plugin from pppd 2.4.9
Wed Jun 12 19:28:09 2024 daemon.notice pppd[150272]: pppd 2.4.9 started by root, uid 0
Wed Jun 12 19:28:24 2024 daemon.warn pppd[150272]: Timeout waiting for PADS packets
Wed Jun 12 19:28:24 2024 daemon.err pppd[150272]: Unable to complete PPPoE Discovery
Wed Jun 12 19:28:24 2024 daemon.info pppd[150272]: Exit.
Wed Jun 12 19:28:24 2024 daemon.info pppd[150823]: Plugin pppoe.so loaded.
Wed Jun 12 19:28:24 2024 daemon.info pppd[150823]: PPPoE plugin from pppd 2.4.9
Wed Jun 12 19:28:24 2024 daemon.notice pppd[150823]: pppd 2.4.9 started by root, uid 0
Wed Jun 12 19:28:34 2024 daemon.err pppd[150823]: select (waitForPADS): Interrupted system call
Wed Jun 12 19:28:34 2024 daemon.warn pppd[150823]: Timeout waiting for PADS packets
Wed Jun 12 19:28:34 2024 daemon.err pppd[150823]: Unable to complete PPPoE Discovery
Wed Jun 12 19:28:34 2024 daemon.info pppd[150823]: Exit.
Wed Jun 12 19:28:34 2024 daemon.info pppd[151126]: Plugin pppoe.so loaded.
Wed Jun 12 19:28:34 2024 daemon.info pppd[151126]: PPPoE plugin from pppd 2.4.9
Wed Jun 12 19:28:34 2024 daemon.notice pppd[151126]: pppd 2.4.9 started by root, uid 0
Wed Jun 12 19:28:49 2024 daemon.warn pppd[151126]: Timeout waiting for PADS packets
Wed Jun 12 19:28:49 2024 daemon.err pppd[151126]: Unable to complete PPPoE Discovery
Wed Jun 12 19:28:49 2024 daemon.info pppd[151126]: Exit.
Wed Jun 12 19:28:49 2024 daemon.info pppd[151487]: Plugin pppoe.so loaded.
Wed Jun 12 19:28:49 2024 daemon.info pppd[151487]: PPPoE plugin from pppd 2.4.9
Wed Jun 12 19:28:49 2024 daemon.notice pppd[151487]: pppd 2.4.9 started by root, uid 0
Wed Jun 12 19:29:04 2024 daemon.warn pppd[151487]: Timeout waiting for PADS packets
Wed Jun 12 19:29:04 2024 daemon.err pppd[151487]: Unable to complete PPPoE Discovery
Wed Jun 12 19:29:04 2024 daemon.info pppd[151487]: Exit.
Wed Jun 12 19:29:04 2024 daemon.info pppd[151787]: Plugin pppoe.so loaded.
Wed Jun 12 19:29:04 2024 daemon.info pppd[151787]: PPPoE plugin from pppd 2.4.9
Wed Jun 12 19:29:04 2024 daemon.notice pppd[151787]: pppd 2.4.9 started by root, uid 0
Wed Jun 12 19:29:19 2024 daemon.warn pppd[151787]: Timeout waiting for PADS packets
Wed Jun 12 19:29:19 2024 daemon.err pppd[151787]: Unable to complete PPPoE Discovery
Wed Jun 12 19:29:19 2024 daemon.info pppd[151787]: Exit.
Wed Jun 12 19:29:19 2024 daemon.info pppd[152103]: Plugin pppoe.so loaded.
Wed Jun 12 19:29:19 2024 daemon.info pppd[152103]: PPPoE plugin from pppd 2.4.9
Wed Jun 12 19:29:19 2024 daemon.notice pppd[152103]: pppd 2.4.9 started by root, uid 0
modprobe 以下 kernel 后解决。(起因是别人的报错中没有 kernel module 相关信息,并且我发现 kernel 目录下有其它 ko 文件)
root@n5105-pve ➜  ~ l /lib/modules/6.5.13-1-pve/kernel/drivers/net/ppp/
total 88K
-rw-r--r-- 1 root root 22K Feb  5 21:50 bsd_comp.ko
-rw-r--r-- 1 root root 29K Feb  5 21:50 ppp_async.ko
-rw-r--r-- 1 root root 19K Feb  5 21:50 ppp_deflate.ko
-rw-r--r-- 1 root root 22K Feb  5 21:50 ppp_mppe.ko
-rw-r--r-- 1 root root 40K Feb  5 21:50 pppoe.ko
-rw-r--r-- 1 root root 15K Feb  5 21:50 pppox.ko
-rw-r--r-- 1 root root 27K Feb  5 21:50 ppp_synctty.ko
-rw-r--r-- 1 root root 28K Feb  5 21:50 pptp.ko
Wed Jun 12 19:35:30 2024 daemon.info pppd[156589]: Terminating on signal 15
Wed Jun 12 19:35:30 2024 daemon.info pppd[156589]: Connect time 2.6 minutes.
Wed Jun 12 19:35:30 2024 daemon.info pppd[156589]: Sent 2342096 bytes, received 636835 bytes.
Wed Jun 12 19:35:30 2024 daemon.notice pppd[156589]: Connection terminated.
Wed Jun 12 19:35:30 2024 daemon.info pppd[156589]: Connect time 2.6 minutes.
Wed Jun 12 19:35:30 2024 daemon.info pppd[156589]: Sent 2342096 bytes, received 636835 bytes.
Wed Jun 12 19:35:30 2024 daemon.info pppd[156589]: Exit.
Wed Jun 12 19:35:30 2024 daemon.info pppd[158315]: Plugin pppoe.so loaded.
Wed Jun 12 19:35:30 2024 daemon.info pppd[158315]: PPPoE plugin from pppd 2.4.9
Wed Jun 12 19:35:30 2024 daemon.notice pppd[158315]: pppd 2.4.9 started by root, uid 0
Wed Jun 12 19:35:35 2024 daemon.info pppd[158315]: PPP session is 4826
Wed Jun 12 19:35:35 2024 daemon.warn pppd[158315]: Connected to 00:00:5e:00:01:98 via interface eth0
Wed Jun 12 19:35:35 2024 daemon.info pppd[158315]: Renamed interface ppp0 to pppoe-wan
Wed Jun 12 19:35:35 2024 daemon.info pppd[158315]: Using interface pppoe-wan
Wed Jun 12 19:35:35 2024 daemon.notice pppd[158315]: Connect: pppoe-wan <--> eth0
Wed Jun 12 19:35:38 2024 daemon.info pppd[158315]: CHAP authentication succeeded: Authentication success,Welcome!
Wed Jun 12 19:35:38 2024 daemon.notice pppd[158315]: CHAP authentication succeeded
Wed Jun 12 19:35:38 2024 daemon.notice pppd[158315]: peer from calling number 00:00:5E:00:01:98 authorized
Wed Jun 12 19:35:38 2024 daemon.notice pppd[158315]: local  LL address fe80::b16e:4c9f:8fb8:4702
Wed Jun 12 19:35:38 2024 daemon.notice pppd[158315]: remote LL address fe80::0200:5eff:fe00:0198
Wed Jun 12 19:35:38 2024 daemon.notice pppd[158315]: local  IP address 100.67.41.202
Wed Jun 12 19:35:38 2024 daemon.notice pppd[158315]: remote IP address 100.67.0.1
Wed Jun 12 19:35:38 2024 daemon.notice pppd[158315]: primary   DNS address 211.138.180.2
Wed Jun 12 19:35:38 2024 daemon.notice pppd[158315]: secondary DNS address 211.138.180.3
遇到问题
openwrt pppoe NO_KERNEL_SUPPORT
luci interface 显示 NO_KERNEL_SUPPORT
logread 报错
Fri Feb  2 21:23:28 2024 daemon.info pppd[13110]: Plugin pppoe.so loaded.
Fri Feb  2 21:23:28 2024 daemon.info pppd[13110]: PPPoE plugin from pppd 2.4.9
Fri Feb  2 21:23:28 2024 daemon.err pppd[13110]: Couldn't open the /dev/ppp device: Permission denied
Fri Feb  2 21:23:28 2024 daemon.err pppd[13110]: Sorry - this system lacks PPP kernel support
Fri Feb  2 21:23:28 2024 daemon.notice netifd: wan (13110): /usr/sbin/pppd: Sorry - this system lacks PPP kernel support
该问题为 /dev/ppp 权限问题。host 上 chmod 777 是简单的一种解决方式。详情见 pppoe 的坑。
无法修改 ssh 端口,固定为 22
现象:/etc/ssh/sshd_config中设置了非 22 端口,但是 s restart ssh 仍然使用 22 端口(好像文件中配置的禁止密码登录是正确应用了的)。发现 s reload ssh 可以临时将端口改为配置文件中设置的端口(ss -tnlp 同时有 22 和设置的端口),但是 restart 后又变回了 22
解决
google: pve lxc sshd can't port 22 https://forum.proxmox.com/threads/ssh-doesnt-work-as-expected-in-lxc.54691/post-451843
貌似重点在于 ssh.socket 这个
不管用
添加以下两行,op 确实出现了 ppp 设备 (c600, nobody, nobody),但是 logread 仍然报错
换用特权容器,仍然报错
chmod 777 /dev/ppp,luci报错稍微不同,但仍然是NO_KERNEL_SUPPORT
host modprobe ppp 相关模块
modprobe tun
modprobe ppp-compress-18
modprobe ppp_mppe
modprobe ppp_deflate
modprobe ppp_async
modprobe pppoatm
modprobe ppp_generic
解决
cp /usr/share/pve-docs/examples/guest-example-hookscript.pl /var/lib/vz/snippets/hookscript.pl

vim /var/lib/vz/snippets/hookscript.pl
添加两行 system 调用
# Second phase 'post-start' will be executed after the guest
    # successfully started.
    system("lxc-device add -n $vmid /dev/ppp");
    system("lxc-device add -n $vmid /dev/net/tun");

    print "$vmid started successfully.\n";
Fri Feb  2 23:29:27 2024 daemon.info pppd[8111]: Renamed interface ppp0 to pppoe-wan
Fri Feb  2 23:29:27 2024 daemon.info pppd[8111]: Using interface pppoe-wan
Fri Feb  2 23:29:27 2024 daemon.notice pppd[8111]: Connect: pppoe-wan <--> eth0
Fri Feb  2 23:29:28 2024 daemon.info pppd[8111]: Remote message: Radius User Restriction [64|FBB&WiFi]
Fri Feb  2 23:29:28 2024 daemon.err pppd[8111]: PAP authentication failed
Fri Feb  2 23:29:28 2024 daemon.notice pppd[8111]: Modem hangup
Fri Feb  2 23:29:28 2024 daemon.notice pppd[8111]: Connection terminated.
Fri Feb  2 23:29:28 2024 daemon.info pppd[8111]: Exit.
参考
- lxc 容器配置文件添加 ppp 108 设备权限:[SOLVED] - PVE 7 - How to make all new CTs have PPP enabled | Proxmox Support Forum
- 解决:pve lxc安装的openwrt拨号提示NO_KERNEL_SUPPORT,尝试多个固件都拨不上-软路由,x86系统,openwrt(x86),Router OS 等-恩山无线论坛 (right.com.cn) --> 指路:ProxmoxVE 7.0 LXC下搭建openwrt软路由_lxc openwrt-CSDN博客
备份和恢复
Backup and Restore - Proxmox VE
LXC
qm
性能优化
Windows 11 VM (Best Performance) | Proxmox Support Forum
- You could use virtio NIC + virtio SCSI.
- In case you don't plan to migrate those VMs you could set the CPU type to "host".
- Don't overprovision your RAM or CPU cores.
- Enable NUMA in case you got a multi-socket server.
- If you got a little big CPU architecture it might help to pin a VM to the performance cores.
- And in case you trust all your guests you could disable mitigations in the bootloader.
PVE显卡直通
PCI(e) Passthrough - Proxmox VE PCI Passthrough - Proxmox VE (7) The Ultimate Beginner's Guide to GPU Passthrough (Proxmox, Windows 10) : HomeLab (reddit.com)
步骤
修改内核参数
p.s grub和systemd-boot修改方法不一样,这里以systemd-boot为说明
intel_iommu=on | amd_iommu=on:For Intel CPUs, you may also need to enable the IOMMU on the kernel command line for older (pre-5.15) kernels. For AMD CPUs it should be enabled automatically.iommu=pt:If your hardware supports IOMMU passthrough mode, enabling this mode might increase performance.
- (optional)启用acs override
非grub修改内核参数方法
我使用zfs,pve8.0 root分区也位于zfs,使用systemd-boot引导。因此内核参数需要在/etc/kernel/cmdline修改。
- Grub:The kernel commandline needs to be placed in the variable GRUB_CMDLINE_LINUX_DEFAULT in the file /etc/default/grub. Running update-grub appends its content to all linux entries in /boot/grub/grub.cfg.
- Systemd-boot
- The kernel commandline needs to be placed as one line in
/etc/kernel/cmdline. To apply your changes, runproxmox-boot-tool refresh, which sets it as the option line for all config files inloader/entries/proxmox-*.conf.
- The kernel commandline needs to be placed as one line in
最后的内核参数
#/etc/kernel/cmdline
root=ZFS=rpool/ROOT/pve-1 boot=zfs amd_iommu=on iommu=pt pcie_acs_override=downstream,multifunction
更新引导参数:proxmox-boot-tool refresh
kernel module
设置尽早加载
保证以下module尽早加载,将其添加到/etc/modules
设置模块参数
修改一些内核模块的参数,位于/etc/modprobe.d
vifo.conf
- disable_vga后,pve启动时显示器会无法使用(vifo接管显卡后,屏幕便会卡住不变了)
kvm.conf
blacklist.conf
更新initramfs
每当修改内核模块后,需要重新生成initramfs。
update-initramfs -u
-u: update-k a: 指定一个内核版本或者all指定所有
ACS override
VFIO tips and tricks: VFIO+VGA FAQ
pcie_acs_override = [PCIE] Override missing PCIe ACS support for: downstream All downstream ports - full ACS capabilties multifunction All multifunction devices - multifunction ACS subset id:nnnn:nnnn Specfic device - full ACS capabilities Specified as vid:did (vendor/device ID) in hex
遇到的问题
boot gpu直通问题
960(第一个槽),需要关闭显示器重启pve,才能正确工作。添加内核参数video=efifb:off后,连接显示器重启没问题?
video=efifb:offand related kernel parameters don't work on Proxmox anymore. Use this work-around when doing passthrough of the boot (or only) GPU.
Also,amd_iommu=onreally does nothing andiommu=ptdoes mostly nothing. And not all Proxmox installations use GRUB.What a nice post! I've been looking for a solution to this BAR 3 issues all night. Big Thanks!
By the way, I also found better solution on a reddit post. It is adding "initcall_blacklist=sysfb_init" to kernel parameter. No need "video=efifb:off" or "video=simplefb:off" in kernel parameter. I also tested, it does solve the problem!
Reference:
https://www.reddit.com/r/VFIO/comme...let_simplefb_stay_away_from_the_gpu/?sort=old
https://www.reddit.com/r/Proxmox/comments/vc9hw3/latest_proxmox_7_the_kernel_breaks_my_gpu/?sort=old
amd 6500xt 43错误(BIOS关闭resizable BAR)
给czw直通6500xt,结果即使安装完amd驱动后仍然报43错误。最后发现是AMD GPU的问题,需要关闭Resizable BAR/Smart Access Memory https://pve.proxmox.com/wiki/PCI_Passthrough#BIOS_options
"Resizable BAR'/'Smart Access Memory': Some AMD GPUs (Vega and up) experience 'Code 43' in Windows guests if this is enabled on the host. It's not supported in VMs either way (yet), so the recommended setting is 'off'."
https://forum.proxmox.com/threads/gpu-passthrough-radeon-6800xt-and-beyond.86932/post-561971
总结
- 有用
- 关闭bios csm和smart access memory
- 添加内核参数
initcall_blacklist=sysfb_init(video=efifb:off仍然保留),重启pve
- 无用
- 我自己评论的:I firstly tryed another method, since driver 43 error is a common problem when using libvirt to create VM. see ovmf arch wiki 43. So I did similar thing: edit guest qemu config file(/etc/pve/qemu-sever/ VM id.conf), modify cpu property to "cpu: host,hidden=1,hv-vender-id=123456789".
windows随机蓝屏BOSD(修改cpu x86-v3)
VIDEO_DXGKRNL
- 10来分钟就蓝屏,没有触发条件
- gfe安装最新驱动,安装完成时黑屏,只能在pve console里操作。
- 可以再次点击快速安装安装驱动
- 可以看到设备管理器中显卡报13错误
- 重启后显示安装上了,但是如果重新安装又是以上步骤
尝试
- 关闭vnc, parsec, 小飞机等可能修改显卡的软件
- 勾上primay gpu
- 使用网上下载的msi 公版vbios,设置romfile参数VGA Bios Collection: MSI GTX 1070 8 GB | TechPowerUp
- 安装studio驱动(仍然会有上面问题)
Urgent Help, Windows 10 Crash!!! BSOD VIDEO_DXGKRNL_FATAL_ERROR | Proxmox Support Forum
把下面句子翻译成英文: 我遇到了完全一样的问题,我的win10虚拟机最近开始随机蓝屏。它过去3个星期是很正常的。我尝试了很多方法(reinstall win10, try win11, pass vbios rom file),问题仍没解决。直到我看到了你的帖子,我也尝试把CPU从host改为kvm64,问题居然神奇的解决了。
经过我之前非常多的尝试,我发现了一个能够稳定触发BOSD的方法,那就是使用GPU-Z软件导出GPU的vbios,每次确认导出时,win10系统就会蓝屏。
并且我也发现了一个不太正常的现象。GPU-Z只有在第一次打开时UEFI状态是勾上的,关闭GPU-Z软件然后再打开,UEFI就会变为未勾选状态。并打开GPU-Z软件几秒后,bus interface也会从PCIex16 3.0@x16 3.0变为 PCI。
在将CPU从host换成KVM64后,上面的问题就被解决了。GPU-Z UEFI和bus interface显示的都是正确的。
VIDEO_DXGKRNL_FATAL_ERROR in a Windows VM - workarounds? | Proxmox Support Forum
- 这个帖子认为是MSI这种软件读取了底层的不存在的寄存器导致系统崩溃
43错误总结
- 显卡驱动检测虚拟机 最早使用KVM创建虚拟机,遇到的便是这个。安装英伟达最新驱动即可
Video card drivers by AMD incorporate very basic virtual machine detection targeting Hyper-V extensions. Should this detection mechanism trigger, the drivers will refuse to run, resulting in a black screen. Nvidia guest drivers prior to version 465 exhibited a similar behaviour which resulted in a generic error 43 in the card's device manager status. Systems using these older drivers therefore also need the above modification. In addition, they also require hiding the KVM CPU leaf
If you own a GPU that supports Resizable BAR / SAM and have the corresponding BIOS option enabled, you might get code 43 because this feature is disabled in QEMU [11]. Linux Kernel release 6.1 added option to manipulate PCIe Resizable BARs through sysfs, so you can try permanently resizing it using a udev rule:
/etc/udev/rules.d/01-amd.rules

ACTION=="add", SUBSYSTEM=="pci", ATTR{vendor}=="0x1002", ATTR{device}=="0x73bf", ATTR{resource0_resize}="14"
ACTION=="add", SUBSYSTEM=="pci", ATTR{vendor}=="0x1002", ATTR{device}=="0x73bf", ATTR{resource2_resize}="8"
Alternatively, to temporarily resize the PCIe BAR, you can write the new size to /sys/bus/pci/devices/_device_address_/resource_number__resize, where device_address is the address of your GPU, such as 0000:03:00.0 (note that for changing this parameter, no driver can be loaded for the device).
You can confirm values using lspci -vvvxxxx.
直通 AX200 没有蓝牙(解决)
[求助] VM 直通 AX210 蓝牙遇到问题 - Chinese / 简体中文 - Unraid
- 看到别人都是 lsusb 能看到集成的蓝牙,但是我的没有。
[SOLVED] No bluetooth adaptater on AX200 / Kernel & Hardware / Arch Linux Forums 我的输出没有任何 firware load 的信息
root@ryzen-pve ➜  ~ dmesg | grep firm
[    0.512405] Spectre V2 : Enabling Restricted Speculation for firmware calls
[    7.689816] platform regulatory.0: Direct firmware load for regulatory.db failed with error -2

root@ryzen-pve ➜  ~ ls /lib/firmware |grep a0
iwlwifi-cc-a0-66.ucode.xz
iwlwifi-cc-a0-72.ucode.xz
我这里没有 AX200 Bluetooth,这是别人的输出
[(16:36:45)xeph:~]lsusb
Bus 004 Device 001: ID 1d6b:0003 Linux Foundation 3.0 root hub
Bus 003 Device 003: ID 8087:0029 Intel Corp. AX200 Bluetooth
Bus 003 Device 002: ID 046d:c52b Logitech, Inc. Unifying Receiver
Bus 003 Device 001: ID 1d6b:0002 Linux Foundation 2.0 root hub
Bus 002 Device 002: ID 05e3:0620 Genesys Logic, Inc. GL3523 Hub
Bus 002 Device 001: ID 1d6b:0003 Linux Foundation 3.0 root hub
Bus 001 Device 004: ID 048d:c101 Integrated Technology Express, Inc. ITE Device(8910)
Bus 001 Device 003: ID 13d3:56ff IMC Networks Integrated Camera
Bus 001 Device 002: ID 05e3:0610 Genesys Logic, Inc. Hub
Bus 001 Device 001: ID 1d6b:0002 Linux Foundation 2.0 root hub
感觉可能是因为绑定了 vifo-pci 导致的? Does anyone know how to pass through the Wi Fi 6 ax200 network card to a virtual machine with Kali Linux OS? - VM Engine (KVM) - Unraid --- 有谁知道如何通过 Wi Fi 6 ax200 网卡传递到带有 Kali Linux 操作系统的虚拟机?- 虚拟机引擎(KVM) - 取消突袭 [6.10.0-RC1] Onboard Bluetooth no longer able to passthrough to VM - Prereleases - Unraid --- [6.10.0-RC1]板载蓝牙无法再直通到 VM - 售前赛 - 取消突袭
好像和我一样,蓝牙从 usb 中消失 PVE 7.4 + Home Assistant: Intel AX200 Bluetooth issues | Proxmox Support Forum --- PVE 7.4 + 家庭助理:英特尔 AX200 蓝牙问题 |Proxmox 支持论坛
旧笔记本上的 ax200 lsusb 确实能看到设备
update:可能原因确实是绑定了 vifo-pci,导致没有看到 bluetooth。后面不知道怎么能看到 usb 蓝牙了。 但在 win10 虚拟机中,无法识别设备
解决方法为blacklist 蓝牙驱动
显卡不能连接多显示器
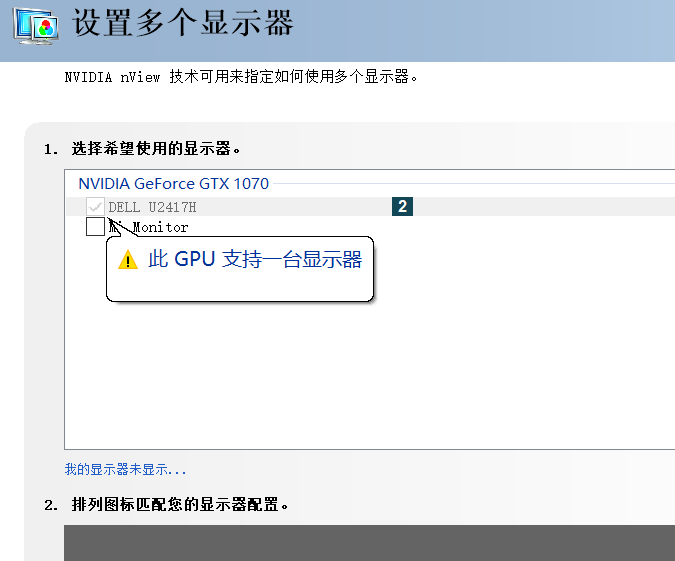
nvidia 控制面板显示该显卡只支持一个显示器。
可能的解决:直通显卡时添加了 rom 文件
参考资料
iommu=pt 能够提高性能
If intel_iommu=on or amd_iommu=on works, you can try replacing them with iommu=pt or amd_iommu=pt. The pt option only enables IOMMU for devices used in passthrough and will provide better host performance. However, the option may not be supported on all hardware. Revert to previous option if the pt option doesn't work for your host.
allow_unsafe_interrupts 选项
If the passthrough fails because the hardware does not support interrupt remapping, you can consider enabling the allow_unsafe_interrupts option if the virtual machines are trusted. The allow_unsafe_interrupts is not enabled by default because enabling it potentially exposes the host to MSI attacks from virtual machines. To enable the option:
gentoo wiki
GPU passthrough with libvirt qemu kvm - Gentoo wiki
redhat
Product Documentation for Red Hat Virtualization 4.4 | Red Hat Customer Portal Red Hat Virtualization 4.4 Setting up an NVIDIA GPU for a virtual machine in Red Hat Virtualization
qemu 参数与隐藏虚拟化
参考资料
- 方法1 设置 qemu 参数隐藏:Using VRChat in a Virtual Machine
- 启用
hypervisor=on的情况下的绕过 - 介绍了一个个启用hv-foo和使用hv-passthrough=on的区别 - 有关于 qemu SMBIOS 设置的介绍和脚本 - 方法2 修改 qemu 源码:zhaodice/proxmox-ve-anti-detection: A patch to hide PVE itself
- 是否可以在 VM 中再运行 WSL2 虚拟机? - WLS2 on Win11 VM。25% slower。Windows 11 with Hyper-V on Proxmox - onemarcfifty
qemu 参数研究
使用如下命令可以查看 pve 运行虚拟机的 qemu 命令
原来x86-64-v3,已经带了这些参数了
-cpu 'qemu64,+abm,+aes,+avx,+avx2,+bmi1,+bmi2,enforce,+f16c,+fma,hv_ipi,hv_relaxed,hv_reset,hv_runtime,hv_spinlocks=0x1fff,hv_stimer,hv_synic,hv_time,hv_vapic,hv_vpindex,+kvm_pv_eoi,+kvm_pv_unhalt,+movbe,+pni,+popcnt,+sse4.1,+sse4.2,+ssse3,+xsave'
cpu type
QEMU / KVM CPU model configuration — QEMU documentation
- 两种 CPU 方法: - host passthrough:无法 live 迁移 - named model
QEMU comes with a number of predefined named CPU models, that typically refer to specific generations of hardware released by Intel and AMD. These allow the guest VMs to have a degree of isolation from the host CPU, allowing greater flexibility in live migrating between hosts with differing hardware.
在两种情况下,都可以启用或者禁用一些特性
In both cases, it is possible to optionally add or remove individual CPU features, to alter what is presented to the guest by default.
x86-64 兼容等级,传统的操作系统和工具链采用默认的等级(x86-64-v1),但是未来的软件可能采用更高的等级。
Traditionally most operating systems and toolchains would only target the original baseline ABI. It is expected that in future OS and toolchains are likely to target newer ABIs.
x86 psABIs / x86-64 psABI · GitLab
Hyper-V Enlightenments
Hyper-V Enlightenments: Hyper-V Enlightenments — QEMU documentation
- 提示 windows 操作系统加速某些特性,类似于一种半虚拟化。
In some cases when implementing a hardware interface in software is slow, KVM implements its own paravirtualized interfaces. This works well for Linux as guest support for such features is added simultaneously with the feature itself. It may, however, be hard-to-impossible to add support for these interfaces to proprietary OSes, namely, Microsoft Windows. KVM on x86 implements Hyper-V Enlightenments for Windows guests. These features make Windows and Hyper-V guests think they’re running on top of a Hyper-V compatible hypervisor and use Hyper-V specific features.
让 windows 任务管理器不显示虚拟机最小配置
cpu: host,hidden=1:pve CPU 类型加上 hidden 不行-cpu kvm=off:不行 -kvm=off:kvm=off don't touch kvm acceleration, just changes visibility of KVM to guests.
成功让任务管理器显示非虚拟机
args: -cpu 'host,-hypervisor,kvm=off,+kvm_pv_unhalt,+kvm_pv_eoi,hv_spinlocks=0x1fff,hv_vapic,hv_time,hv_reset,hv_vpindex,hv_runtime,hv_relaxed,hv_vendor_id=intel'
hv_vendor_id 可以随便填。并不是表示intel CPU的意思。
是否仅需(待测试):args: -cpu host,-hypervisor,hv_vendor_id=amd
调节 qemu -cpu 参数
VRChat 虚拟机运行(居然是官方文档):Using VRChat in a Virtual Machine
- 设置1
- 设置2 - 这个方案启用了 hv-passthrogth,是不推荐的。会启用所有 KVM 支持的 Hyper-V entitlments,可能硬件不支持一些选项
- 设置3
- 增加一些
-smbios type=#,...,使得看得更像真实硬件。 - 获取脚本:https://gist.github.com/kiler129/5d437a37c07ac6eb1cdf0e595e488fd2
设置1 +设置3 可用配置
args: -cpu 'host,kvm=off,migratable=off,hypervisor=on,topoext=on,hv_relaxed,hv_reset,hv_runtime,hv_stimer,hv_synic,hv_time,hv_vapic,hv_vpindex,hv-frequencies,hv-avic,hv-vendor-id=0123456789AB,host-cache-info=on,apic=on,invtsc=on' -smbios 'type=0,version=2803,vendor=American Megatrends Inc.,uefi=on,release=5.17,date=04/27/2022' -smbios 'type=1,version=System Version,sku=SKU,product=System Product Name,manufacturer=ASUS,uuid=1eb6d23f-6e89-a8c6-1bca-7c10c9a253d8,serial=System Serial Number,family=To be filled by O.E.M.' -smbios 'type=2,asset=Default string,version=Rev X.0x,product=TUF GAMING B550M-PLUS (WI-FI),location=Default string,manufacturer=ASUSTeK COMPUTER INC.,serial=210686671502915' -smbios 'type=3,asset=Default string,version=Default string,sku=Default string,manufacturer=Default string,serial=Default string' -smbios 'type=4,asset=Unknown,version=AMD Ryzen 7 5800X 8-Core Processor             ,part=Zen,manufacturer=Advanced Micro Devices,, Inc.,serial=Unknown,sock_pfx=AM4' -smbios 'type=11,value=Default string' -smbios 'type=17,bank=Bank 0,asset=Not Specified,part=YPT4U2666D19161C,manufacturer=GLOWAY,speed=3200,serial=31EEBDB8,loc_pfx=DIMM 0'
balloon: 0
bios: ovmf
boot: order=scsi0;sata0
cores: 16
cpu: host,hidden=1
游戏例子
- EasyAntiCheat(EAC) - VRChat - 原神
- 腾讯 ACE - 即使 windows 不显示虚拟机了,仍然反作弊报错。寄,网上找不到解决办法
pve-anti-cheat 项目
zhaodice/proxmox-ve-anti-detection: A patch to hide PVE itself zhaodice/qemu-anti-detection: A patch to hide qemu itself, bypass mhyprot,EAC,nProtect / VMProtect,VProtect, Themida, Enigma Protector,Safegine Shielden 原理:更改 qemu 字符串,伪装成真实硬件型号
目前支持的反作弊
| Type | Engine | Bypass |
|---|---|---|
| AntiCheat | Anti Cheat Expert (ACE) | ☑️ |
| AntiCheat | Easy Anti Cheat (EAC) | ☑️ |
| AntiCheat | Gepard Shield | ☑️ (Needs patched kernel on host: https://github.com/WCharacter/RDTSC-KVM-Handler ) |
| AntiCheat | Mhyprot | ☑️ |
| AntiCheat | nProtect GameGuard (NP) | ☑️ |
| AntiCheat | Roblox | ☑️ May work with Hyper-V in the guest: #56 |
| AntiCheat | Vanguard | ‼️(1: Incorrect function) |
| Encrypt | Enigma Protector | ☑️ |
| Encrypt | Safegine Shielden | ☑️ |
| Encrypt | Themida | ☑️ |
| Encrypt | VMProtect | ☑️ |
| Encrypt | VProtect | ☑️ |
原版不更新了,支持版本有限,fork 版本 lixiaoliu666/pve-anti-detection: PVE virtual machine emulates a physical machine to avoid(or anti) detection(pve虚拟机模拟真实机器防检测)
- action 自动编译最新 pve qemu 版本
- 安装 deb 即可,不需要自己手动编译
PVE 8.2.7,仅手动安装 pve-qemu-kvm_9.2.0-2_amd64.deb 了,win11 虚拟机甚至没重启,居然已经生效了。
cpu 设置为 x86-v3 的情况下,可以启动 VRChat 和 ACE 软件。
其它问题
修改 hostname 寄
Fix Proxmox Error after hostname/ip change (web-wilke.de) 修改了 hostname 后,容器虚拟机都看不见了。尝试修改/etc/hosts 但是不够,最后没弄好,还是改回原来的 hostname 了。
备份单个 disk
zfs 自己备份可以吗? 我创建的 VM 不知为何不支持快照。
backup single disk in VM | Proxmox Support Forum
zerotier 无法启动
特权容器或添加权限
vim /etc/pve/lxc/100.conf

...
onboot: 1
ostype: unmanaged
parent: basic
rootfs: local-zfs:subvol-100-disk-0,size=100G
swap: 0
unprivileged: 1
lxc.cgroup2.devices.allow: c 10:200 rwm
lxc.mount.entry: /dev/net dev/net none bind,create=dir

[basic]
#%E5%9F%BA%E6%9C%AC%E9%98%B2%E7%81%AB%E5%A2%99%EF%BC%8Cddns%EF%BC%8Cwg_s2s%E5%8F%AF%E4%BB%A5%E8%BF%9E%E6%8E%A5op1,op3
arch: amd64
cores: 2
hostname: op2
磁盘测速
ryzen 虚拟机
pcie4.0 爱国者 2T
➜  fio sudo fio --filename=test.bin ssd-win-likely.fio
seq-read-4m: (g=0): rw=read, bs=(R) 4096KiB-4096KiB, (W) 4096KiB-4096KiB, (T) 4096KiB-4096KiB, ioengine=libaio, iodepth=32
seq-write-4m: (g=1): rw=write, bs=(R) 4096KiB-4096KiB, (W) 4096KiB-4096KiB, (T) 4096KiB-4096KiB, ioengine=libaio, iodepth=32
rand-read-4k: (g=2): rw=randread, bs=(R) 4096B-4096B, (W) 4096B-4096B, (T) 4096B-4096B, ioengine=libaio, iodepth=4
rand-write-4k: (g=3): rw=randwrite, bs=(R) 4096B-4096B, (W) 4096B-4096B, (T) 4096B-4096B, ioengine=libaio, iodepth=4
fio-3.28
Starting 4 processes
seq-read-4m: Laying out IO file (1 file / 10240MiB)
Jobs: 1 (f=1): [_(3),w(1)][68.5%][w=80.5MiB/s][w=20.6k IOPS][eta 01m:10s]
seq-read-4m: (groupid=0, jobs=1): err= 0: pid=778450: Fri Sep 29 23:47:57 2023
  read: IOPS=556, BW=2226MiB/s (2334MB/s)(10.0GiB/4600msec)
    slat (usec): min=47, max=7932, avg=478.16, stdev=665.62
    clat (msec): min=8, max=162, avg=56.62, stdev=22.04
     lat (msec): min=8, max=162, avg=57.10, stdev=21.94
    clat percentiles (msec):
     |  1.00th=[   15],  5.00th=[   23], 10.00th=[   28], 20.00th=[   36],
     | 30.00th=[   44], 40.00th=[   51], 50.00th=[   59], 60.00th=[   64],
     | 70.00th=[   69], 80.00th=[   74], 90.00th=[   82], 95.00th=[   91],
     | 99.00th=[  131], 99.50th=[  142], 99.90th=[  159], 99.95th=[  161],
     | 99.99th=[  163]
   bw (  MiB/s): min= 1993, max= 2336, per=99.89%, avg=2223.66, stdev=118.21, samples=8
   iops        : min=  498, max=  584, avg=555.63, stdev=29.56, samples=8
  lat (msec)   : 10=0.08%, 20=3.01%, 50=36.45%, 100=58.32%, 250=2.15%
  cpu          : usr=0.89%, sys=25.74%, ctx=2221, majf=1, minf=32780
  IO depths    : 1=0.1%, 2=0.1%, 4=0.2%, 8=0.3%, 16=0.6%, 32=98.8%, >=64=0.0%
     submit    : 0=0.0%, 4=100.0%, 8=0.0%, 16=0.0%, 32=0.0%, 64=0.0%, >=64=0.0%
     complete  : 0=0.0%, 4=100.0%, 8=0.0%, 16=0.0%, 32=0.1%, 64=0.0%, >=64=0.0%
     issued rwts: total=2560,0,0,0 short=0,0,0,0 dropped=0,0,0,0
     latency   : target=0, window=0, percentile=100.00%, depth=32
seq-write-4m: (groupid=1, jobs=1): err= 0: pid=778524: Fri Sep 29 23:47:57 2023
  write: IOPS=82, BW=330MiB/s (346MB/s)(10.0GiB/31034msec); 0 zone resets
    slat (usec): min=76, max=221964, avg=1061.67, stdev=5512.31
    clat (msec): min=4, max=7483, avg=385.10, stdev=1126.37
     lat (msec): min=5, max=7484, avg=386.16, stdev=1126.51
    clat percentiles (msec):
     |  1.00th=[   12],  5.00th=[   22], 10.00th=[   27], 20.00th=[   34],
     | 30.00th=[   43], 40.00th=[   52], 50.00th=[   64], 60.00th=[   74],
     | 70.00th=[   96], 80.00th=[  142], 90.00th=[  502], 95.00th=[ 2970],
     | 99.00th=[ 5604], 99.50th=[ 5604], 99.90th=[ 7483], 99.95th=[ 7483],
     | 99.99th=[ 7483]
   bw (  KiB/s): min=65667, max=2682078, per=100.00%, avg=823187.87, stdev=652362.03, samples=24
   iops        : min=   16, max=  654, avg=200.58, stdev=159.18, samples=24
  lat (msec)   : 10=0.82%, 20=2.77%, 50=34.80%, 100=32.73%, 250=15.51%
  lat (msec)   : 500=3.20%, 750=1.64%, 1000=0.55%, 2000=1.41%, >=2000=6.56%
  cpu          : usr=3.45%, sys=5.12%, ctx=1899, majf=0, minf=15
  IO depths    : 1=0.1%, 2=0.1%, 4=0.2%, 8=0.3%, 16=0.6%, 32=98.8%, >=64=0.0%
     submit    : 0=0.0%, 4=100.0%, 8=0.0%, 16=0.0%, 32=0.0%, 64=0.0%, >=64=0.0%
     complete  : 0=0.0%, 4=100.0%, 8=0.0%, 16=0.0%, 32=0.1%, 64=0.0%, >=64=0.0%
     issued rwts: total=0,2560,0,0 short=0,0,0,0 dropped=0,0,0,0
     latency   : target=0, window=0, percentile=100.00%, depth=32
rand-read-4k: (groupid=2, jobs=1): err= 0: pid=778956: Fri Sep 29 23:47:57 2023
  read: IOPS=50.4k, BW=197MiB/s (207MB/s)(10.0GiB/51982msec)
    slat (nsec): min=1170, max=3868.5k, avg=4517.95, stdev=7664.76
    clat (nsec): min=220, max=1695.1M, avg=74038.40, stdev=2120026.59
     lat (usec): min=12, max=1695.1k, avg=78.64, stdev=2120.05
    clat percentiles (usec):
     |  1.00th=[   18],  5.00th=[   21], 10.00th=[   23], 20.00th=[   26],
     | 30.00th=[   33], 40.00th=[   76], 50.00th=[   81], 60.00th=[   84],
     | 70.00th=[   88], 80.00th=[   93], 90.00th=[  105], 95.00th=[  123],
     | 99.00th=[  210], 99.50th=[  293], 99.90th=[  627], 99.95th=[ 1074],
     | 99.99th=[ 1975]
   bw (  KiB/s): min= 5643, max=270960, per=100.00%, avg=205429.51, stdev=34312.15, samples=101
   iops        : min= 1410, max=67740, avg=51357.30, stdev=8578.07, samples=101
  lat (nsec)   : 250=0.01%, 500=0.01%, 750=0.01%, 1000=0.01%
  lat (usec)   : 2=0.01%, 10=0.01%, 20=4.52%, 50=32.03%, 100=50.56%
  lat (usec)   : 250=12.11%, 500=0.62%, 750=0.08%, 1000=0.02%
  lat (msec)   : 2=0.05%, 4=0.01%, 10=0.01%, 20=0.01%, 50=0.01%
  lat (msec)   : 500=0.01%, 2000=0.01%
  cpu          : usr=7.47%, sys=29.84%, ctx=1440214, majf=0, minf=21
  IO depths    : 1=0.1%, 2=0.1%, 4=100.0%, 8=0.0%, 16=0.0%, 32=0.0%, >=64=0.0%
     submit    : 0=0.0%, 4=100.0%, 8=0.0%, 16=0.0%, 32=0.0%, 64=0.0%, >=64=0.0%
     complete  : 0=0.0%, 4=100.0%, 8=0.0%, 16=0.0%, 32=0.0%, 64=0.0%, >=64=0.0%
     issued rwts: total=2621440,0,0,0 short=0,0,0,0 dropped=0,0,0,0
     latency   : target=0, window=0, percentile=100.00%, depth=4
rand-write-4k: (groupid=3, jobs=1): err= 0: pid=779798: Fri Sep 29 23:47:57 2023
  write: IOPS=20.3k, BW=79.1MiB/s (83.0MB/s)(4748MiB/60005msec); 0 zone resets
    slat (nsec): min=1270, max=418621k, avg=6166.83, stdev=381021.38
    clat (nsec): min=290, max=1815.5M, avg=190356.30, stdev=6618668.74
     lat (usec): min=16, max=1815.5k, avg=196.62, stdev=6629.88
    clat percentiles (usec):
     |  1.00th=[   21],  5.00th=[   26], 10.00th=[   30], 20.00th=[   52],
     | 30.00th=[   83], 40.00th=[   87], 50.00th=[   91], 60.00th=[   95],
     | 70.00th=[  102], 80.00th=[  120], 90.00th=[  188], 95.00th=[  318],
     | 99.00th=[ 1844], 99.50th=[ 2008], 99.90th=[ 4424], 99.95th=[ 7635],
     | 99.99th=[20579]
   bw (  KiB/s): min= 1920, max=185240, per=100.00%, avg=88600.73, stdev=62711.61, samples=108
   iops        : min=  480, max=46310, avg=22150.14, stdev=15677.91, samples=108
  lat (nsec)   : 500=0.01%, 750=0.01%, 1000=0.01%
  lat (usec)   : 2=0.01%, 4=0.01%, 10=0.01%, 20=0.63%, 50=19.19%
  lat (usec)   : 100=47.74%, 250=25.71%, 500=3.06%, 750=0.44%, 1000=0.25%
  lat (msec)   : 2=2.46%, 4=0.39%, 10=0.08%, 20=0.02%, 50=0.01%
  lat (msec)   : 100=0.01%, 500=0.01%, 750=0.01%, 1000=0.01%, 2000=0.01%
  cpu          : usr=2.85%, sys=12.76%, ctx=889109, majf=0, minf=17
  IO depths    : 1=0.1%, 2=0.1%, 4=100.0%, 8=0.0%, 16=0.0%, 32=0.0%, >=64=0.0%
     submit    : 0=0.0%, 4=100.0%, 8=0.0%, 16=0.0%, 32=0.0%, 64=0.0%, >=64=0.0%
     complete  : 0=0.0%, 4=100.0%, 8=0.0%, 16=0.0%, 32=0.0%, 64=0.0%, >=64=0.0%
     issued rwts: total=0,1215500,0,0 short=0,0,0,0 dropped=0,0,0,0
     latency   : target=0, window=0, percentile=100.00%, depth=4

Run status group 0 (all jobs):
   READ: bw=2226MiB/s (2334MB/s), 2226MiB/s-2226MiB/s (2334MB/s-2334MB/s), io=10.0GiB (10.7GB), run=4600-4600msec

Run status group 1 (all jobs):
  WRITE: bw=330MiB/s (346MB/s), 330MiB/s-330MiB/s (346MB/s-346MB/s), io=10.0GiB (10.7GB), run=31034-31034msec

Run status group 2 (all jobs):
   READ: bw=197MiB/s (207MB/s), 197MiB/s-197MiB/s (207MB/s-207MB/s), io=10.0GiB (10.7GB), run=51982-51982msec

Run status group 3 (all jobs):
  WRITE: bw=79.1MiB/s (83.0MB/s), 79.1MiB/s-79.1MiB/s (83.0MB/s-83.0MB/s), io=4748MiB (4979MB), run=60005-60005msec

Disk stats (read/write):
  sdb: ios=2641793/1235910, merge=38/87, ticks=1077282/5674545, in_queue=6778554, util=94.90%
三星 981at
➜  fio sudo fio --directory=/root/ --filename=test.bin ssd-win-likely.fio
seq-read-4m: (g=0): rw=read, bs=(R) 4096KiB-4096KiB, (W) 4096KiB-4096KiB, (T) 4096KiB-4096KiB, ioengine=libaio, iodepth=32
seq-write-4m: (g=1): rw=write, bs=(R) 4096KiB-4096KiB, (W) 4096KiB-4096KiB, (T) 4096KiB-4096KiB, ioengine=libaio, iodepth=32
rand-read-4k: (g=2): rw=randread, bs=(R) 4096B-4096B, (W) 4096B-4096B, (T) 4096B-4096B, ioengine=libaio, iodepth=4
rand-write-4k: (g=3): rw=randwrite, bs=(R) 4096B-4096B, (W) 4096B-4096B, (T) 4096B-4096B, ioengine=libaio, iodepth=4
fio-3.28
Starting 4 processes
seq-read-4m: Laying out IO file (1 file / 10240MiB)
Jobs: 1 (f=0): [_(3),f(1)][100.0%][w=69.1MiB/s][w=17.7k IOPS][eta 00m:00s]
seq-read-4m: (groupid=0, jobs=1): err= 0: pid=787066: Fri Sep 29 23:56:40 2023
  read: IOPS=460, BW=1841MiB/s (1930MB/s)(10.0GiB/5563msec)
    slat (usec): min=53, max=9744, avg=478.53, stdev=703.84
    clat (msec): min=9, max=889, avg=68.36, stdev=87.28
     lat (msec): min=10, max=889, avg=68.84, stdev=87.24
    clat percentiles (msec):
     |  1.00th=[   16],  5.00th=[   23], 10.00th=[   28], 20.00th=[   36],
     | 30.00th=[   43], 40.00th=[   51], 50.00th=[   59], 60.00th=[   67],
     | 70.00th=[   74], 80.00th=[   82], 90.00th=[   91], 95.00th=[  106],
     | 99.00th=[  743], 99.50th=[  885], 99.90th=[  885], 99.95th=[  885],
     | 99.99th=[  894]
   bw (  MiB/s): min=  945, max= 2324, per=100.00%, avg=1988.74, stdev=387.84, samples=10
   iops        : min=  236, max=  581, avg=496.70, stdev=96.92, samples=10
  lat (msec)   : 10=0.04%, 20=2.54%, 50=36.60%, 100=54.69%, 250=4.92%
  lat (msec)   : 750=0.39%, 1000=0.82%
  cpu          : usr=0.58%, sys=21.22%, ctx=2383, majf=0, minf=32780
  IO depths    : 1=0.1%, 2=0.1%, 4=0.2%, 8=0.3%, 16=0.6%, 32=98.8%, >=64=0.0%
     submit    : 0=0.0%, 4=100.0%, 8=0.0%, 16=0.0%, 32=0.0%, 64=0.0%, >=64=0.0%
     complete  : 0=0.0%, 4=100.0%, 8=0.0%, 16=0.0%, 32=0.1%, 64=0.0%, >=64=0.0%
     issued rwts: total=2560,0,0,0 short=0,0,0,0 dropped=0,0,0,0
     latency   : target=0, window=0, percentile=100.00%, depth=32
seq-write-4m: (groupid=1, jobs=1): err= 0: pid=787186: Fri Sep 29 23:56:40 2023
  write: IOPS=235, BW=940MiB/s (986MB/s)(10.0GiB/10890msec); 0 zone resets
    slat (usec): min=69, max=73786, avg=783.64, stdev=3051.53
    clat (msec): min=2, max=2041, avg=135.28, stdev=287.50
     lat (msec): min=2, max=2042, avg=136.06, stdev=287.42
    clat percentiles (msec):
     |  1.00th=[   14],  5.00th=[   21], 10.00th=[   27], 20.00th=[   36],
     | 30.00th=[   46], 40.00th=[   57], 50.00th=[   68], 60.00th=[   83],
     | 70.00th=[  102], 80.00th=[  126], 90.00th=[  182], 95.00th=[  326],
     | 99.00th=[ 2022], 99.50th=[ 2022], 99.90th=[ 2039], 99.95th=[ 2039],
     | 99.99th=[ 2039]
   bw (  MiB/s): min=  370, max= 2341, per=100.00%, avg=1198.88, stdev=516.41, samples=16
   iops        : min=   92, max=  585, avg=299.31, stdev=129.04, samples=16
  lat (msec)   : 4=0.20%, 10=0.55%, 20=4.14%, 50=29.77%, 100=34.84%
  lat (msec)   : 250=24.14%, 500=2.30%, 750=1.05%, 2000=1.76%, >=2000=1.25%
  cpu          : usr=7.14%, sys=12.19%, ctx=1959, majf=0, minf=14
  IO depths    : 1=0.1%, 2=0.1%, 4=0.2%, 8=0.3%, 16=0.6%, 32=98.8%, >=64=0.0%
     submit    : 0=0.0%, 4=100.0%, 8=0.0%, 16=0.0%, 32=0.0%, 64=0.0%, >=64=0.0%
     complete  : 0=0.0%, 4=100.0%, 8=0.0%, 16=0.0%, 32=0.1%, 64=0.0%, >=64=0.0%
     issued rwts: total=0,2560,0,0 short=0,0,0,0 dropped=0,0,0,0
     latency   : target=0, window=0, percentile=100.00%, depth=32
rand-read-4k: (groupid=2, jobs=1): err= 0: pid=787189: Fri Sep 29 23:56:40 2023
  read: IOPS=42.8k, BW=167MiB/s (175MB/s)(9.79GiB/60001msec)
    slat (nsec): min=1180, max=378282k, avg=4607.87, stdev=236197.07
    clat (nsec): min=240, max=1725.2M, avg=87451.41, stdev=4192102.00
     lat (usec): min=12, max=1725.2k, avg=92.80, stdev=4327.60
    clat percentiles (usec):
     |  1.00th=[   18],  5.00th=[   21], 10.00th=[   22], 20.00th=[   26],
     | 30.00th=[   30], 40.00th=[   47], 50.00th=[   92], 60.00th=[   96],
     | 70.00th=[   99], 80.00th=[  104], 90.00th=[  115], 95.00th=[  129],
     | 99.00th=[  212], 99.50th=[  306], 99.90th=[  578], 99.95th=[  742],
     | 99.99th=[ 1893]
   bw (  KiB/s): min=13755, max=264232, per=100.00%, avg=183324.63, stdev=52285.27, samples=111
   iops        : min= 3438, max=66058, avg=45831.09, stdev=13071.34, samples=111
  lat (nsec)   : 250=0.01%, 500=0.01%, 750=0.01%, 1000=0.01%
  lat (usec)   : 2=0.01%, 4=0.01%, 10=0.01%, 20=4.54%, 50=35.97%
  lat (usec)   : 100=31.58%, 250=27.11%, 500=0.66%, 750=0.10%, 1000=0.03%
  lat (msec)   : 2=0.01%, 4=0.01%, 10=0.01%, 20=0.01%, 50=0.01%
  lat (msec)   : 500=0.01%, 750=0.01%, 1000=0.01%, 2000=0.01%
  cpu          : usr=7.24%, sys=27.70%, ctx=1476701, majf=0, minf=20
  IO depths    : 1=0.1%, 2=0.1%, 4=100.0%, 8=0.0%, 16=0.0%, 32=0.0%, >=64=0.0%
     submit    : 0=0.0%, 4=100.0%, 8=0.0%, 16=0.0%, 32=0.0%, 64=0.0%, >=64=0.0%
     complete  : 0=0.0%, 4=100.0%, 8=0.0%, 16=0.0%, 32=0.0%, 64=0.0%, >=64=0.0%
     issued rwts: total=2567447,0,0,0 short=0,0,0,0 dropped=0,0,0,0
     latency   : target=0, window=0, percentile=100.00%, depth=4
rand-write-4k: (groupid=3, jobs=1): err= 0: pid=788193: Fri Sep 29 23:56:40 2023
  write: IOPS=30.2k, BW=118MiB/s (124MB/s)(7081MiB/60001msec); 0 zone resets
    slat (nsec): min=1260, max=40475k, avg=6308.96, stdev=55626.04
    clat (nsec): min=300, max=1630.1M, avg=125086.99, stdev=2894812.01
     lat (usec): min=17, max=1630.1k, avg=131.50, stdev=2895.61
    clat percentiles (usec):
     |  1.00th=[   21],  5.00th=[   25], 10.00th=[   29], 20.00th=[   49],
     | 30.00th=[   94], 40.00th=[   98], 50.00th=[  101], 60.00th=[  105],
     | 70.00th=[  111], 80.00th=[  119], 90.00th=[  149], 95.00th=[  221],
     | 99.00th=[  498], 99.50th=[  758], 99.90th=[ 3163], 99.95th=[ 6063],
     | 99.99th=[23725]
   bw (  KiB/s): min=10431, max=171952, per=100.00%, avg=122835.52, stdev=47622.27, samples=112
   iops        : min= 2607, max=42988, avg=30708.83, stdev=11905.58, samples=112
  lat (nsec)   : 500=0.01%, 750=0.01%, 1000=0.01%
  lat (usec)   : 2=0.01%, 4=0.01%, 10=0.01%, 20=0.73%, 50=19.45%
  lat (usec)   : 100=25.98%, 250=49.77%, 500=3.06%, 750=0.49%, 1000=0.19%
  lat (msec)   : 2=0.17%, 4=0.07%, 10=0.05%, 20=0.02%, 50=0.01%
  lat (msec)   : 100=0.01%, 250=0.01%, 750=0.01%, 2000=0.01%
  cpu          : usr=4.53%, sys=20.36%, ctx=1376235, majf=0, minf=16
  IO depths    : 1=0.1%, 2=0.1%, 4=100.0%, 8=0.0%, 16=0.0%, 32=0.0%, >=64=0.0%
     submit    : 0=0.0%, 4=100.0%, 8=0.0%, 16=0.0%, 32=0.0%, 64=0.0%, >=64=0.0%
     complete  : 0=0.0%, 4=100.0%, 8=0.0%, 16=0.0%, 32=0.0%, 64=0.0%, >=64=0.0%
     issued rwts: total=0,1812637,0,0 short=0,0,0,0 dropped=0,0,0,0
     latency   : target=0, window=0, percentile=100.00%, depth=4

Run status group 0 (all jobs):
   READ: bw=1841MiB/s (1930MB/s), 1841MiB/s-1841MiB/s (1930MB/s-1930MB/s), io=10.0GiB (10.7GB), run=5563-5563msec

Run status group 1 (all jobs):
  WRITE: bw=940MiB/s (986MB/s), 940MiB/s-940MiB/s (986MB/s-986MB/s), io=10.0GiB (10.7GB), run=10890-10890msec

Run status group 2 (all jobs):
   READ: bw=167MiB/s (175MB/s), 167MiB/s-167MiB/s (175MB/s-175MB/s), io=9.79GiB (10.5GB), run=60001-60001msec

Run status group 3 (all jobs):
  WRITE: bw=118MiB/s (124MB/s), 118MiB/s-118MiB/s (124MB/s-124MB/s), io=7081MiB (7425MB), run=60001-60001msec

Disk stats (read/write):
  sda: ios=2588374/1830074, merge=92/389, ticks=1241127/2284278, in_queue=3529480, util=95.33%
n5105 铠侠 rc20 500GB
root@n5105-pve ➜  fio fio --filename=test.bin ssd-win-likely.fio
seq-read-4m: (g=0): rw=read, bs=(R) 4096KiB-4096KiB, (W) 4096KiB-4096KiB, (T) 4096KiB-4096KiB, ioengine=libaio, iodepth=32
seq-write-4m: (g=1): rw=write, bs=(R) 4096KiB-4096KiB, (W) 4096KiB-4096KiB, (T) 4096KiB-4096KiB, ioengine=libaio, iodepth=32
rand-read-4k: (g=2): rw=randread, bs=(R) 4096B-4096B, (W) 4096B-4096B, (T) 4096B-4096B, ioengine=libaio, iodepth=4
rand-write-4k: (g=3): rw=randwrite, bs=(R) 4096B-4096B, (W) 4096B-4096B, (T) 4096B-4096B, ioengine=libaio, iodepth=4
fio-3.33
Starting 4 processes
Jobs: 1 (f=1): [_(3),w(1)][59.0%][w=3081KiB/s][w=770 IOPS][eta 02m:19s]
seq-read-4m: (groupid=0, jobs=1): err= 0: pid=422690: Sat Sep 30 00:46:36 2023
  read: IOPS=140, BW=560MiB/s (588MB/s)(10.0GiB/18274msec)
    slat (usec): min=5966, max=22258, avg=7123.69, stdev=945.70
    clat (usec): min=13, max=331888, avg=219709.66, stdev=21151.42
     lat (msec): min=6, max=338, avg=226.83, stdev=21.36
    clat percentiles (msec):
     |  1.00th=[  180],  5.00th=[  209], 10.00th=[  211], 20.00th=[  213],
     | 30.00th=[  218], 40.00th=[  218], 50.00th=[  220], 60.00th=[  222],
     | 70.00th=[  222], 80.00th=[  222], 90.00th=[  226], 95.00th=[  232],
     | 99.00th=[  296], 99.50th=[  330], 99.90th=[  330], 99.95th=[  330],
     | 99.99th=[  334]
   bw (  KiB/s): min=357840, max=614400, per=99.09%, avg=568612.03, stdev=44133.11, samples=36
   iops        : min=   87, max=  150, avg=138.75, stdev=10.82, samples=36
  lat (usec)   : 20=0.04%
  lat (msec)   : 10=0.04%, 20=0.04%, 50=0.20%, 100=0.23%, 250=95.62%
  lat (msec)   : 500=3.83%
  cpu          : usr=0.33%, sys=26.03%, ctx=10676, majf=0, minf=32779
  IO depths    : 1=0.1%, 2=0.1%, 4=0.2%, 8=0.3%, 16=0.6%, 32=98.8%, >=64=0.0%
     submit    : 0=0.0%, 4=100.0%, 8=0.0%, 16=0.0%, 32=0.0%, 64=0.0%, >=64=0.0%
     complete  : 0=0.0%, 4=100.0%, 8=0.0%, 16=0.0%, 32=0.1%, 64=0.0%, >=64=0.0%
     issued rwts: total=2560,0,0,0 short=0,0,0,0 dropped=0,0,0,0
     latency   : target=0, window=0, percentile=100.00%, depth=32
seq-write-4m: (groupid=1, jobs=1): err= 0: pid=447378: Sat Sep 30 00:46:36 2023
  write: IOPS=29, BW=118MiB/s (123MB/s)(7168MiB/60944msec); 0 zone resets
    slat (usec): min=1337, max=3922.2k, avg=33986.69, stdev=277349.50
    clat (usec): min=13, max=4661.5k, avg=1053752.98, stdev=1375122.08
     lat (msec): min=54, max=4680, avg=1087.74, stdev=1395.81
    clat percentiles (msec):
     |  1.00th=[   63],  5.00th=[   88], 10.00th=[  105], 20.00th=[  109],
     | 30.00th=[  144], 40.00th=[  205], 50.00th=[  262], 60.00th=[  531],
     | 70.00th=[ 1028], 80.00th=[ 2970], 90.00th=[ 3574], 95.00th=[ 3809],
     | 99.00th=[ 4530], 99.50th=[ 4597], 99.90th=[ 4665], 99.95th=[ 4665],
     | 99.99th=[ 4665]
   bw (  KiB/s): min= 8208, max=787386, per=100.00%, avg=306489.37, stdev=235225.24, samples=46
   iops        : min=    2, max=  192, avg=74.54, stdev=57.29, samples=46
  lat (usec)   : 20=0.06%
  lat (msec)   : 100=8.37%, 250=37.67%, 500=13.06%, 750=3.18%, 1000=6.19%
  lat (msec)   : 2000=10.71%, >=2000=20.76%
  cpu          : usr=0.86%, sys=5.95%, ctx=26464, majf=0, minf=12
  IO depths    : 1=0.1%, 2=0.1%, 4=0.2%, 8=0.4%, 16=0.9%, 32=98.3%, >=64=0.0%
     submit    : 0=0.0%, 4=100.0%, 8=0.0%, 16=0.0%, 32=0.0%, 64=0.0%, >=64=0.0%
     complete  : 0=0.0%, 4=99.9%, 8=0.0%, 16=0.0%, 32=0.1%, 64=0.0%, >=64=0.0%
     issued rwts: total=0,1792,0,0 short=0,0,0,0 dropped=0,0,0,0
     latency   : target=0, window=0, percentile=100.00%, depth=32
rand-read-4k: (groupid=2, jobs=1): err= 0: pid=449479: Sat Sep 30 00:46:36 2023
  read: IOPS=2352, BW=9409KiB/s (9634kB/s)(551MiB/60001msec)
    slat (usec): min=6, max=24639, avg=421.40, stdev=272.49
    clat (usec): min=2, max=36072, avg=1277.22, stdev=607.71
     lat (usec): min=374, max=42067, avg=1698.61, stdev=744.53
    clat percentiles (usec):
     |  1.00th=[  996],  5.00th=[ 1037], 10.00th=[ 1074], 20.00th=[ 1106],
     | 30.00th=[ 1139], 40.00th=[ 1156], 50.00th=[ 1188], 60.00th=[ 1237],
     | 70.00th=[ 1287], 80.00th=[ 1352], 90.00th=[ 1483], 95.00th=[ 1614],
     | 99.00th=[ 2507], 99.50th=[ 3032], 99.90th=[12518], 99.95th=[15401],
     | 99.99th=[17695]
   bw (  KiB/s): min= 1744, max=10080, per=99.99%, avg=9408.22, stdev=1395.59, samples=119
   iops        : min=  436, max= 2520, avg=2351.96, stdev=348.88, samples=119
  lat (usec)   : 4=0.01%, 500=0.01%, 750=0.03%, 1000=1.37%
  lat (msec)   : 2=96.73%, 4=1.58%, 10=0.15%, 20=0.14%, 50=0.01%
  cpu          : usr=0.87%, sys=9.69%, ctx=141627, majf=0, minf=13
  IO depths    : 1=0.1%, 2=0.1%, 4=100.0%, 8=0.0%, 16=0.0%, 32=0.0%, >=64=0.0%
     submit    : 0=0.0%, 4=100.0%, 8=0.0%, 16=0.0%, 32=0.0%, 64=0.0%, >=64=0.0%
     complete  : 0=0.0%, 4=100.0%, 8=0.0%, 16=0.0%, 32=0.0%, 64=0.0%, >=64=0.0%
     issued rwts: total=141132,0,0,0 short=0,0,0,0 dropped=0,0,0,0
     latency   : target=0, window=0, percentile=100.00%, depth=4
rand-write-4k: (groupid=3, jobs=1): err= 0: pid=505899: Sat Sep 30 00:46:36 2023
  write: IOPS=776, BW=3105KiB/s (3179kB/s)(182MiB/60001msec); 0 zone resets
    slat (usec): min=8, max=64884, avg=1276.50, stdev=1138.90
    clat (usec): min=4, max=125427, avg=3870.75, stdev=2918.05
     lat (usec): min=760, max=168093, avg=5147.25, stdev=3727.98
    clat percentiles (usec):
     |  1.00th=[  1680],  5.00th=[  2147], 10.00th=[  2245], 20.00th=[  2376],
     | 30.00th=[  2507], 40.00th=[  2704], 50.00th=[  3032], 60.00th=[  3982],
     | 70.00th=[  4817], 80.00th=[  5407], 90.00th=[  5997], 95.00th=[  6521],
     | 99.00th=[  8848], 99.50th=[ 11338], 99.90th=[ 31065], 99.95th=[ 66323],
     | 99.99th=[110625]
   bw (  KiB/s): min= 1405, max= 5016, per=99.72%, avg=3096.45, stdev=976.25, samples=119
   iops        : min=  351, max= 1254, avg=774.01, stdev=244.12, samples=119
  lat (usec)   : 10=0.01%, 750=0.01%, 1000=0.01%
  lat (msec)   : 2=1.54%, 4=58.60%, 10=39.19%, 20=0.46%, 50=0.12%
  lat (msec)   : 100=0.03%, 250=0.03%
  cpu          : usr=0.77%, sys=8.83%, ctx=99364, majf=0, minf=10
  IO depths    : 1=0.1%, 2=0.1%, 4=100.0%, 8=0.0%, 16=0.0%, 32=0.0%, >=64=0.0%
     submit    : 0=0.0%, 4=100.0%, 8=0.0%, 16=0.0%, 32=0.0%, 64=0.0%, >=64=0.0%
     complete  : 0=0.0%, 4=100.0%, 8=0.0%, 16=0.0%, 32=0.0%, 64=0.0%, >=64=0.0%
     issued rwts: total=0,46570,0,0 short=0,0,0,0 dropped=0,0,0,0
     latency   : target=0, window=0, percentile=100.00%, depth=4

Run status group 0 (all jobs):
   READ: bw=560MiB/s (588MB/s), 560MiB/s-560MiB/s (588MB/s-588MB/s), io=10.0GiB (10.7GB), run=18274-18274msec

Run status group 1 (all jobs):
  WRITE: bw=118MiB/s (123MB/s), 118MiB/s-118MiB/s (123MB/s-123MB/s), io=7168MiB (7516MB), run=60944-60944msec

Run status group 2 (all jobs):
   READ: bw=9409KiB/s (9634kB/s), 9409KiB/s-9409KiB/s (9634kB/s-9634kB/s), io=551MiB (578MB), run=60001-60001msec

Run status group 3 (all jobs):
  WRITE: bw=3105KiB/s (3179kB/s), 3105KiB/s-3105KiB/s (3179kB/s-3179kB/s), io=182MiB (191MB), run=60001-60001msec
pci subvendor id
summary 时间为 1970
引导修复
lvm
Recover From Grub Failure - Proxmox VE linux - How to mount an LVM volume? - Super User
prepare
activate LVM
mount the the root partition that is inside the LVM container
sudo mkdir /media/RESCUE
sudo mount /dev/pve/root /media/RESCUE/
sudo mount /dev/sdb2 /media/RESCUE/boot/efi  # mount EFI
sudo mount -t proc proc /media/RESCUE/proc
sudo mount -t sysfs sys /media/RESCUE/sys
sudo mount -o bind /dev /media/RESCUE/dev
sudo mount -o bind /run /media/RESCUE/run  # for LVM and raid
install grub
zfs
todo
换主板后的一大堆问题
识别不到启动项
主板中也存储了启动项,和EFI分区中的efi文件并不一样。主板通常会自己扫描识别,但是也有丢失的情况。
大概就是进入usb live ubuntu,重新install grub。efimanager
TODO
显卡直通进不了系统
启动后,由于显卡直通了。而由于pci槽变了,所以vm也无法启动成功。网卡又变了,因此也无法通过网络连接pve。
即使进入usb live cd系统,由于使用的zfs,操作起来很不方便。
有一个办法,就是内核参数中临时关闭iommu,这样会禁用所有显卡直通的机器启动。从而可以进入pve的命令行进行操作。
windows 磁盘扩充
- pve 中 zfs set volsize
- qm set --scsix:用于更新配置文件中磁盘的 size 参数(也许这步是可选的)
- 关机虚拟机:必须的,重启虚拟机大小不会改变
- 启动虚拟机,虚拟机内调整磁盘大小
e.g
zfs set volsize=1200G pool0/data/vm-200-disk-gamessd

qm set 201 --scsi4 pool0:vm-200-disk-gamessd,discard=on,iothread=1,ssd=1
windows guest agent not running
之前尝试 virtfs 时,下载了 virtio-win-0.1.262 iso 文件,想给 windows 更新新的 virtio 驱动。但是发现安装失败了(感觉是由于 windows 系统就安装在 virtio 盘上,更新驱动会导致冲突)。
安装过程中会卸载原有驱动,甚至导致由于丢失驱动,网络不通的情况,最后通过 zfs 备份恢复系统盘恢复了。
这次给 gamessd 虚拟盘扩容时,又尝试更新驱动,仍然更新不了。并且发现 PVE WebUI 中虚拟机显示的是 guest agent not running, 看不到虚拟机 ip 了。
问题在于驱动丢失了,参考 wiki 修复驱动:Qemu-guest-agent - Proxmox VE
Then install the virtio-serial driver:
1. Attach the ISO to your windows VM (virtio-*.iso)
2. Go to the windows Device Manager
3. Look for "PCI Simple Communications Controller"
4. Right Click -> Update Driver and select on the mounted iso in DRIVE:\vioserial\<OSVERSION>\ where <OSVERSION> is your Windows Version (e.g. 2k12R2 for Windows 2012 R2)
测试,没有输出表示成功(这条命令在 qm --help 中都没有显示,zsh 也不会补全)
Smartd 发邮件
磁盘出现了坏扇区,PVE 每 24 h 发送一封邮件,很烦,并且可能让我错过真正重要的信息。因此想实现,只有在磁盘错误增加时才通知我。
smartd.conf(5) — smartmontools — Debian unstable — Debian Manpages 当前无法读取(待处理)的扇区 - SMART-Daemon Proxmox – Thomas-Krenn-Wiki --- Currently unreadable (pending) sectors - SMART-Daemon Proxmox – Thomas-Krenn-Wiki
先简单实现为禁止那块坏盘通知我
- 放在
DEVICESCAN之前
-I ID
- [ATA only] Ignore device Attribute ID when tracking changes in the Attribute values. ID must be a decimal integer in the range from 1 to 255. This Directive modifies the behavior of the '-p', '-u', and '-t' tracking Directives and has no effect without one of them.
- This is useful, for example, if one of the device Attributes is the disk temperature (usually Attribute 194 or 231). It's annoying to get reports each time the temperature changes. This Directive may appear multiple times for a single device, if you want to ignore multiple Attributes.